Page 1 of 5
Cabinet Construction - Outfeed Table
Posted: Wed Feb 15, 2012 12:41 pm
by heathicus
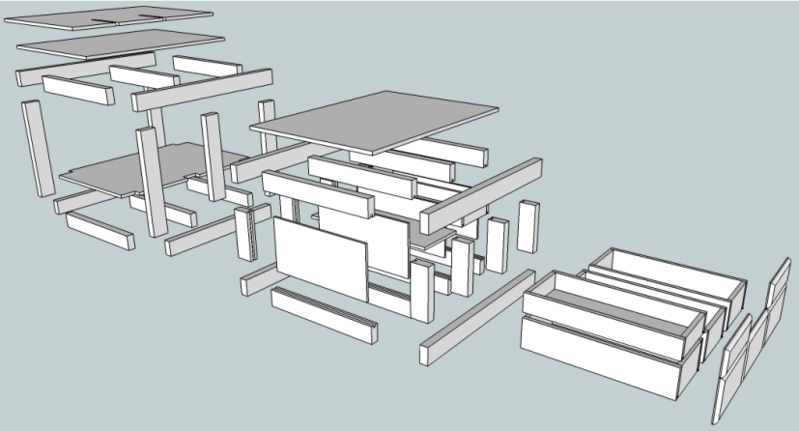
I want to build a cabinet to put my old Craftsman table saw on. I actually got the general idea from an answer to a question I posed on sawmillcreek forums. The idea is to have storage under the saw, and also incorporate an outfeed table. One of my design ideas is to have them connected, but able to separate should it ever be necessary (such as a change in table saw).
I want to use the space under the outfeed table to store larger items like crosscut sleds and other jigs. I haven't worked out the specifics of dust collection, but it is my mind.
I threw something together in Sketchup and I'm including pictures below. But I've never built any kind of cabinetry before and wanted some feedback on my ideas.
On my budget, my materials will have to be inexpensive - 2x4 lumber and 3/4" OSB panels on the cabinet and MDF (maybe with hardboard for the top layer) for the outfeed table. It will sit on casters, but I did not include those in the drawing.
Any ideas or feedback would be appreciated.


Posted: Wed Feb 15, 2012 12:49 pm
by heathicus
Posted: Wed Feb 15, 2012 1:25 pm
by JPG
I will leave the finer cabinet comments to others more qualified, but the basic structure has some 'issues'.
IIWM, I would orient the four vertical legs such that the rails both(side and frnt/rear) are secured to the legs. I would orient them so the longer side faces the sides for both the saw table and the outfeed table. Thus the sides(3 1/2") are attached to the side rails and the front rails are attached to the 1 1/2" side.
I think most stress will be front to rear pushing.
Melamine would make a nice top surface for the outfeed table, but $. I have seen some fairly large cutoffs in the cull bin at HD here at times. I had to have one I picked up( 3/4" < $5) cut in half to transport! Wish I had a pickup!
P.S. Are divider 'panels' necessary between the drawers?
Posted: Wed Feb 15, 2012 1:37 pm
by heathicus
JPG40504 wrote:I will leave the finer cabinet comments to others more qualified, but the basic structure has some 'issues'.
IIWM, I would orient the four vertical legs such that the rails both(side and frnt/rear) are secured to the legs. I would orient them so the longer side faces the sides for both the saw table and the outfeed table. Thus the sides(3 1/2") are attached to the side rails and the front rails are attached to the 1 1/2" side.
Just the kind of feedback I was looking for! I think I understand what you're saying and see the "issues."
JPG40504 wrote:P.S. Are divider 'panels' necessary between the drawers?
I don't know. You tell me. The saw will sit directly over those two middle "panels" so I figured that added support couldn't hurt. That was my line of thinking on that.
Posted: Wed Feb 15, 2012 1:46 pm
by JPG
heathicus wrote:Just the kind of feedback I was looking for! I think I understand what you're saying and see the "issues."
I don't know. You tell me. The saw will sit directly over those two middle "panels" so I figured that added support couldn't hurt. That was my line of thinking on that.
I think the 2x4s front to rear across 30" is more than stout enough. I see no need to attempt to transfer part of the load down to the bottom rail. The vertical dividers being 2x4 should suffice. You need those dividers to attach drawer support cleats on. You could probably dado(shallow) the supports to help support/locate the cleats.
Posted: Wed Feb 15, 2012 1:50 pm
by reible
Your sketch brings back memories of my first ultimate router table.
I had a metal router table mounted on the lower section for under table use and then the top was level with the upper portion for support when working on larger pieces. The router table could also mount a jig saw so that was pretty cool at the time.
The top had holes drilled much like a workbench so I could clamp workpieces to it for free hand router work. It also of course worked like a mini workbench. The top area was drop in MDF sections (2) that I could pull out and replace with other tools like a grinder or a small drill press or a vice all mounted on the same size drop in. The drop in idea also worked well since the router top would get messed up from time to time doing through routing, so replacement was easy.
Mine was lighter duty then yours will need to be and I went with 1x4 stock for most of it and 3/4" MDF for the panels. The storage portion was just cabinet space but I did think of redoing that and adding drawers, that would have been an improvement. Storage was for router stuff, jigs, and some other small junk that didn't have a home else where.
I got a lot of use out of it and at the time it fit my needs to a "T", I don't even remember why I decided to make my second ultimate router table or third or .... Anyway it did bring back the memories, from way back in the late 70's.
Ed
Posted: Wed Feb 15, 2012 1:56 pm
by dusty
With only a cursory glance, the SU plans look great BUT there has been some discussion about casters. There are no casters shown and yet if you install casters on the outfeed table the height will change.
I know you know that but sometimes we get carried away.
I suggest that you select and purchase all of the hardware BEFORE you start building. Please don't ask why I say that.

Give some thought to the butt joints. You might want to consider half laps. One thing is for certain; it is impossible to be too strong.
Posted: Wed Feb 15, 2012 2:27 pm
by pennview
If that Craftsman table saw is of the contractor saw type, the motor hangs out behind the saw table, so you'll have to take that into account when designing the uprights on the outfeed table. Also, the motor rotates with the saw blade, so you'll have to take that into account as well.
If the Craftsman is a direct drive saw, then there's likely is no problem with your design, but I'd use a joint stronger than a butt joint where the horizontal and vertical pieces meet. Half lap joints will make a strong frame. Dowels, biscuits, or mortise and tenon joints would also hold those pieces together.
Posted: Wed Feb 15, 2012 3:04 pm
by heathicus
Thanks for the additional feedback. I'll revise my SU later tonight when I get home and the kids are in bed.
Re: Saw Type
It is a direct drive saw. No motor hanging out the back. Eventually, I'd like to replace it with something of higher quality (even if a similar design), hence the desire to be able to separate the cabinet from the outfeed table in the future. Maybe it's not necessary, but I really like a modular design. But I also want them connected so I can move the unit as a whole without having to futz with realignment.
Re: Casters
I didn't show it in the drawing because I'm still not sure what I'm going to do. I'm thinking four casters, one on each corner of the cabinet. Then the back legs of the outfeed table being longer and sitting on the floor. To move the whole thing, lift slightly on the rear of the outfeed table and push the whole assembly where I want it, then set those legs back down again. Maybe incorporate a leveling/height adjustment bolt on those legs. I currently move my table saw around in this fashion. The left legs have casters and the right legs have their length extended with a block of wood. I lift the side with the wood extensions and roll the table saw on the two legs with casters. The casters don't lock, but I haven't had any cases of the table trying to shift or roll during use.
Re: Construction
Half laps instead of butt joints make perfect sense. I'll incorporate that in the revision. I don't have a biscuit joiner, but I do have a doweling jig, although my previous experiments with it have been less than stellar. I've never done any mortise and tenon joinery. I also have a friend that might let me borrow his Kreg pocket hole jig.
Posted: Wed Feb 15, 2012 8:56 pm
by JPG
heathicus wrote:Thanks for the additional feedback. I'll revise my SU later tonight when I get home and the kids are in bed.
Re: Saw Type
It is a direct drive saw. No motor hanging out the back. Eventually, I'd like to replace it with something of higher quality (even if a similar design), hence the desire to be able to separate the cabinet from the outfeed table in the future. Maybe it's not necessary, but I really like a modular design. But I also want them connected so I can move the unit as a whole without having to futz with realignment.
Re: Casters
I didn't show it in the drawing because I'm still not sure what I'm going to do. I'm thinking four casters, one on each corner of the cabinet. Then the back legs of the outfeed table being longer and sitting on the floor. To move the whole thing, lift slightly on the rear of the outfeed table and push the whole assembly where I want it, then set those legs back down again. Maybe incorporate a leveling/height adjustment bolt on those legs. I currently move my table saw around in this fashion. The left legs have casters and the right legs have their length extended with a block of wood. I lift the side with the wood extensions and roll the table saw on the two legs with casters. The casters don't lock, but I haven't had any cases of the table trying to shift or roll during use.
Re: Construction
Half laps instead of butt joints make perfect sense. I'll incorporate that in the revision. I don't have a biscuit joiner, but I do have a doweling jig, although my previous experiments with it have been less than stellar. I've never done any mortise and tenon joinery. I also have a friend that might let me borrow his Kreg pocket hole jig.
I think lag bolts/washers are more appropriate than pocket screws for this. You need the beef!