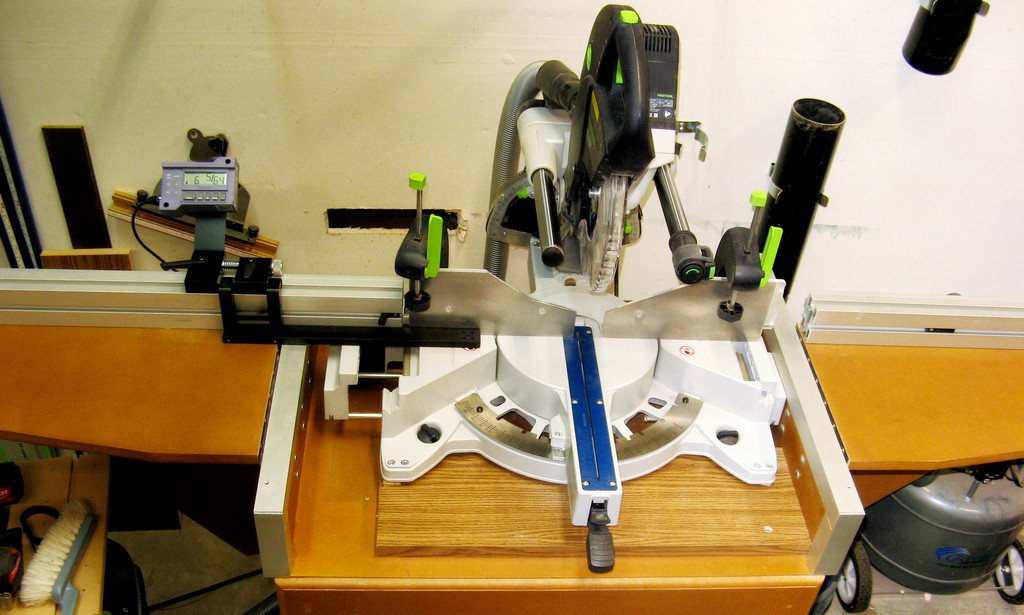
Today we will look at the construction of the fixture board for the miter saw and some of the stops and clamps that can be used with it. The first picture shows my current miter saw station. I have it setting down on a 30” wide shelf so it is level with the foldable wings that extend 4 feet on each side. I want to be able to be able to easily install and remove the fixture board without making any changes to the miter saw configuration. I am shooting for change over times of less than one minute. There are two Festool hold down clamps that are part of the miter saw system behind the fence which I plan to use to secure the back of the fixture board. On the front of the board close fit holes will be drilled to mate with tapped holes in the two aluminum angle bars on each side to ensure quick, repeatable and accurate placement each time I re-install it. I recently added a ProStop Digital Fence System which I won’t cover here but probably will do a review on after have a little more time to use it. It is fully explained here for those interested.
I used a track saw to cut the 11”x 33” fixture board and the two 33”x 3” strips for the fence. The two strips were glued together with the aid of dominos or biscuits for alignment. After the glue cured I took light cuts on the jointer and planer to ensure the laminated fence was square and parallel on all sides. There are several choices for cutting the WoodAnchor slots. I have used my table router that has a 3.5hp Milwaukee router in it and my gantry type CNC router which has a 1.8 KW spindle. Both have enough power to cut the slot in a single pass at 17,500 RPM and 30 IPM feed rate using the special Whiteside bit. That is definitely the way I do it on the table router but on the CNC I get better dust collection if I first use a 3/8” or 7/16” spiral bit to cut a starter slot prior to a pass with the Whiteside bit. On the table router it is too cumbersome to do multiple passes for starter slots so I do it in a single pass with the Whitside bit and just put up with the saw dust mess. Dennis has used a handheld router to make his fixturing grid worktop as discussed on the ToolQuest web site but I have never tried that. I am pretty sure I could also use the Whiteside bit with a single pass on the PowerPro at 10,000 RPM at maybe a slower feed rate. Unfortunately, the ½” shank does not allow the use of the Shaper Origin but you might be able to use the SO to cut 3/8”- 1/2” starter slots with a standard straight bit which then could be finished with a standard handheld router. I might try that technique sometime because if the starter slots can then be used as a guide for the handheld router it could be very worthwhile. If you are using Baltic birch make sure you make all of the cross grain cuts first and then do the slots with the grain. As I found out the hard way if you do it the other way around you will probably get chip out on the slot corners. I use the minimum depth of cut of 7/16” for the slots to preserve as much structural integrity as possible for the fixture board. Once the slots are cut the fence can be glued to the base using dominos or biscuits for alignment. Finally I mounted it on the miter saw using the miter saw hold down clamps and drilled two close fit holes in the base to use with button head screws in the aluminum angle bars. I then finished sanding it and applied Osmo hard wax oil for an easy but durable finish.
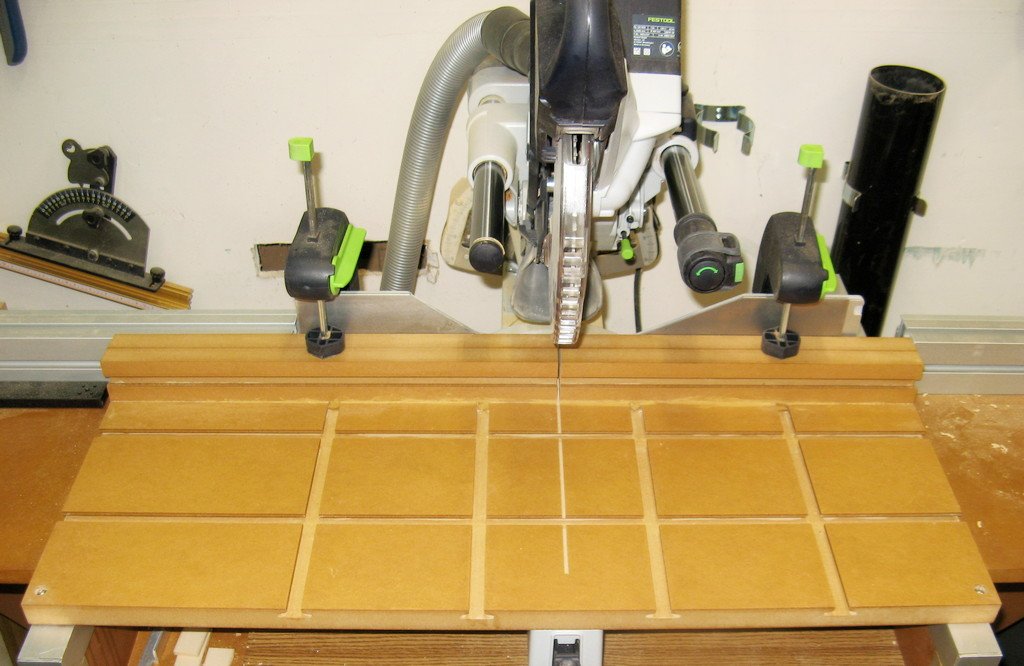
You will see that after the finish went on some very noticeable areas along the fence where glue residue is preventing the hard wax oil finish from soaking in. I didn’t notice it until the finish went on so now only a few options remain. The most obvious would be to aggressively sand and scrap the glue areas and re-apply the finish but I would run the risk of creating divots or valleys in the fence and base that might effect cuts for small parts. If I were really a perfectionist, I would just start over but I am choosing to just live with it. It is smooth, square and functional so I will take it. It will serve as a reminder for me to use blue painters tape to prevent glue squeeze out issues like this one.
The next picture shows an array of clamps that I have used on other fixture boards which might be candidates for this one.
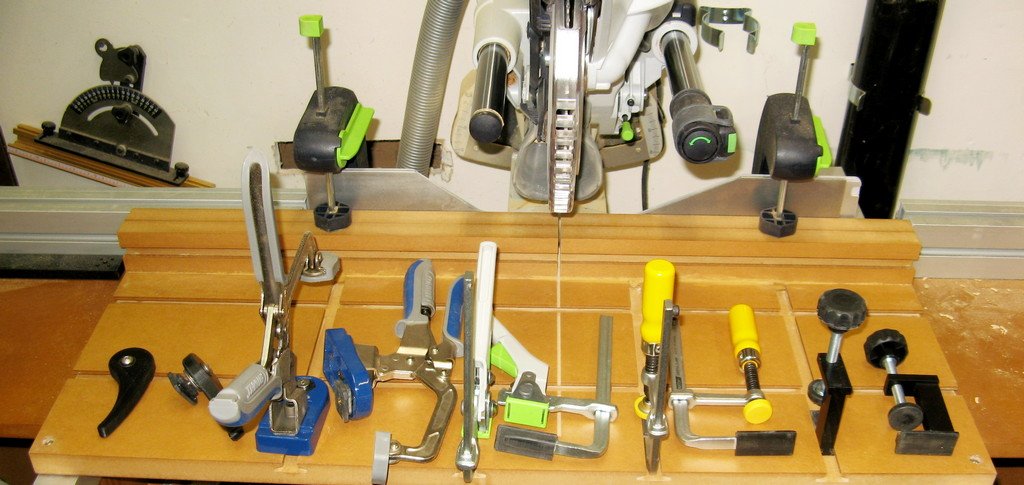
First you will notice that most of these are standard clamps for ¼” T-tracks that have been fitted with a plastic sleeve which fits perfectly in the WoodAnchor slots. I am in the process of beta testing these prototype sleeves for ToolQuest and so far most are working out great. From right to left the first set of clamps are a very cost effective and compact set from PowerTec. They have a limited throat capacity but are great for holding small parts without not getting in the way.
Next up are the standard MatchFit clamps that many of you may already have. With the plastic sleeves you will be able to use them in WoodAnchor slots and still use them in dovetail slots without the sleeves.
Next are my favorite, the Festool Quick clamps that are used in MFT dog holes and track saw guide rails. When outfitted with the plastic sleeves they are my go to clamp for WoodAnchor slots as well.
Next are the Kreg bench clamps configured to fit into 20 mm or ¾” dog holes. Here a Toolquest prototype adaptor is used to convert the base into accepting a ¼ - 20 screw that in turn screws into a WoodAnchor sliding nut. A little too big for small parts but works great for larger pieces.
Last is a ToolQuest prototype CAM clamp that I am testing which is a little awkward for small parts but works well on larger ones.
The next picture shows an array of stops and some miniature clamps that are very useful.
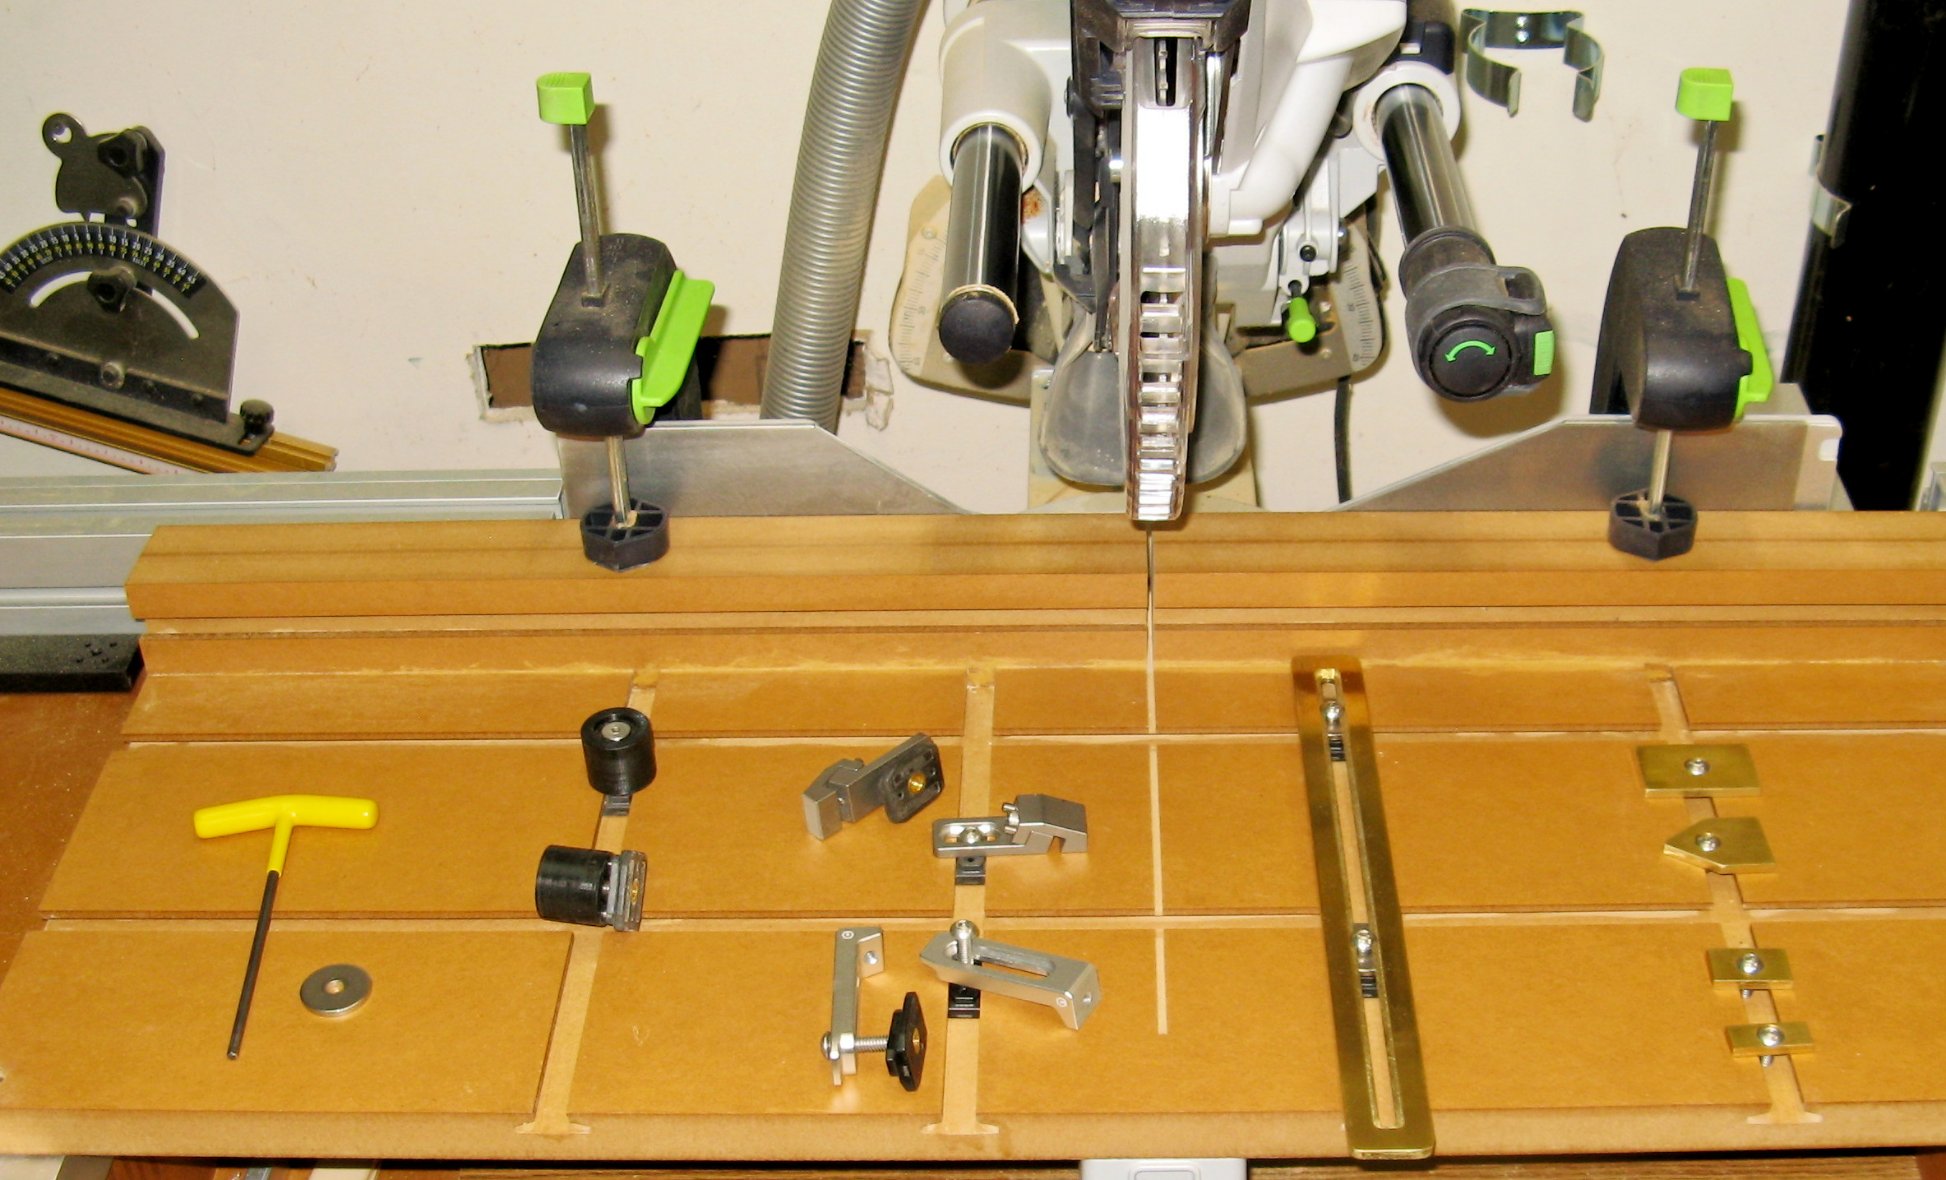
Again from right to left the first are some stops I made myself using ¼” brass. They were fairly easy to make out of brass remnants off of Ebay and work very well as low profile stops with a button head screw and WoodAnchor sliding nut. Next is a 12” long slotted stop also out of ¼” brass which can be used as a secondary fence that can be set at most any angle using WoodAnchor sliding nuts in two parallel slots.
Next are the two most useful low profile clamps for small parts from Carbide 3D. At the bottom are the Gator Tooth clamps which grip small parts from the top.
https://shop.carbide3d.com/collections/workholding/products/gatortooth?variant=31475366461501
Then above the Gator Tooth clamps are the Tiger Claw clamps that apply lateral pressure against the work piece using a screw for adjustment. They work great with a WoodAnchor sliding nut for clamping pieces against one of the stops or the primary fence.
https://shop.carbide3d.com/collections/workholding/products/tiger-claw-clamps?variant=31628957712445
Next are what we call floating dogs which are now in the ToolQuest prototype stage. They are used just like dogs on a MFT but can be positioned and tightened down anywhere along the WoodAnchor slots. As long as you have slots that are square two floating dogs in a horizontal slot can be used to establish a fence that is perpendicular to a work piece that is aligned by other two dogs that are in a vertical slot. Alternatively they can be positioned to hold a work piece at any angle on the fixture board.
I show a ToolQuest washer to indicate that you can make your own clamps out a wooden block that you provide, a button head screw and a WoodAnchor sliding nut as shown in the picture with a knob instead of a lower profile screw. Choose a block thickness that is slightly less then the thickness of the work piece and simple tighten the screw down on the washer next to the work piece. These clamps really work well and you can’t beat the price. I have a set of blocks for use with all the common stock thicknesses that I use as hold downs on my CNC router bed. I recommend using the heavy duty washers from ToolQuest. Fender washers are not nearly as good for this application.
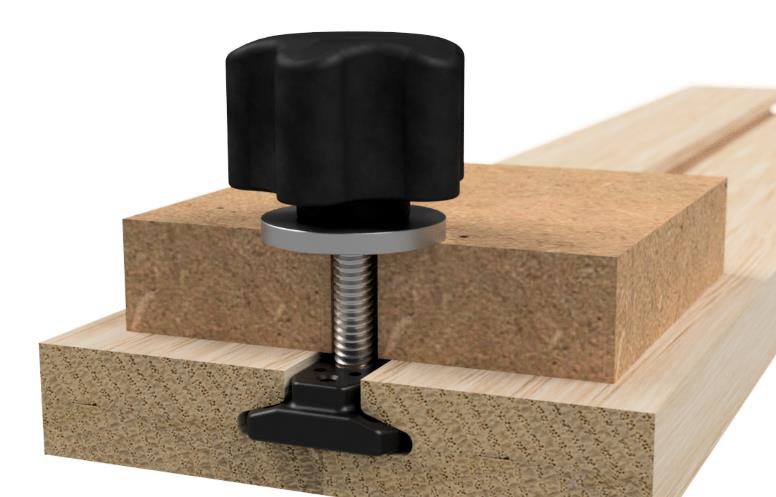
Another application of the washer is a make shift floating dog. Simply stack several washers on top of each other and secure them with a button head screw into a sliding nut. It can be positioned and tightened down anywhere along a slot just like a stop or floating dog.
That concludes this installment which got to be longer than I planned. While some of the hardware discussed is still in the ToolQuest product pipeline, it is nice to know that they are on their way and will be available hopefully in the near future. In the mean time the washer-based clamps/stops and the Carbide 3D clamps can serve you well for small parts holding. Next up are examples of how some of these stops and clamps can be used on the miter saw fixture board.


