
Well not a good week, in a couple of ways.
First, no time at all spent on hobby woodworking, in spite of all the work I should be doing.
This was mainly because we have entered into a new renovation phase and I was asked, to install wainscotting panelling on the walls of a bedroom. I tried to tell my dear wife that it would be difficult to cut and place the panelling precisely between the baseboard and the chair rail that is already in place, on old plaster walls that were out of square, without removing the chair rail. I seem to have gone to great lengths to prove myself right and am now completely frustrated, and angry as I don't think I can salvage the job to my standards. Don't ask why the chair rail was not removed or that the easier alternative of using a wallpaper that resembled wood panelling was not used!!
I did get to go to a craft show in the area where a fellow Canadian Forum member was exibiting for the first time. I had a two reasons to go. First to offer a little support as this chap recently lost his job and hopes to be able to use his woodworking skills to earn some money. He makes some fine and unique rocking chairs and stools, as well as some other nice pieces of furniture. I also wanted to scope out the show which is in a more affluent area than the ones I usually participate in.
I wasn't disappointed on the first count as his exhibit was by far the best, but it was really just another routine show and though he got good exposure, it was not really the venue to show off high end furniture and accessories. Hopefully he will get some positive feedback just from being there.
Besides a few interesting craft items, the show did have a few woodworkers. One in particular caught my eye with his wood jigsaw type puzzles. I have done some but could never achieve the close cuts that he does. He says he uses a #5 Olsen blade so I guess I will have to try that.
Next week we start removing ceiling tiles in our den, and preparing the upstairs for a contractor to come in and install sheetrock over the cracking plaster. We got tired of major plaster repairs every time we paint, so decided to cover it.
Have a good week!
John
Weekly Blog - October 21st
Moderators: HopefulSSer, admin

Yea those house hold things sure get in the way of woodworking. I was playing plumber replacing some turn off valves, J-pipes, faucet replacement, o-rings and springs in another one and a basket in the kitchen sink.... gee seemed like more when I was doing it???
Anyway I did manage to get a bit farther on the climbing bears see:
http://www.shopsmith.net/forums/showthread.htm?t=822
If you missed the first part.
I add a few more pictures as well, this time with eyes and nose and strings for some of them, and they are stained now. I'm up to five now and it looks like 2 more need to be done... told you these things get started and it hard to stop them. Photos are at:
http://www.flickr.com/photos/12199425@N ... 338130436/
The last project I'll mention is what I call a "sand almost free" I'll do another post on that yet tonight but it is a really cool project that you can do in an afternoon and still have time to play with it.
Ed
{Knight of the Shopsmith} [Hero's don't wear capes, they wear dog tags]
Ed- good job on the "sand almost free"- looks like it'll really be useful for smaller projects.
Hope the recipients enjoy the bears!
I put together my new Incra Miter Express this weekend, but haven't yet tried it out. Decided to do some long-overdue Shopsmith maintenance instead. I guess Chuck's sandstorm stories inspired me....
Gary
Hope the recipients enjoy the bears!
I put together my new Incra Miter Express this weekend, but haven't yet tried it out. Decided to do some long-overdue Shopsmith maintenance instead. I guess Chuck's sandstorm stories inspired me....
Gary
Gotta ditto the comments re: Ed's inventiveness! Nice Idea on the "sand almost free"!
This part of the world has been once again, struck by the disaster dejouir! Last Tues. a weather front came through bringing high winds out of the North West and lots of blowing sand/dust. Home duties included cleaning up the outside before I could clean the shop. Now the front has been displaced by a High pressure area that brings "Santa Ana" winds from the other direction (NW and East). This caused low single digit humidities with dew points like 0 degrees. Many fatal fires over the mts., by the coast.
The east winds don't bring dust to my shop however! Yeah!
Finished the first shutter for the first window. It came out perfectly rectangular (54" X 45") - it isn't yet mounted so I hope the window opening is just as rectangular as I think it is. Photos are attached. The plywood thing to the left of the shutter is the jig used for spacing louvers and attaching stiles.
Have been waiting for a HVLP sprayer to get here so I can put the finishing coat(s) of paint on the shutter. It arrived today!
In the meantime I turned 3 salt mills (Photo attached) and am waiting for the walnut to get here so I can turn the pepper mills. These will be gifts. I haven't snapped a pix of the finished mills. Will do so after the pepper mills are finished.
There are almost enough projects going on in my shop I feel almost as busy as John.
- Attachments
-
- Full 45x54 Shutter Closed tight.jpg (106.86 KiB) Viewed 13554 times
-
- Full Shutter for one window with jig.jpg (121.05 KiB) Viewed 13557 times
-
- 3 Salt Mills Unfinished.jpg (127.78 KiB) Viewed 13558 times
Octogenarian's have an earned right to be a curmudgeon.
Chuck in Lancaster, CA
Chuck in Lancaster, CA
-
dusty

- Platinum Member
- Posts: 21371
- Joined: Wed Nov 22, 2006 6:52 am
- Location: Tucson (Wildcat Country), Arizona
Weekly Blog - October 21st
Good work, charlese.
One of these days I'm going to have to sharpen my chisels and take a turn at turning.
The work that I see here on the forum is inspiring. Maybe someday I'll create something other than sawdust.
One of these days I'm going to have to sharpen my chisels and take a turn at turning.
The work that I see here on the forum is inspiring. Maybe someday I'll create something other than sawdust.
"Making Sawdust Safely"
Dusty
Sent from my Dell XPS using Firefox.
Dusty
Sent from my Dell XPS using Firefox.
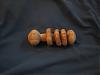
Just finished up with my latest turning and thought I would share it with all. It is a captive ring baby rattle I made for a coworker who is having a baby any day. It is made from sugar maple with a pure virgin olive oil finish then buffed out. The dimensions are 5" X 1 1/2". I used the new captive ring chisel that Sorby makes and it worked great with no catches.
- Attachments
-
- Captive Ring Baby Rattle2 10-25-07.JPG (139.48 KiB) Viewed 13561 times
-
- Captive Ring Baby Rattle 10-25-07.JPG (129.77 KiB) Viewed 13558 times
Ron from Lewisburg, TN
-
Ed in Tampa

- Platinum Member
- Posts: 5830
- Joined: Fri Jul 21, 2006 12:45 am
- Location: North Tampa Bay area Florida
I was going to keep quiet but I decided to tell my story of woe. On going since July of this year. I have commented on this before but this is the latest in my situation.
As some might know I have been building cabinets for the Master bath. What a project. Long story short I built them out of maple. Big mistake since the wife wants them stained the same color as the cabinets in HD. I think HD describes it as mocha cherry. To me it is light walnut.
In any case someone suggestted first using a sealing coat of shellac and then gel stain. Oh boy what fun. With the shellac on you are really not staining but painting. Well I did 5 doors, 7 drawer fronts, four face frames, two slidding doors and 2 medicine cabinets.
They looked awful. I hated them. I started stripping the stain/shellac off. Luckly I used shellac first and found that alcohol will remove both but with a great mess. Sanding loads up the sanding disk really quick. So I have been doing a little of both.
Stripped the componets, then I had to resand everything since the alcohol and stripping raised the grain. First I sanded with 80 grit, then 120, and finished with 180. I now ready to restain.
I would try nitric acid but I'm afraid how much shellac may still be deep in the pores and what the end result would look like. I think I'm going to once again use shellac, 2 coats this time. Then use the gel stain wiping it off almost immediately and then a coat of polystain. I'm not sure of the poly stain at this moment. Some of my test samples look almost fake with the poly stain on.
In any case these cabinets are well sanded having been sanded twice. I'm ready to pull some hair. My day has been get up begin stripping the components or sanding taking a break (check the forum) go back to the shop and strip or sand somemore take another break (check forum) and go back to the shop. I know I have 80 hours stripping and sanding and I just finished today. The trash man thought I was up to something with all the dirty rags, spent sand paper disks and stripping supplies I threw out in the last few weeks.
I'm trying to build courage to begin finishing once again. Never will I use one wood and try to make it look like another wood again. Never!!! Let me add if I didn't have so much money tied up already ($400+) I would scrap the maple components and rebuild the whole thing out of walnut.
Ed