Assembling a Whatsit.

Moderators: HopefulSSer, admin

User avatar
JPG
Platinum Member
Posts: 34641
Joined: Wed Dec 10, 2008 7:42 pm
Location: Lexington, Ky (TAMECAT territory)

Assembling a Whatsit.

Post by JPG »

Assembling a tool that I made. See if you can guess it's prime directive.

All the parts:
1 whatzit overview.jpg
1 whatzit overview.jpg (185.29 KiB) Viewed 1882 times
First wood part ' two bores filled with a barrel nut made from a cable crimping kit. The center hole is NOT functional, but there is a 10-24 thread through the sides. The holes in the side of the wood piece allow a 10-24 bolt to 'swivel'.
2 barrel nut bores.jpg
2 barrel nut bores.jpg (282.9 KiB) Viewed 1882 times
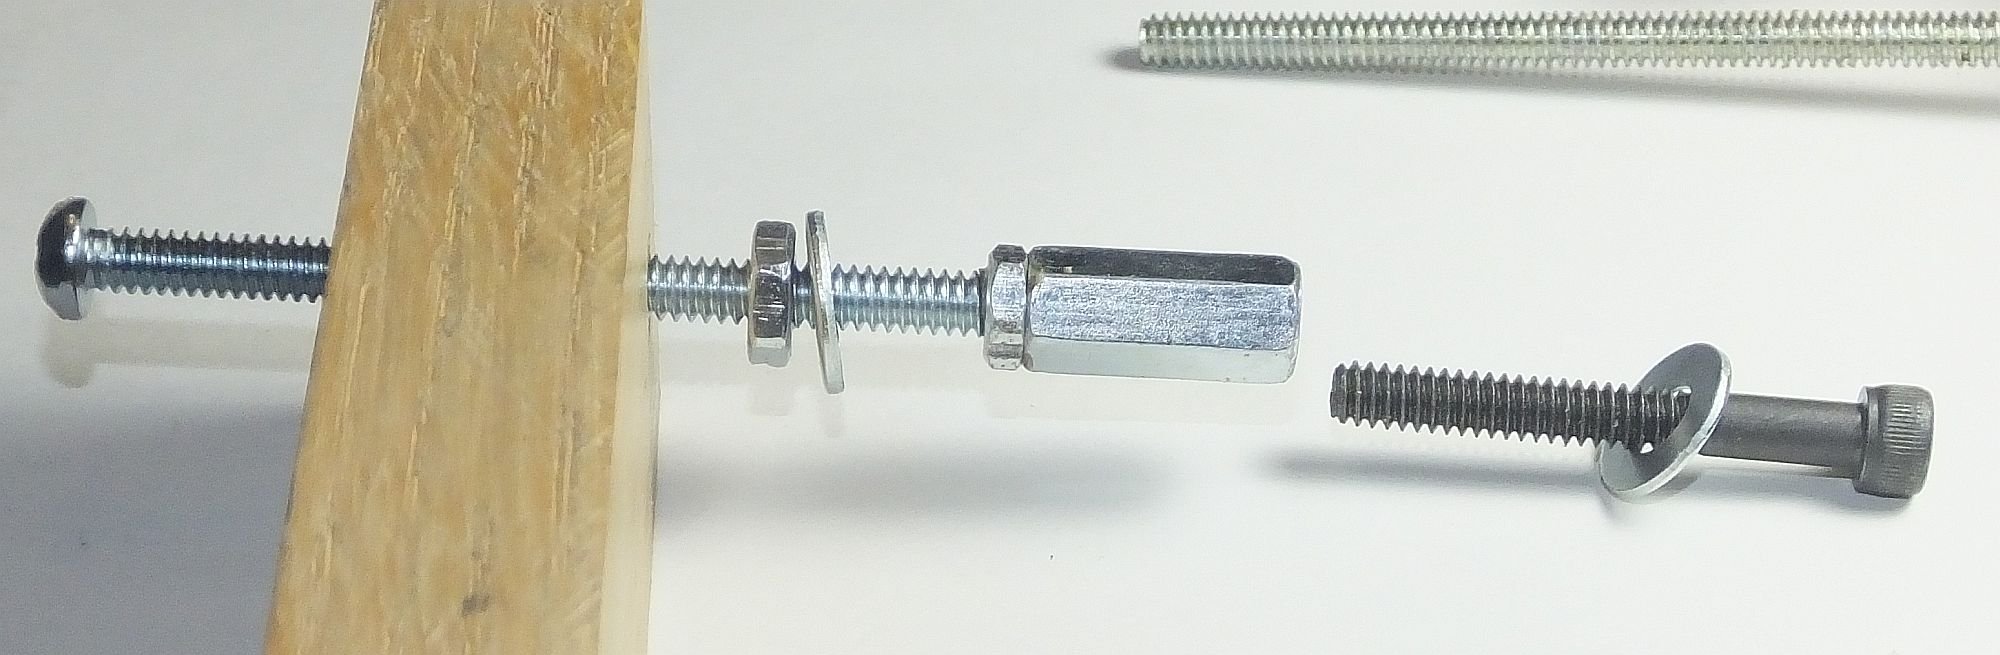
A long screw goes through one of the barrel nuts and a nut, washer, jam nut and threaded coupling are next joined. The nut started life as an 8-32 nut which was drilled/tapped to 10-24.
3 long screw etc.jpg
3 long screw etc.jpg (247.98 KiB) Viewed 1882 times
The jam nut is tightened with the screw thread going about half way through the coupling.
4 jam coupling.jpg
4 jam coupling.jpg (301.51 KiB) Viewed 1882 times
A cap screw with 5/32 socket will be threaded into the remaining threads of the coupler.
5 add 5-32 allen head screw.jpg
5 add 5-32 allen head screw.jpg (170.35 KiB) Viewed 1882 times
But first insert the coupling etc. into a deep 3/8" counter bore in the largest wood piece. The counter bore does not go all the way through but is deep enough to clear the coupling. The jam nut needed to be the small enough to fit into the bore. The cap screw is jam tightened. The screw head(phillips) and the cap screw head(5/32 hex socket) allows tightening it into one piece that rotates simultaneously.
6 add wood part(s).jpg
6 add wood part(s).jpg (161.22 KiB) Viewed 1882 times
Now for what is left. The wood piece has a through hole in the center of it's long dimension. The ends are counterbored to accept a flat washer. One end has a shallow c'bore that leaves the face of the nut proud.
7 att thread etc.jpg
7 att thread etc.jpg (151.89 KiB) Viewed 1882 times
The other end has a deep c'bore that allows the nut/screw to be recessed.
8 deep cbore.jpg
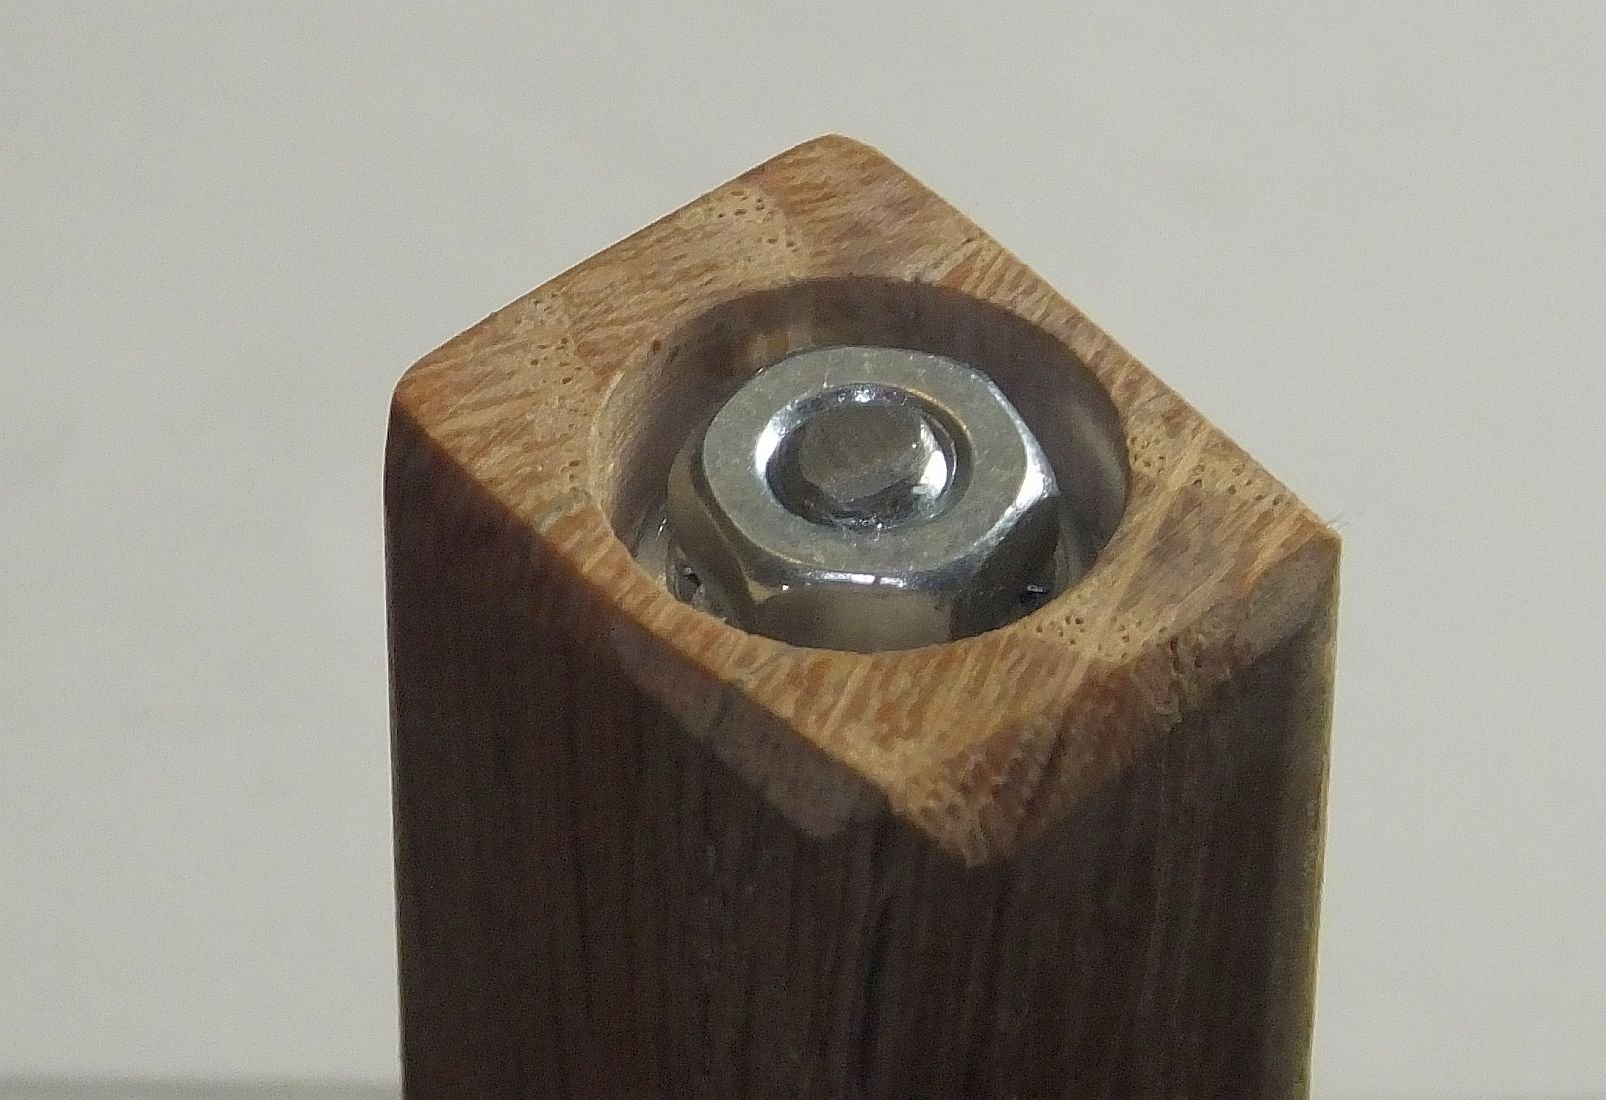
8 deep cbore.jpg (242.13 KiB) Viewed 1882 times
That long all thread screws into the barrel nut at the other end and completed the 'assembly'.
9 assembly complete.jpg
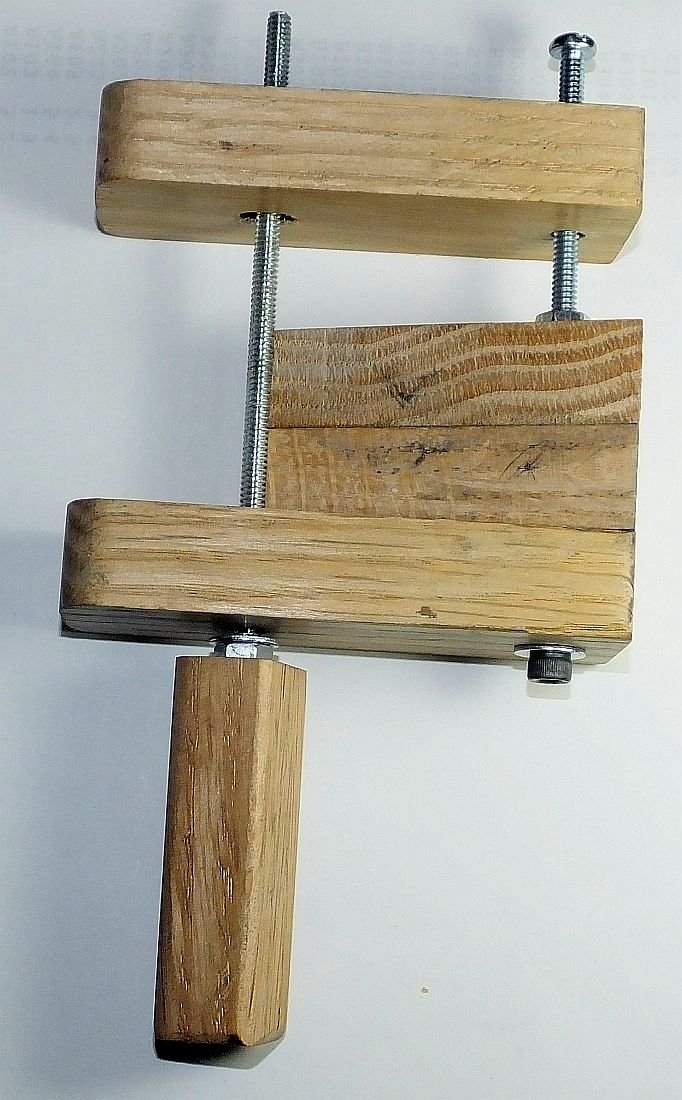
9 assembly complete.jpg (141.04 KiB) Viewed 1882 times
Now commences the 'guessing'. :D

over
╔═══╗
╟JPG ╢
╚═══╝

Goldie(Bought New SN 377425)/4" jointer/6" beltsander/12" planer/stripsander/bandsaw/powerstation /Scroll saw/Jig saw /Craftsman 10" ras/Craftsman 6" thicknessplaner/ Dayton10"tablesaw(restoredfromneighborstrashpile)/ Mark VII restoration in 'progress'/ 10
E[/size](SN E3779) restoration in progress, a 510 on the back burner and a growing pile of items to be eventually returned to useful life. - aka Red Grange
User avatar
wrmnfzy
Platinum Member
Posts: 744
Joined: Sun Apr 29, 2012 7:59 pm
Location: Destrehan, LA

Re: Assembling a Whatsit.

Post by wrmnfzy »

No problem, it’s a Whatsit!
User avatar
algale
Platinum Member
Posts: 4796
Joined: Thu Nov 04, 2010 8:13 am

Re: Assembling a Whatsit.

Post by algale »

Need a hint.
Gale's Law: The bigger the woodworking project, the less the mistakes show in any photo taken far enough away to show the entire project!

User avatar
JPG
Platinum Member
Posts: 34641
Joined: Wed Dec 10, 2008 7:42 pm
Location: Lexington, Ky (TAMECAT territory)

Re: Assembling a Whatsit.

Post by JPG »

ok
hint.jpg
hint.jpg (91.38 KiB) Viewed 1795 times
╔═══╗
╟JPG ╢
╚═══╝

Goldie(Bought New SN 377425)/4" jointer/6" beltsander/12" planer/stripsander/bandsaw/powerstation /Scroll saw/Jig saw /Craftsman 10" ras/Craftsman 6" thicknessplaner/ Dayton10"tablesaw(restoredfromneighborstrashpile)/ Mark VII restoration in 'progress'/ 10
E[/size](SN E3779) restoration in progress, a 510 on the back burner and a growing pile of items to be eventually returned to useful life. - aka Red Grange
User avatar
algale
Platinum Member
Posts: 4796
Joined: Thu Nov 04, 2010 8:13 am

Re: Assembling a Whatsit.

Post by algale »

Need a better hint. lol.

I guess a fence clamp/hold down?
Gale's Law: The bigger the woodworking project, the less the mistakes show in any photo taken far enough away to show the entire project!

User avatar
BuckeyeDennis
Platinum Member
Posts: 3696
Joined: Tue Jul 24, 2012 10:03 pm
Location: Central Ohio

Re: Assembling a Whatsit.

Post by BuckeyeDennis »

I’m drawing a blank as well. Hint #2?
User avatar
JPG
Platinum Member
Posts: 34641
Joined: Wed Dec 10, 2008 7:42 pm
Location: Lexington, Ky (TAMECAT territory)

Re: Assembling a Whatsit.

Post by JPG »

Clamp yes!

What fence?(hint #2)
╔═══╗
╟JPG ╢
╚═══╝

Goldie(Bought New SN 377425)/4" jointer/6" beltsander/12" planer/stripsander/bandsaw/powerstation /Scroll saw/Jig saw /Craftsman 10" ras/Craftsman 6" thicknessplaner/ Dayton10"tablesaw(restoredfromneighborstrashpile)/ Mark VII restoration in 'progress'/ 10
E[/size](SN E3779) restoration in progress, a 510 on the back burner and a growing pile of items to be eventually returned to useful life. - aka Red Grange
rogersk
Gold Member
Posts: 116
Joined: Tue Jun 09, 2015 2:17 pm

Re: Assembling a Whatsit.

Post by rogersk »

Some sort of jig for holding hand plane blades, wood chisels, jointer blades, etc, at the correct angle for sharpening? Maybe on the belt sander?
User avatar
JPG
Platinum Member
Posts: 34641
Joined: Wed Dec 10, 2008 7:42 pm
Location: Lexington, Ky (TAMECAT territory)

Re: Assembling a Whatsit.

Post by JPG »

Think where a small two screw(hand/jorgensen) clamp is shown in a 'video'.
╔═══╗
╟JPG ╢
╚═══╝

Goldie(Bought New SN 377425)/4" jointer/6" beltsander/12" planer/stripsander/bandsaw/powerstation /Scroll saw/Jig saw /Craftsman 10" ras/Craftsman 6" thicknessplaner/ Dayton10"tablesaw(restoredfromneighborstrashpile)/ Mark VII restoration in 'progress'/ 10
E[/size](SN E3779) restoration in progress, a 510 on the back burner and a growing pile of items to be eventually returned to useful life. - aka Red Grange
bainin
Platinum Member
Posts: 544
Joined: Mon Apr 22, 2019 11:09 pm
Location: NC

Re: Assembling a Whatsit.

Post by bainin »

chisel holder for the tool rest arm...from the spindle thread !
Post Reply