I acquired a ss mount Scroll Saw last week and have decided to take Y'all on the journey to restoring it. It is not in bad condition, but is in need of 'cleaning' up and some TLC and a few parts replaced. The PO had a sick spell and he had not used it recently. He was acquiring :eek:Stand alone:eek: replacements. Real nice Guy!!! Never met him b4.
I will attempt to create an index here as I proceed.
Introduction and rear trunion Post 1 https://forum.shopsmith.com/viewtopic.php?p=91961&postcount=1
Table and trunion Refurbing Post 8 https://forum.shopsmith.com/viewtopic.php?p=92141&postcount=8
Rear Trunion Shimming Post 9 https://forum.shopsmith.com/viewtopic.php?p=92143&postcount=9 EDIT 5-21-2011
..".......".........."....... Post 10 https://forum.shopsmith.com/viewtopic.php?p=92178&postcount=10
Cleaning up the Workpiece Holddown Post 11 https://forum.shopsmith.com/viewtopic.php?p=92195&postcount=11
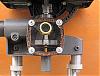
Separating upper arm assembly from lower base Post 19 https://forum.shopsmith.com/viewtopic.php?p=92333&postcount=19
Disassembling Lower Base Assembly Post 23 https://forum.shopsmith.com/viewtopic.php?p=92381&postcount=23 EDIT (5-20-2011)(5-21-2011)(5-21-2011)
Reassembling counter weighted gear and shaft Post 27 https://forum.shopsmith.com/viewtopic.php?p=92604&postcount=27
Base ready for reassembly Post 28 https://forum.shopsmith.com/viewtopic.php?p=92606&postcount=28
Disassembling Upper Assembly Post 30 https://forum.shopsmith.com/viewtopic.php?p=92687&postcount=30
....."...............".........."....... Post 31 https://forum.shopsmith.com/viewtopic.php?p=92688&postcount=31
Bushing issues/installation Post 32 https://forum.shopsmith.com/viewtopic.php?p=92988&postcount=32
Bearing Installation Post 33 https://forum.shopsmith.com/viewtopic.php?p=92989&postcount=33
Tension Rod old/new differences Post 36 https://forum.shopsmith.com/viewtopic.php?p=93499&postcount=36
More Tension Rod 'differences' Post 37 https://forum.shopsmith.com/viewtopic.php?p=93500&postcount=37
Reassembling upper assembly Post 38 https://forum.shopsmith.com/viewtopic.php?p=93588&postcount=38
Reassembling upper assembly cont'd Post 39 https://forum.shopsmith.com/viewtopic.php?p=93590&postcount=39
Reassembling upper assembly cont'd again Post 40 https://forum.shopsmith.com/viewtopic.php?p=93591&postcount=40
Miscellaneous final tasks Post 41 https://forum.shopsmith.com/viewtopic.php?p=93593&postcount=41
The END! Post 42 http://www.shopsmith.net/forums/showpos ... stcount=42
This is an older gray model that I believe is late 80's genre.
[ATTACH]12975[/ATTACH]
Before from the bottom
[ATTACH]12976[/ATTACH]
Before rear trunion
[ATTACH]12977[/ATTACH]
Before rear trunion pin
[ATTACH]12978[/ATTACH]
After evaporust wire brushing and JPW(original)
[ATTACH]12979[/ATTACH]
The evaporust removed the black oxide as well as the 'red'. I will retain the 'natural' finish and hope the wax does its thing.
Not sure it is significant, but the rear trunion pin was loose. I do not know if the PO loosened it to make tilting easier. I doubt it and think it just came loose on its own.
I have started with the most accessible stuff and the table is next!
Refurbing a Scroll Saw
Moderator: admin
-
JPG

- Platinum Member
- Posts: 35598
- Joined: Wed Dec 10, 2008 7:42 pm
- Location: Lexington, Ky (TAMECAT territory)
Refurbing a Scroll Saw
- Attachments
-
- sn label.jpg (115.61 KiB) Viewed 20463 times
-
- b4 bottom.jpg (106.08 KiB) Viewed 20456 times
-
- b4 rear trunion.jpg (130.37 KiB) Viewed 20463 times
-
- b4 rear trunion pin.jpg (64.42 KiB) Viewed 20448 times
-
- after rear trunion.jpg (68.33 KiB) Viewed 20434 times
╔═══╗
╟JPG ╢
╚═══╝
Goldie(Bought New SN 377425)/4" jointer/6" beltsander/12" planer/stripsander/bandsaw/powerstation /Scroll saw/Jig saw /Craftsman 10" ras/Craftsman 6" thicknessplaner/ Dayton10"tablesaw(restoredfromneighborstrashpile)/ Mark VII restoration in 'progress'/ 10E[/size](SN E3779) restoration in progress, a 510 on the back burner and a growing pile of items to be eventually returned to useful life. - aka Red Grange

-
JPG
- Platinum Member
- Posts: 35598
- Joined: Wed Dec 10, 2008 7:42 pm
- Location: Lexington, Ky (TAMECAT territory)
They come out of the evaporust with a thin grey colored finish. Light wire brushing brings out the 'shine'!. The screws were plated to start with so they are merely cleaned up.jayp413 wrote:Wow what a difference! That evaporust really works nice! Great job.
╔═══╗
╟JPG ╢
╚═══╝
Goldie(Bought New SN 377425)/4" jointer/6" beltsander/12" planer/stripsander/bandsaw/powerstation /Scroll saw/Jig saw /Craftsman 10" ras/Craftsman 6" thicknessplaner/ Dayton10"tablesaw(restoredfromneighborstrashpile)/ Mark VII restoration in 'progress'/ 10E[/size](SN E3779) restoration in progress, a 510 on the back burner and a growing pile of items to be eventually returned to useful life. - aka Red Grange
╟JPG ╢
╚═══╝
Goldie(Bought New SN 377425)/4" jointer/6" beltsander/12" planer/stripsander/bandsaw/powerstation /Scroll saw/Jig saw /Craftsman 10" ras/Craftsman 6" thicknessplaner/ Dayton10"tablesaw(restoredfromneighborstrashpile)/ Mark VII restoration in 'progress'/ 10E[/size](SN E3779) restoration in progress, a 510 on the back burner and a growing pile of items to be eventually returned to useful life. - aka Red Grange
-
JPG
- Platinum Member
- Posts: 35598
- Joined: Wed Dec 10, 2008 7:42 pm
- Location: Lexington, Ky (TAMECAT territory)
jayp413 wrote:I'm sold! I will be buying some for my restore!
HF Buy the Gallon!!!]only[/B] the oxide is removed!
╔═══╗
╟JPG ╢
╚═══╝
Goldie(Bought New SN 377425)/4" jointer/6" beltsander/12" planer/stripsander/bandsaw/powerstation /Scroll saw/Jig saw /Craftsman 10" ras/Craftsman 6" thicknessplaner/ Dayton10"tablesaw(restoredfromneighborstrashpile)/ Mark VII restoration in 'progress'/ 10E[/size](SN E3779) restoration in progress, a 510 on the back burner and a growing pile of items to be eventually returned to useful life. - aka Red Grange
╟JPG ╢
╚═══╝
Goldie(Bought New SN 377425)/4" jointer/6" beltsander/12" planer/stripsander/bandsaw/powerstation /Scroll saw/Jig saw /Craftsman 10" ras/Craftsman 6" thicknessplaner/ Dayton10"tablesaw(restoredfromneighborstrashpile)/ Mark VII restoration in 'progress'/ 10E[/size](SN E3779) restoration in progress, a 510 on the back burner and a growing pile of items to be eventually returned to useful life. - aka Red Grange
-
JPG
- Platinum Member
- Posts: 35598
- Joined: Wed Dec 10, 2008 7:42 pm
- Location: Lexington, Ky (TAMECAT territory)
Scroll Saw Table Refurb
I decided to change the gray color to the Goldie combination. I discovered the original gray paint is impervious to Citrusstrip AND Lacquer thinner. Therefore the original gray is now a primer! The outer edge of the table and the trunions are painted Rustoleum Hammered Coppertone.
Table Before
[ATTACH]13035[/ATTACH]
Table after
[ATTACH]13036[/ATTACH]
Not as evenly colored as I would have liked. Discoloration removed by light wire brushing. The original finish is quite rough so polishing is out of the question.
Rear Trunion Mounting hole Before
[ATTACH]13038[/ATTACH]
The casting of the slotted holes was quite rough and you can see where flash has rubbed(interfered) the mounting screw.
Rear Trunion Mounting Hole After
[ATTACH]13039[/ATTACH]
The slots have been filed to remove the interfering flash.
Front Trunion After
[ATTACH]13040[/ATTACH]
The upper arc(lower in the upside down pix) was masked off. The degree scale was painted over, then after the paint set slightly, masking tape was pressed onto the areas where I wanted the paint removed. Once the paint was nearly dry, light rubbing with a cloth and citrustrip removed the remaining undesired paint between the lettering.
- Attachments
-
- b4 table.jpg (63.77 KiB) Viewed 20354 times
-
- after table.jpg (75.08 KiB) Viewed 20325 times
-
- b4 rear trunion mount.jpg (56.48 KiB) Viewed 20328 times
-
- after rear trunion mount.jpg (55.42 KiB) Viewed 20311 times
-
- after front trunion.jpg (83.79 KiB) Viewed 20316 times
╔═══╗
╟JPG ╢
╚═══╝
Goldie(Bought New SN 377425)/4" jointer/6" beltsander/12" planer/stripsander/bandsaw/powerstation /Scroll saw/Jig saw /Craftsman 10" ras/Craftsman 6" thicknessplaner/ Dayton10"tablesaw(restoredfromneighborstrashpile)/ Mark VII restoration in 'progress'/ 10E[/size](SN E3779) restoration in progress, a 510 on the back burner and a growing pile of items to be eventually returned to useful life. - aka Red Grange
╟JPG ╢
╚═══╝
Goldie(Bought New SN 377425)/4" jointer/6" beltsander/12" planer/stripsander/bandsaw/powerstation /Scroll saw/Jig saw /Craftsman 10" ras/Craftsman 6" thicknessplaner/ Dayton10"tablesaw(restoredfromneighborstrashpile)/ Mark VII restoration in 'progress'/ 10E[/size](SN E3779) restoration in progress, a 510 on the back burner and a growing pile of items to be eventually returned to useful life. - aka Red Grange
-
JPG
- Platinum Member
- Posts: 35598
- Joined: Wed Dec 10, 2008 7:42 pm
- Location: Lexington, Ky (TAMECAT territory)
Rear Trunion Shimming
As I mentioned earlier, the pin was loose on the rear trunion. The reason it was 'loose' is that the trunion bracket does not provide adequate clearance for the segment to rotate in the bracket.
Rear Trunion Pin shimmed
[ATTACH]13041[/ATTACH] EDIT I have since 'discovered' this was intentional so it could act as a clamp. 5-21-2011
The pin needs to be shimmed about .060". The washer is about .050 and the paper under the washer is about .010. I will fabricate something close to .060 thick prior to reassembly.
- Attachments
-
- rear trunion shimmed.jpg (100.05 KiB) Viewed 20316 times
╔═══╗
╟JPG ╢
╚═══╝
Goldie(Bought New SN 377425)/4" jointer/6" beltsander/12" planer/stripsander/bandsaw/powerstation /Scroll saw/Jig saw /Craftsman 10" ras/Craftsman 6" thicknessplaner/ Dayton10"tablesaw(restoredfromneighborstrashpile)/ Mark VII restoration in 'progress'/ 10E[/size](SN E3779) restoration in progress, a 510 on the back burner and a growing pile of items to be eventually returned to useful life. - aka Red Grange
╟JPG ╢
╚═══╝
Goldie(Bought New SN 377425)/4" jointer/6" beltsander/12" planer/stripsander/bandsaw/powerstation /Scroll saw/Jig saw /Craftsman 10" ras/Craftsman 6" thicknessplaner/ Dayton10"tablesaw(restoredfromneighborstrashpile)/ Mark VII restoration in 'progress'/ 10E[/size](SN E3779) restoration in progress, a 510 on the back burner and a growing pile of items to be eventually returned to useful life. - aka Red Grange
-
JPG
- Platinum Member
- Posts: 35598
- Joined: Wed Dec 10, 2008 7:42 pm
- Location: Lexington, Ky (TAMECAT territory)
Rear Trunion Pin Shimming
Today I scavenged a piece of steel about .060" thick, and made a shim for the rear trunion pin.
[ATTACH]13049[/ATTACH]
[ATTACH]13050[/ATTACH]
[ATTACH]13051[/ATTACH]
The material was originally a cheap stamped faucet wrench in a box of garage sale junk.
[ATTACH]13049[/ATTACH]
[ATTACH]13050[/ATTACH]
[ATTACH]13051[/ATTACH]
The material was originally a cheap stamped faucet wrench in a box of garage sale junk.
- Attachments
-
- rear trunion shim1.jpg (101.09 KiB) Viewed 20282 times
-
- rear trunion shim2.jpg (92.89 KiB) Viewed 20274 times
-
- rear trunion shim3.jpg (100.36 KiB) Viewed 20264 times
╔═══╗
╟JPG ╢
╚═══╝
Goldie(Bought New SN 377425)/4" jointer/6" beltsander/12" planer/stripsander/bandsaw/powerstation /Scroll saw/Jig saw /Craftsman 10" ras/Craftsman 6" thicknessplaner/ Dayton10"tablesaw(restoredfromneighborstrashpile)/ Mark VII restoration in 'progress'/ 10E[/size](SN E3779) restoration in progress, a 510 on the back burner and a growing pile of items to be eventually returned to useful life. - aka Red Grange
╟JPG ╢
╚═══╝
Goldie(Bought New SN 377425)/4" jointer/6" beltsander/12" planer/stripsander/bandsaw/powerstation /Scroll saw/Jig saw /Craftsman 10" ras/Craftsman 6" thicknessplaner/ Dayton10"tablesaw(restoredfromneighborstrashpile)/ Mark VII restoration in 'progress'/ 10E[/size](SN E3779) restoration in progress, a 510 on the back burner and a growing pile of items to be eventually returned to useful life. - aka Red Grange