
mtobey, in another General Woodworking thread made mention of configuring his Shopsmith with dual carriages.
I opened this thread so that this subject might be discussed, added to, praised or criticised in a manner that is easy to reference in the future.
I have configured my Shopsmith with a dual main table as well. Why, so that I can cut large pieces (sheet goods) without feeling unsafe.
I have heard many comments about the small Shopsmith table being a big drawback - it is not.
The extension tables and floating table, if used, make that criticism null and void.
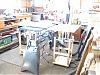
Nonetheless, today, I installed a second carriage and main table. I now have 84 1/2 inches of table top with four inches of gap strategically located throughout.
I will post pictures and comments on the configuration after I have had an opportunity to work with it. With infeed and outfeed tables attached, it looks awesome. Time will tell if it is reasonable.
Using a second main table is "overkill". The Shopsmith, with proper use of floating and extension tables, handls wide stock very well.

