Mike,
I promised you a few more pics so when I went out to the dungeon tonight I took some more pics. This was after I painted the legs and repainted the carriage that I had screwed up the first time. This time I taped up all the holes in the carriage so i won't need to clean them out risking paint damage....DUH! I also used my better camera this time around, I have $2,000 in Canon equipment and I used the cheapo Canon point & shoot the last time not sure why i did that??? So here they are and I will have to post several times to get them all in.
Here is a closeup of the belt cover
Here is the casters which I am really pleased with, they were in the worst shape of any part on the machine but truly cleaned up nicely and work as if they were brand new
Here is the extension table legs you asked about nothing fancy just a lot of hard work polishing on the grinder.
Here is a pic of the Headstock housing which came out really nice minus a drip or two
Michael Mayo
Senior IT Support Engineer
Soft Designs Inc. albiemanmike@gmail.com
1960's SS Mark VII, 1954 Greenie, 1983 Mark V, Jointer, Bandsaw, Jigsaw, Dewalt Slider, Delta Super 10, Delta 8" Grinder, Craftsman compressor, Drill Doctor, Kreg PH Jig, Bosch Jigsaw, Craftsman Router and Table...........and adding more all the time....
Here you see a pic of the motor pan with a brand new 12/3 power cord installed with a nice cable strain relief I picked up at HD looks really nice and factory
Here is a closeup of the quill lock and how nicely it shined up for me
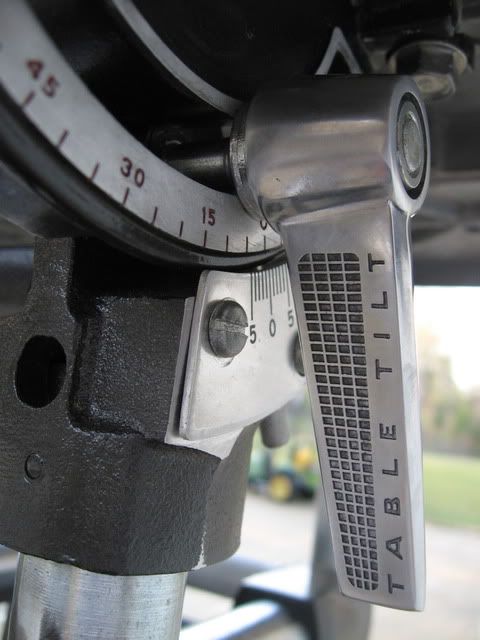
This is a closeup of the table trunnion assy. the 0 pointer plate came out especially shiny
And last the tie bar which painted up very nice compared to some of the other parts. the legs should be dry tomorrow but I am going to wait 2 days for it to really cure before I do anything with them which was the mistake I made with the first set of parts I painted
Michael Mayo
Senior IT Support Engineer
Soft Designs Inc. albiemanmike@gmail.com
1960's SS Mark VII, 1954 Greenie, 1983 Mark V, Jointer, Bandsaw, Jigsaw, Dewalt Slider, Delta Super 10, Delta 8" Grinder, Craftsman compressor, Drill Doctor, Kreg PH Jig, Bosch Jigsaw, Craftsman Router and Table...........and adding more all the time....
Man that looks great. I do like the black and silver combo.
Just as a note, my tubes are a very good fit in the tiebar. You may want to clean the paint from the inside of it before you try to seat the way tubes. It might never come apart again if you don't.
Mike......... Rowlett, Texas, near Dallas
86 MK V 500/520. 59 MK 5 Greenie Shorty. SS Jointer, SS Planer,
SS Bandsaw, SS Lathe duplicator, SS Belt Sander,SS Molder & Shaper,
SS Tenon master jig, SS Mortising kit, SS 2 1/4' Drum Sanders, Ringmaster, DC3300....
Wow. What's your process for shining up the various handles and whatnot? I hit mine with some scotchbrite, but they all still have that matte oxide finish. Also, did you re-fill the red lines on the drill press depth gauge? I thought about introducing it to the wire wheel, but I thought it might be too aggressive for the paint.
mikelst wrote:Man that looks great. I do like the black and silver combo.
Just as a note, my tubes are a very good fit in the tiebar. You may want to clean the paint from the inside of it before you try to seat the way tubes. It might never come apart again if you don't.
Believe me they will be cleaned out but not sure how I am going to do it without ruining the paint job. That is what happened to the carriage. I really learned a good lesson painting these parts. I was a bit lazy and didn't feel like taping everything up and figured I could just clean the overspray after the fact. Well that was a collosal mistake and now I am re-painting the carriage AGAIN! So live and learn and I completely taped up every hole tonight before re-priming the carriage. The top coat will go on tomorrow after work. The legs I painted with the silver tonight after priming them last night. They came out pretty nice but painting with spray cans is definitely an art that is learned and cannot be taught. Really is not the proper way to paint but can be done. And I have a compressor? The problem with using a compressor and spray guns is then i have to learn how to mix the paint and all that goes with that. At least with the spray cans all the mixing is done and I just have to do some shaking.
The other problem while painting was the fact I do not have a dedicated area for painting so i had to just do it just outside the garage. I hung the parts on a frame that the wife had made for a blind to mask a bunch of junk next to the garage. That seemed to work pretty well and gave me good access to the parts to spray them but it is getting pretty nice weather and temperature wise here in the NE and with that comes the bugs. Well bugs + wet spray paint = Bad Things! But I don't have any other option so I will work through it and the bugs will be my personal touch.........
Michael Mayo
Senior IT Support Engineer
Soft Designs Inc. albiemanmike@gmail.com
1960's SS Mark VII, 1954 Greenie, 1983 Mark V, Jointer, Bandsaw, Jigsaw, Dewalt Slider, Delta Super 10, Delta 8" Grinder, Craftsman compressor, Drill Doctor, Kreg PH Jig, Bosch Jigsaw, Craftsman Router and Table...........and adding more all the time....
cml wrote:Wow. What's your process for shining up the various handles and whatnot? I hit mine with some scotchbrite, but they all still have that matte oxide finish. Also, did you re-fill the red lines on the drill press depth gauge? I thought about introducing it to the wire wheel, but I thought it might be too aggressive for the paint.
I struggled with the red lines and numbers on the depth indicator and the red lettering and such on the speed indicator. But I consulted with MickyD and he clued me in on a great technique. First, tape off the areas that would be hard to clean out such as the deep ridges on the smaller part of the depth indicator, and the teeth in the speed indicator. Then, shoot the whole thing with red. About 30 minutes later (so the paint is mostly dry to the touch, but still a little gummy), dampen a clean cloth with acetone and wrap it around something flat like a piece of glass or mirror. Using the flat surface, clean off all of the paint from the piece. The cloth, if it's tight around the flat surface (and just damp, not soaked with acetone), won't get down into the lines and numbers leaving the red paint there. The lines and numbers on mine were originally black, but I decided I wanted them red. I followed MickyD's aluminum polishing and his procedure as outlined above, and this was the result:
If you want a mirror finish on the aluminum handles, you'll have to put some time into it. MickyD discussed his aluminum polishing to a mirror finish in his Greenie restoration thread.
wannabewoodworker wrote:Believe me they will be cleaned out but not sure how I am going to do it without ruining the paint job.
Try the same procedure as above, but instead of using something flat, use something curved - like a big socket. You could also use this same procedure on your trunnion and miter gauge so the markings are more clearly visible.
I've also used a flapper wheel on my drill for those areas.
When my flapper wheels wore out, I just taped a strip of sandpaper to a drill bit and wrapped it around and used it just like a flapper wheel.
Heath
Central Louisiana
-10ER - SN 13927, Born 1949, Acquired October 2008, Restored November, 2008
-10ER - SN 35630, Born 1950, Acquired April 2009, Restored May 2009, A34 Jigsaw
-Mark V - SN 212052, Born 1986, Acquired Sept 2009, Restored March 2010, Bandsaw
-10ER - SN 39722, Born 1950, Acquired March 2011, awaiting restoration
When my flapper wheels wore out, I just taped a strip of sandpaper to a drill bit and wrapped it around and used it just like a flapper wheel.
That is really a good idea I am glad you thought of it... My table trunnion angle guage was polished mirror bright but after blasting it was somewhat dull and i didn't want to repolish it again but now you gone and done it and i will have to repolish it now.....
To polish my aluminum pieces I just used my new 8" Delta grinder with an 8" stitched cloth polishing wheel and green polishing compound. It left some black residue behind and I actually stumbled on a great way to remove that residue after buffing. It especially worked well on the speed control emblem and the emblem on the other side of the headstock where the checkerboard pattern had gotten real black from the residue of buffing the shiny parts of the emblem. All of my parts were already painted red and the paint was still very good so i left that alone.
Here is the secret to removing the residue from the red parts and shiny parts after buffing. Buy some electrical parts cleaner spray, get a tooth brush, spray the parts with the cleaner and scrub with the brush working it in circular motions to get all of the crevices clean. You will have to spray the part often as you scrub it as the electrical parts cleaner completely breaks down the black buffing residue and you won't be able to see what needs scrubbing and what doesn't with out occassional spraying. The great thing about this little secret that I stumbled on is the electrical parts spray breaks down the residue but levaes the paint untouched! Bonus find for me! Heath you still had to do the paint thing as you wanted red instead of black but if you already have red that is in good condition no need to repaint just buff and clean. And when finished your paint will be bright and your bare metal will shine bright.
Michael Mayo
Senior IT Support Engineer
Soft Designs Inc. albiemanmike@gmail.com
1960's SS Mark VII, 1954 Greenie, 1983 Mark V, Jointer, Bandsaw, Jigsaw, Dewalt Slider, Delta Super 10, Delta 8" Grinder, Craftsman compressor, Drill Doctor, Kreg PH Jig, Bosch Jigsaw, Craftsman Router and Table...........and adding more all the time....
I know this thread is a little old, but I'm very interested to see how your Shopsmith came out fully re-assembled. I really like the look of the hammered metal black and silver paint job! It's awesome looking and would look even better with the 21st Century look of the new PowerPro speed dial, but I must admit the polish on the aluminum parts is awesome!
I pikced up a can of the spray paint at Lowe's today to test it out on a couple areas of my Shopsmith
Thanks,
John
Making sawdust in Lake Ridge, VA
Shopsmith Mark V, 520 Upgrade, Jointer, DC 3300, Router Table, Several DeWalt power tools