First wood turning project...

Forum for people who are new to woodworking. Feel free to ask questions or contribute.

Moderators: HopefulSSer, admin

nil
Gold Member
Posts: 79
Joined: Mon Jun 11, 2012 4:39 am
Location: Mountain View, CA

First wood turning project... and second and third and fourth...

Post by nil »

I've now turned wood for the first time. I wasn't intending to make a magic wand when I pulled a piece of sapwood off a larger slab of walnut I have plans to make a desk out of, but after I started practicing some beads and tapers, I ended up here, and it's already become a favorite toy of my 2 and 4 year old kids.

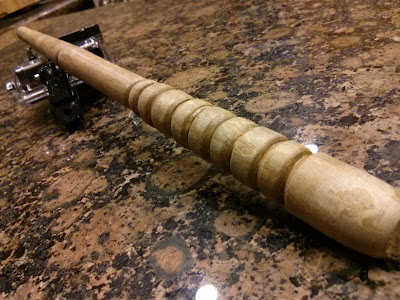
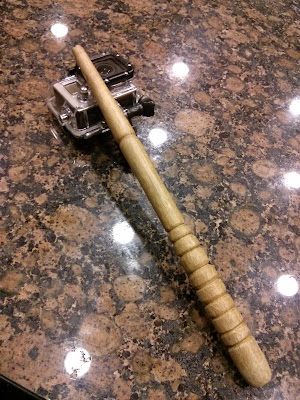
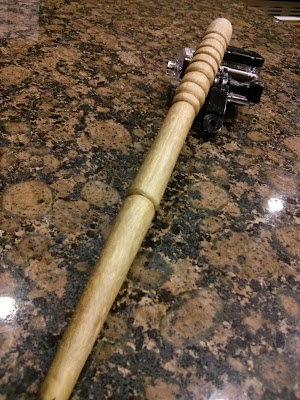
I've only sanded it through two grits, since that's all I have at home and I put a coat of paste wax on it, since that's what I had available to me and I didn't really have much time to spend on this. Now that I've made one, I will probably end up having to make another two so each boy will have one.

I made this in two days, about a half hour each day before daycare pickup, and I have some video of day two that I will embed a youtube link for below after I have some time to process the video, but here are some photos to start:

Image

Image

Image

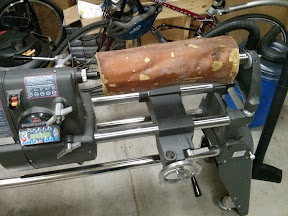
... and a teaser of what's up next for turning:

Image

I've also started a blog here, with the post above:

http://www.airquotewoodworker.com/2013/ ... pwood.html

Video of Sunday's turning session coming soon.
User avatar
terrydowning
Platinum Member
Posts: 1678
Joined: Mon Jul 19, 2010 3:26 pm
Location: Windsor, CO

Post by terrydowning »

Careful

Turning can be addictive!!

Nice job on your first.
--
Terry
Copy and paste the URLs into your browser if you want to see the photos.

1955 Shopsmith Mark 5 S/N 296860 Workshop and Tools
https://1drv.ms/i/s!AmpX5k8IhN7ahFCo9VvTDsCpoV_g

Public Photos of Projects
http://sdrv.ms/MaXNLX
User avatar
fredsheldon
Platinum Member
Posts: 1175
Joined: Tue Jan 17, 2012 1:31 pm
Location: The Woodlands, Texas

Post by fredsheldon »

Nil, now you went and done it. Welcome to the turning club :D Is the next project going to be a fat baseball bat:p
Fred Sheldon
The Woodlands, Tx
'52 10ER # 60869 (restored in 2012, used as a dedicated drill press), '52 10ER # 88712 (restored 01/2013), 52 10ER # 71368 (in process of restoring), '83 500 Shorty with OPR installed, '83 520 PowerPro with Lift Assist, 6" Joiner, 6" Belt Sander, 18" Jig Saw, 11" Band Saw, 12" ProPlaner, SS Crosscut Table. SS Dust Collector, Hitachi 1/2" router, Work Sharp 3000 with all attachement, Nova G3 Chuck, Universal Tool Rest, Appalachia Tool Works Sled.
johnwilliamson062
Gold Member
Posts: 60
Joined: Sat May 25, 2013 1:31 am

Post by johnwilliamson062 »

Well done. Much better than my first(ended up a peg leg from a 40 year old pine 4X4 piece of scrap). My second was better though, so I am challenging you there!(ice cream scoop handle from a purchase cherry blank).
I am Planning project number three. Probably a baton of some sort. Recently had a storm that downed some large limbs. Trying to figure out what the species is on the one with the best spindle is.
nil
Gold Member
Posts: 79
Joined: Mon Jun 11, 2012 4:39 am
Location: Mountain View, CA

Post by nil »

fredsheldon wrote:Is the next project going to be a fat baseball bat:p
Close! It's going to be a big fat mallet. I think I may bandsaw off the waste first though, so that I can use it for other projects rather than just a bag of shavings. Also, this is green wood, so it should be interesting to see how it deforms and cracks and checks over time. It should still be perfectly usable as a mallet for hitting a froe all the same.
nil
Gold Member
Posts: 79
Joined: Mon Jun 11, 2012 4:39 am
Location: Mountain View, CA

Post by nil »

The mallet is now done, photos and video to come as well... mistakes and all (and there were a lot of mistakes -- I'm not even yet sure how to use the skew chisel correctly on something like this -- though it worked well for my magic wand, so I had to fix mistakes from each time I tried).

It's green wood, so it's going to take some time to dry and crack on me (in fact it's already cracking at one end), so I have it sitting in a bag of its shavings now hoping that will close up over time, but I could also get some more practice with epoxy if not.

I found a nice little insect trail inside when I was turning the mallet.
User avatar
terrydowning
Platinum Member
Posts: 1678
Joined: Mon Jul 19, 2010 3:26 pm
Location: Windsor, CO

Post by terrydowning »

Make sure all insects are in fact dead if storing this in your home or shop where there may be wood you don't want damaged!!

Sealing completely with shellac (sanding sealer) or other film forming finish so no oxygen gets inside can kill off any insects but will slow the drying process significantly.

The cracks will not "close up". These can be filled with epoxy once the wood reaches EMC and stabilizes.
--
Terry
Copy and paste the URLs into your browser if you want to see the photos.

1955 Shopsmith Mark 5 S/N 296860 Workshop and Tools
https://1drv.ms/i/s!AmpX5k8IhN7ahFCo9VvTDsCpoV_g

Public Photos of Projects
http://sdrv.ms/MaXNLX
nil
Gold Member
Posts: 79
Joined: Mon Jun 11, 2012 4:39 am
Location: Mountain View, CA

Post by nil »

Video is posted, but I am not sure how long youtube will take to process it.

https://www.youtube.com/watch?v=tqsAhwi4Eo0

I am still editing the video of the large mallet, but I put another teaser photo at the end of the above video.
User avatar
jtevans
Gold Member
Posts: 45
Joined: Sun Mar 03, 2013 9:12 pm
Location: Evans, WV.

Post by jtevans »

nil wrote:Video is posted, but I am not sure how long youtube will take to process it.

https://www.youtube.com/watch?v=tqsAhwi4Eo0

I am still editing the video of the large mallet, but I put another teaser photo at the end of the above video.
I checked out your video and thought you did a great job for a beginner;
I'm a "real" beginner myself. I turned a new handle for a yard tool, out of scrap oak, it turned out okay. It's not real pretty, but it sure was functional...and it allowed me to continue using something that was once broken...good job !!!
User avatar
JPG
Platinum Member
Posts: 34643
Joined: Wed Dec 10, 2008 7:42 pm
Location: Lexington, Ky (TAMECAT territory)

Post by JPG »

The video is slick!!!

Yer turning technique(s) is interesting.;)
╔═══╗
╟JPG ╢
╚═══╝

Goldie(Bought New SN 377425)/4" jointer/6" beltsander/12" planer/stripsander/bandsaw/powerstation /Scroll saw/Jig saw /Craftsman 10" ras/Craftsman 6" thicknessplaner/ Dayton10"tablesaw(restoredfromneighborstrashpile)/ Mark VII restoration in 'progress'/ 10
E[/size](SN E3779) restoration in progress, a 510 on the back burner and a growing pile of items to be eventually returned to useful life. - aka Red Grange
Post Reply