edward wrote:No sir, it was not long solved. But it is now thanks to your excellent suggestion. Ah, the satisfaction of freeing those dadgum screws.
While at HF I bit the bullet and bought Bill's Bearing Separator and Puller set. Now I just need to figure out how to use and get those bearings out.
Time to get to work. Thanks for all the tips. Etcguy, I'll be using your instructions for the motor (it's definitely the bearings in there). I'll also be pulling the bearings in the drive sleeve and maybe the quill.
Any tips that come to mind, let me know. Thanks.
Glad to here you had success with the impact driver. I almost didn't even mention it figuring you did the task already. The impact driver is one of the best tools I've purchased. jpg's advise will help you master the thing. As your smacking it with the hammer, you keep firm rotational pressure on it (counterclockwise) as if your turning the screw out by hand and it prevents the tools from walking away from you.
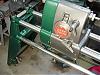
Here's a couple pics to give you a visual of the puller at work. It's really easy. If your not clear on it, don't hesitate to bark up. We'll help you out.
Thanks for the photos. I may get one of these sometime in lieu of the machine shop work I'd gotten before. One thing I do not readily picture is pressing the bearings on -- especially for a very long shaft. Is the same tool capable of this?
Thanks for the photos. I may get one of these sometime in lieu of the machine shop work I'd gotten before. One thing I do not readily picture is pressing the bearings on -- especially for a very long shaft. Is the same tool capable of this?
thanks,
This puller is on sale until March 23. Yes, I had used the same puller to install bearings on the Drive Sleeve. It has extensions that you put together to extend its reach. I had to make a button ( used several body washers for a while) for the quill shaft end of the Drive Sleeve for the puller's screw to work againest. I center punch the center of any solid shaft for the puller's screw tit so it would stay in the center of the shaft. I use the flat side of the plates againest the bearing when installing them. I use a 5/8" ID X 6" pipe to install the quill bearings.
Bill Mayo bill.mayo@verizon.net
Shopsmith owner since 73. Sell, repair and rebuild Shopsmith, Total Shop & Wood Master headstocks, SPTs, attachments, accessories and parts. US Navy 1955-1975 (FTCS/E-8)
Thanks for the photos. I may get one of these sometime in lieu of the machine shop work I'd gotten before. One thing I do not readily picture is pressing the bearings on -- especially for a very long shaft. Is the same tool capable of this?
thanks,
The only ShopSmith V bearing that you can't readily install with the bearing separator kit as purchased is the quill bearing BUT.....it's easy to do without it. If you put the quill in the freezer for a couple hours and the bearing in a warm oven (~150*), the bearing will slide on with little to no force. I installed mine last night and the bearing actually slide on right up to the shoulder with only hand pressure. You have to push it on QUICKLY. The instant after it hit the shoulder, it wouldn't move. Just to make sure it was on all the way, I put the shaft bearing against the jaws on my machinist vise and tunked the opposite end of the shaft with my nylon hammer.
I would certainly agree that there are better products for freeing up stuck screws and bolts than WD-40. It is a good product but that is not its purpose. I keep going back to Liquid Wrench followed by PB Blaster. Every mechanic has his favorite. We were in the vacuum cleaner business (along with several others) for many years and repaired thousands and thousands of vacuum cleaners. Lots of stuck Philips screws. Steel into aluminum is not a friendly combination, especially if it gets exposed to a little moisture. Absolutely get the right size driver as you said, and preferably not at the dollar store. Good screw drivers are available quite cheaply now so don't be afraid to throw a Phillips away now and then and buy a new one. The average person cannot repair the tip properly like you can with a straight driver.
When a screw on a vac wouldn't turn I would normally spritz it and give it a minute. Then I would plant the driver firmly down in the slots and hold it down firmly and turn at the same time as normal but I also then would rap the top of the screw driver quite firmly with a decent sized hammer several times as I twist. It won't hurt a good driver with a plastic handle (don't do that with wood handles unless the blade goes all of the way out the top of the handle with a pad to hammer on) That will not only shake the screw it also makes sure that the tip is sitting all of the way at the bottom in the screw. The combination of the impact and the torque will remove most screws. Yes I know that they make a tool that does that but I don't care for them on small screws. And no the next step is NOT just get a bigger hammer. The next step is to find a drill bit that is smaller than the screw body (you don't want to just drill the head off of it) and drill gently down through the screw and hopefully out of the bottom end of the screw. That does a couple of things for you. One it "relieves" any pressure that may exist. Yeah I know that may sound a little silly to some but it works. Also drilling usually heats the screw some and any kind of tiny motion from expansion and contraction is your friend. Sometimes you can turn a small torch flame (don't over do it) on the screw and get heat down the tiny hole. You can often heat a screw with the tip of a soldering gun. Heat it and cool it several times. When you heat it there is movement there. It is tiny but there is movement. You can also apply more penetrating oil down through the hole. Then you go back to the screw driver and hammer. Always stick you tongue over against the left side of your mouth (unless you are left handed) and either get the screw out of twist the head off. If the head pops off now you have a nice guide hole to drill out the rest of the screw. Don't drill out the threads and all, just drill big enough to get the body out and then you can normally run a tap the right size for the screw down the hole and with luck just clean out the old threads. BTW, it can often help to not just try to loosen the screw but to try to "rock" the screw a few times. Sometimes a screw that will not move to loosen will move a tiny bit in the direction of tightening. That movement allows you to get some penetrating oil in the threads.
Option 2 at this point involves breaking off the #$%& tap in the hole at which point you grab the hammer and smash the part beyond recognition, throw it back in a corner and order a new one...
--
farmer
Francis Robinson
I did not equip with Shopsmiths in spite of the setups but because of them.
1 1988 - Mark V 510 (bought new), 4 Poly vee 1 1/8th HP Mark V's, Mark VII, 1 Mark V Mini, 1 Frankensmith, 1 10-ER, 1 Mark V Push-me-Pull-me Drillpress, SS bandsaw, belt sander, jointer, jigsaw, shaper attach, mortising attach, TS-3650 Rigid tablesaw, RAS, 6" long bed jointer, Foley/Belsaw Planer/molder/ripsaw, 1" sander, oscillating spindle/belt sander, Scroll saw, Woodmizer sawmill
[quote="robinson46176"]I would certainly agree that there are better products for freeing up stuck screws and bolts than WD-40. It is a good product but that is not its purpose. I keep going back to Liquid Wrench followed by PB Blaster. Every mechanic has his favorite. We were in the vacuum cleaner business (along with several others) for many years and repaired thousands and thousands of vacuum cleaners. Lots of stuck Philips screws. Steel into aluminum is not a friendly combination, especially if it gets exposed to a little moisture. Absolutely get the right size driver as you said, and preferably not at the dollar store. ]
OK I messed this one up... I was commenting on the post that said:
===========
The 'motor drive belt' being 'frayed' is not a likely problem. Wear of the belt to a width of less than 7/16" (measured at the outer larger width edge) is an indication to replace it. Not a bad idea to replace it ANYWAY.
The motor mounting screws are usually #3 Phillips. Most folks do NOT have the proper screwdriver for these. Yes phillips screws/drivers come in different sizes with the #2 being the most common and the #1 next. This is where "p1", "p2", px come from. Do NOT try to loosen these bolts without the proper screwdriver! You do NOT want to 'booger up' the screw heads.
Good Luck and keep up the good work you are doing.
=============
I hope this makes more sense now.
--
farmer
Francis Robinson
I did not equip with Shopsmiths in spite of the setups but because of them.
1 1988 - Mark V 510 (bought new), 4 Poly vee 1 1/8th HP Mark V's, Mark VII, 1 Mark V Mini, 1 Frankensmith, 1 10-ER, 1 Mark V Push-me-Pull-me Drillpress, SS bandsaw, belt sander, jointer, jigsaw, shaper attach, mortising attach, TS-3650 Rigid tablesaw, RAS, 6" long bed jointer, Foley/Belsaw Planer/molder/ripsaw, 1" sander, oscillating spindle/belt sander, Scroll saw, Woodmizer sawmill
robinson46176 wrote:Option 2 at this point involves breaking off the #$%& tap in the hole at which point you grab the hammer and smash the part beyond recognition, throw it back in a corner and order a new one...
Just a something I learned awhile back. If you strip a screw head when attempting to extract a screw...Get out your dremel (rotary tool) and make a new slot for your screw driver. I've used this method many times, in fact, I used it this week extracting a screw from a Shopsmith I'm rebuilding.
Dave - Idaho
Greenie S#261612 - Mar 1954 / Greenie S#305336 - Oct 1955 / Gray S#SS1360 - ?
"Why do we drive on parkways and park on driveways?"
I can't get the "face" off the motor in order to get at those bearings. Not the sheave. Just the round silver part that is connected to the shaft. Sheesh. I'm an idiot.