It is most unfortunate that you didn't get the help you were seeking. However, I am sure many are just like me. I have no experience in this matter and had nothing valid to offer.
If I had replied based on gut feeling, I would have said to prime.
Restoration Progress On My 1955 Greenie
Moderators: HopefulSSer, admin
-
mickyd

- Platinum Member
- Posts: 2999
- Joined: Mon Feb 09, 2009 1:18 pm
- Location: San Diego, CA
- Contact:
I am doing work on the Gilmer clutch drive but wanted to include it on a separate thread since it's a topic of it's own and didn't want it to get lost in this thread. You can see it at:
http://www.shopsmith.net/forums/showthr ... #post32871
http://www.shopsmith.net/forums/showthr ... #post32871
Mike
Sunny San Diego
Sunny San Diego
-
mickyd
- Platinum Member
- Posts: 2999
- Joined: Mon Feb 09, 2009 1:18 pm
- Location: San Diego, CA
- Contact:
Quick update on my restoration work. Seems like everything is taking forever. When you get down into the detail, things go much slower.
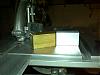
Finished with painting the headstock parts. I put a second coat on everything because of the pinhole condition I noticed. Glad I did because I also got a better texture match this time. For the first coat, I painted the headstock casting, sheet metal motor cover, and belt cover at three separate times and whereas they look good to themselves, I got three unique textures that were visually different when everything was together. To get away from this, I did them at the same time. I assembled the headstock casting and motor pan with temporary screws and them painted them together. Now, all three components match.
[ATTACH]3561[/ATTACH] [ATTACH]3562[/ATTACH]
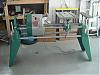
Also completed the bench and way tubes. Bench tubes went through the electrolysis baththen both bench and way tubes were sanded on the drill setupdiscussed in another thread. Polished them up with Johnson's Original Paste wax and they look good as new.
[ATTACH]3564[/ATTACH][ATTACH]3563[/ATTACH]
Got all the cast aluminum stripped and ready for a light sanding and then priming. Shooting for two coats of paint this weekend. (Notice the single polished caster mounting bracket).
[ATTACH]3565[/ATTACH]
That's it for now. Work tomorrow. Time to hit it.
Finished with painting the headstock parts. I put a second coat on everything because of the pinhole condition I noticed. Glad I did because I also got a better texture match this time. For the first coat, I painted the headstock casting, sheet metal motor cover, and belt cover at three separate times and whereas they look good to themselves, I got three unique textures that were visually different when everything was together. To get away from this, I did them at the same time. I assembled the headstock casting and motor pan with temporary screws and them painted them together. Now, all three components match.
[ATTACH]3561[/ATTACH] [ATTACH]3562[/ATTACH]
Also completed the bench and way tubes. Bench tubes went through the electrolysis baththen both bench and way tubes were sanded on the drill setupdiscussed in another thread. Polished them up with Johnson's Original Paste wax and they look good as new.
[ATTACH]3564[/ATTACH][ATTACH]3563[/ATTACH]
Got all the cast aluminum stripped and ready for a light sanding and then priming. Shooting for two coats of paint this weekend. (Notice the single polished caster mounting bracket).
[ATTACH]3565[/ATTACH]
That's it for now. Work tomorrow. Time to hit it.
- Attachments
-
- Img_5141mod2.jpg (75.19 KiB) Viewed 9324 times
-
- Img_5141mod3.jpg (73.52 KiB) Viewed 9304 times
-
- Img_5150mod.jpg (39.45 KiB) Viewed 9220 times
-
- Img_4916-1.jpg (48.39 KiB) Viewed 9232 times
-
- Img_5134mod.jpg (43.35 KiB) Viewed 9231 times
Mike
Sunny San Diego
Sunny San Diego
-
mickyd
- Platinum Member
- Posts: 2999
- Joined: Mon Feb 09, 2009 1:18 pm
- Location: San Diego, CA
- Contact:
Forgot to mention that I used "CitriStrip" from Lowe's to remove all the paint from both steel and cast aluminum. In general it worked GREAT but there were a just a couple of tough spots that from some reason, it wouldn't soften so I had to use regular nasty paint stripper.mickyd wrote:Got all the cast aluminum stripped and ready for a light sanding and then priming. Shooting for two coats of paint this weekend. (Notice the single polished caster mounting bracket).
Mike
Sunny San Diego
Sunny San Diego
Micky - I'm curious about the drill setup you used, but searched the post and couldn't find details. Got a set of tubes that aren't rusted to the point of needing electrolysis, but would certainly benefit from a good polishing.mickyd wrote:Also complete the bench and way tubes. Bench tubes went through the electrolysis bath then both bench and way tubes were sanded on the drill setup discussed previously in the thread. Polished them up with Johnson's Original Paste wax and they look good as new.
Thanks!
Matt
Lost count, over a dozen rebuilt/repaired/restored
Personal equipment: 510 made in 1993, belt sander, jig saw, band saw, planer and jointer
Matt in GA
Personal equipment: 510 made in 1993, belt sander, jig saw, band saw, planer and jointer
Matt in GA
-
dusty

- Platinum Member
- Posts: 21371
- Joined: Wed Nov 22, 2006 6:52 am
- Location: Tucson (Wildcat Country), Arizona
Some of the threads that have been posted here lately are absolutely fantastic. They have been extremely informative. Some, like this one, constitute an extension of what Nick was providing. I believe Nick would be proud of what he has started.
I can't wait to see the finished products.
You guys have got me thinking I need to cleanup the tubes on my Mark V. I don't have any rust but they definitely show signs of wear and tear. Maybe it is time to set up a polishing station.
I can't wait to see the finished products.
You guys have got me thinking I need to cleanup the tubes on my Mark V. I don't have any rust but they definitely show signs of wear and tear. Maybe it is time to set up a polishing station.
"Making Sawdust Safely"
Dusty
Sent from my Dell XPS using Firefox.
Dusty
Sent from my Dell XPS using Firefox.
-
mickyd
- Platinum Member
- Posts: 2999
- Joined: Mon Feb 09, 2009 1:18 pm
- Location: San Diego, CA
- Contact:
Matt,thainglo wrote:Micky - I'm curious about the drill setup you used, but searched the post and couldn't find details. Got a set of tubes that aren't rusted to the point of needing electrolysis, but would certainly benefit from a good polishing.
Thanks!
Matt
The drill setup I used was buried in a thread "Crocus Cloth Substitute". Here's the link to the info. It's post #14.
http://www.shopsmith.net/forums/showthr ... BENCH+TUBE
Note: Expansion plug sizes below were updated 3/26/09 to correct errors.
It's a pretty straight forward process. You'll need a 1-1/2" to 1-3/4" expansion plug to do your bench tubes and a 1-1/4" to 1-3/8" to do your way tubes. In my setup, the far end of the tubes weren't chucked but next time, I think I would use an expansion tube on that side also. The far end just spun resting again a stop and they actually got pretty hot on that side. Even resting that side on a towel to reduce friction wasn't enough to keep them cool.
Let me know if you need any more details.
p.s. If you take your time and make sure the expansion plugs go in nice and straight and you keep the drill RPM reasonable, they'll run true enough where it's not a safety hazard. I had my wife supervise when I did the way tubes because I couldn't get it to run as true as the bench tube. She watched the setup to make sure it wasn't moving. I think it didn't run as true as the bench tubes because of the amount the expansion the plug had expand to fit tightly. It just didn't expand accurately. The 1-1/2"' plug for the bench tubes fit much closer right out out of the shoot.
Mike
Sunny San Diego
Sunny San Diego
Great info Mike! Saw your other post first with the picture showing a very simple, useful setup. I'll try that out this weekend, assuming I can find some expansion plugs. Did you pick those up at the local hardware store?
Matt
Matt
Lost count, over a dozen rebuilt/repaired/restored
Personal equipment: 510 made in 1993, belt sander, jig saw, band saw, planer and jointer
Matt in GA
Personal equipment: 510 made in 1993, belt sander, jig saw, band saw, planer and jointer
Matt in GA