I think you will find the more you are into the ER's the more you will like them. I have not intention of giving up my MKV's. The er's did have a lower blade guard you could buy but if you find one now you will probably give more for it than you did for the ER. The motor has set screws to loosen it when you move the belt and helps the motor stay with the right tension. Also make sure you loosen the motor to change speeds since the pulleys are very brittle and will break easily.
I did not have a fine caliper to use on the tubes but the ER tubes are just a hair or two wider and come in two thickness. The heavy wall you have and the later models came with a thin wall
Enjoy
10ER in pictures, lite on the review
Moderator: admin
-
wlhayesmfs
- Platinum Member
- Posts: 667
- Joined: Fri Jul 21, 2006 10:50 am
- Location: Broken Arrow OK
-
JPG

- Platinum Member
- Posts: 35598
- Joined: Wed Dec 10, 2008 7:42 pm
- Location: Lexington, Ky (TAMECAT territory)
WHAT?:rolleyes: Both are 1)52" long 2)1 3/4" OD The difference is the ID. As Ed has noted, they are thicker!!! They WILL fit a Mark V!:)kartoffelkopf wrote:Sorry, they are not.
╔═══╗
╟JPG ╢
╚═══╝
Goldie(Bought New SN 377425)/4" jointer/6" beltsander/12" planer/stripsander/bandsaw/powerstation /Scroll saw/Jig saw /Craftsman 10" ras/Craftsman 6" thicknessplaner/ Dayton10"tablesaw(restoredfromneighborstrashpile)/ Mark VII restoration in 'progress'/ 10E[/size](SN E3779) restoration in progress, a 510 on the back burner and a growing pile of items to be eventually returned to useful life. - aka Red Grange

10ER in pictures, lite on the review
I have been cleaning, sanding, waxing and polishing the thicker wall 10ER tubes and using them as way tubes on the Mark V. I find even when covered in rust, the 10ER tubes are cleaning up to look like new tubes so they must have had a different finish on them. The rust does not seem to pit the 10ER tubes like I find on most of the Mark V way and bench tubes. I find all the 10ER tubes I have are 1 3/4" OD and feel twice as heavy as the Mark V tubes.wlhayesmfs wrote:I did not have a fine caliper to use on the tubes but the ER tubes are just a hair or two wider and come in two thickness. The heavy wall you have and the later models came with a thin wall
Enjoy
Bill Mayo bill.mayo@verizon.net
Shopsmith owner since 73. Sell, repair and rebuild Shopsmith, Total Shop & Wood Master headstocks, SPTs, attachments, accessories and parts. US Navy 1955-1975 (FTCS/E-8)
Shopsmith owner since 73. Sell, repair and rebuild Shopsmith, Total Shop & Wood Master headstocks, SPTs, attachments, accessories and parts. US Navy 1955-1975 (FTCS/E-8)
-
a1gutterman

- Platinum Member
- Posts: 3653
- Joined: Tue Jan 09, 2007 12:45 am
- Location: "close to" Seattle
Could they have a nickle finish do you think?billmayo wrote:I have been cleaning, sanding, waxing and polishing the thicker wall 10ER tubes and using them as way tubes on the Mark V. I find even when covered in rust, the 10ER tubes are cleaning up to look like new tubes so they must have had a different finish on them. The rust does not seem to pit the 10ER tubes like I find on most of the Mark V way and bench tubes. I find all the 10ER tubes I have are 1 3/4" OD and feel twice as heavy as the Mark V tubes.
Ed, those are fantastic pictures. Thanks for sharing. Your brother should have fun! (and I bet you will be right there helping him!)
Tim
Buying US made products will help keep YOUR job or retirement funds safer.
Buying US made products will help keep YOUR job or retirement funds safer.

Looks like a great machine you have there, Ed. I just picked up my 2nd ER that I am in the midst of restoring. I've still never seen or handled a Mark V so I can't offer any notes of comparison between the two. I'm still very much a newbie to 10ER (only about 6 months into it now), but I do have a couple of notes on your pics and comments.
While there's nothing saying you can't mount the tailstock as pictured, it was designed to mount on the end of the tubes, outside of the base plate arm. You may be missing the bolt used to secure it to the base plate arm (both of my ERs are missing the original bolt). It doesn't have a big knob like the one in your photo. It has a smaller head that will not be in the way when raising the ways into drill press mode.
I seriously doubt the electrical cord is original. I can't say for sure, but I think the 10ER came with a cord going from the switch to the motor and people had to wire in their own cord to go from the power source to the switch.
The original 10E ("E" stands for "Experimental" and "ER" is for "Experimental - Revised) used a wooden table extension. I don't know for sure if the wood table was supplied by Magna or if people had to cut their own. The bracket attached to the tailstock the same way the ER bracket does. To use the rip fence on the extension table, two studs with wing nuts on one end bolted to the table. There were two holes in the rip fence that would fit over those studs and the wing nuts were used to keep it in place.
You can find a lot of great documentation on the ER here: http://www.owwm.com/mfgIndex/detail.aspx?id=338&tab=3 There's also the yahoo group which I have learned a LOT from.
Late EDIT: I meant to mention the quill return spring and how it works. I don't know how this compares to the Mark V, but ER has a coil spring that wraps around the feed pinion shaft. One end connects to the shaft, the other end hooks on the spring housing (you can see it on the left side of the spring housing in your picture). As you advance the quill, the spring tightens. I haven't removed the spring yet on my 2nd ER, but on my first one, the inside of the spring housing was caked with sawdust and other grime. It really wasn't much trouble removing, cleaning, and reinstalling the spring.
-
JPG
- Platinum Member
- Posts: 35598
- Joined: Wed Dec 10, 2008 7:42 pm
- Location: Lexington, Ky (TAMECAT territory)
Ed I thought this might be of interest to you. Courtesy of heathicus. From HIS oww link.
http://www.owwm.com/pubs/338/2708.pdf
http://www.owwm.com/pubs/338/2708.pdf
╔═══╗
╟JPG ╢
╚═══╝
Goldie(Bought New SN 377425)/4" jointer/6" beltsander/12" planer/stripsander/bandsaw/powerstation /Scroll saw/Jig saw /Craftsman 10" ras/Craftsman 6" thicknessplaner/ Dayton10"tablesaw(restoredfromneighborstrashpile)/ Mark VII restoration in 'progress'/ 10E[/size](SN E3779) restoration in progress, a 510 on the back burner and a growing pile of items to be eventually returned to useful life. - aka Red Grange
╟JPG ╢
╚═══╝
Goldie(Bought New SN 377425)/4" jointer/6" beltsander/12" planer/stripsander/bandsaw/powerstation /Scroll saw/Jig saw /Craftsman 10" ras/Craftsman 6" thicknessplaner/ Dayton10"tablesaw(restoredfromneighborstrashpile)/ Mark VII restoration in 'progress'/ 10E[/size](SN E3779) restoration in progress, a 510 on the back burner and a growing pile of items to be eventually returned to useful life. - aka Red Grange
I printed a copy of that Owner's Guide (printing the cover on cardstock paper) and had it spiral bound. I refer to it quite often. You could print a copy and include it as part of the gift.JPG40504 wrote:Ed I thought this might be of interest to you. Courtesy of heathicus. From HIS oww link.
http://www.owwm.com/pubs/338/2708.pdf
Another invaluable reference for me has been the original edition of Power Tool Woodworking For Everyone, by R. J. Decristoforo. You can get a reader copy sans dustjacket for a decent price off Amazon.com.

Hi,
I've been collecting 10ER stuff for the last week. I have had plans to present my brother a notebook with things like the manuals, Ad's, and magazine articles. I got the whole collection from the yahoo 10ER group plus a few other items I've located else where. Turns out there is so much stuff that I think most of it I will burn on to a CD. The note book will be more day to day things like the manual.
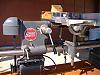
I get ringed binders at Sam's Club and have a lot of my materials put in them. They have a clear plastic outer cover that lets you slip your own information on the front and spline. I just cleaned up a picture off a manual then printed it up. Below you can see how it looks.
[ATTACH]3661[/ATTACH]
I will start taking it apart for the trip tomorrow. It has a 400 mile ride ahead of it and it needs to be broken down in to parts I can box up and lift. I guess it will be in "kit" form.
It has been great fun actually having one to play with and touch. These are indeed quite the machine. It is going to be hard to say good bye to it but I know my brother is really going to love it too. I also know I have to get it out of my garage so I can get back to my hobby... which is woodworking.
Thanks of the comments and tips.
Ed
I've been collecting 10ER stuff for the last week. I have had plans to present my brother a notebook with things like the manuals, Ad's, and magazine articles. I got the whole collection from the yahoo 10ER group plus a few other items I've located else where. Turns out there is so much stuff that I think most of it I will burn on to a CD. The note book will be more day to day things like the manual.
I get ringed binders at Sam's Club and have a lot of my materials put in them. They have a clear plastic outer cover that lets you slip your own information on the front and spline. I just cleaned up a picture off a manual then printed it up. Below you can see how it looks.
[ATTACH]3661[/ATTACH]
I will start taking it apart for the trip tomorrow. It has a 400 mile ride ahead of it and it needs to be broken down in to parts I can box up and lift. I guess it will be in "kit" form.
It has been great fun actually having one to play with and touch. These are indeed quite the machine. It is going to be hard to say good bye to it but I know my brother is really going to love it too. I also know I have to get it out of my garage so I can get back to my hobby... which is woodworking.
Thanks of the comments and tips.
Ed
- Attachments
-
- notebook 10ER fixedsc.jpg (66.77 KiB) Viewed 6725 times
{Knight of the Shopsmith} [Hero's don't wear capes, they wear dog tags]