I believe the answer is no. You can post a link to a video here though. For instance, do a video on you tube and post a link here.Shop_Smith_Poppi wrote:Does any one here know if it is possible to upload videos to this site?
Restoration Progress On My 1955 Greenie
Moderators: HopefulSSer, admin
-
a1gutterman

- Platinum Member
- Posts: 3653
- Joined: Tue Jan 09, 2007 12:45 am
- Location: "close to" Seattle
Tim
Buying US made products will help keep YOUR job or retirement funds safer.
Buying US made products will help keep YOUR job or retirement funds safer.
-
mickyd

- Platinum Member
- Posts: 2999
- Joined: Mon Feb 09, 2009 1:18 pm
- Location: San Diego, CA
- Contact:
Polishing Aluminum
I don't know if locating the metal polishing information at the caswellplating.com website was a blessing or a curse. If you saw the thread that I started in this forum "Polishing Aluminum - How To Guide",it kicked out to Caswells metal finishing polishing guide pdf filethat they had on their website.
Anyway, I've begun doing the aluminum polishing on my '55 Greenie. My plans are to do these parts (possibly excluding the Sleeve and Insert Assemblies (part ref. 11, 22).
[ATTACH]3669[/ATTACH]
Initially, I thought that I would just buff the parts with the "as cast" surface to get a little shine on them. I ran into some "issues" though with not being able to buff the compound off effectively. Have ZERO polishing experience, I had to forum jump to the caswell site and ask for help. Here's the thread. The problem was determined to be due to the rough “as cast” surface finish. The compound would get into the pores. As you buffed, it would slowly pull the compound up out of the pores. This not only caused the problem with me not being able to buff it off BUT, it also created a cross contamination issue when going through the 3 different buffing compounds / buffing wheel combo. Not a good thing when polishing and fortunately, they were able to tell me what I needed to do to get my buffing wheels cleaned up. Since you use a different wheel for each compound, it's critical that you don't cross contaminate.
So here’s where the blessing vs. the curse come in. Being someone who has one set of standards (doing it RIGHT), I tackled the job of getting rid of the “pores” on the casting by sanding prior to buff. My thread at the caswell forum covers the sanding details. Needless to say, 4 hours later, I had a finished piece and p.s….I started at 9:00 pm, on a workday. Here’s the before and after.
[ATTACH]3670[/ATTACH][ATTACH]3674[/ATTACH]
The process was painfully slow due both to my inexperience and that fact that sanding was done without power tools. (Man, we’re spoiled!!). I just didn’t have the right equipment to use. What would have helped tremendously is a small jitterbug sander and a narrow ½” vertical belt sander although I don't know if I trust myself with power yet. Instead, I used a piece of 1"x4" mirror with the sandpaper wrapped around it so that I was sure the surface would be dead flat. Doing it with finger pressure would not have keep the surface flat and that would have definitely showed up on the final part (at least to my eyes it would…..real picky).
Anyway, I wanted to update you guys. Polishing has been an interesting learning process. Whoda thunk it would have been so techy. But then, ANYTHING gets techy when you get into the details. It’s kept me absorbed for several days, that’s why I’ve made so few posts in our forum. Been too busy!!
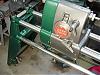
Here's my other before and after of the feed stop.
[ATTACH]3672[/ATTACH][ATTACH]3673[/ATTACH]
See ya.
Anyway, I've begun doing the aluminum polishing on my '55 Greenie. My plans are to do these parts (possibly excluding the Sleeve and Insert Assemblies (part ref. 11, 22).
[ATTACH]3669[/ATTACH]
Initially, I thought that I would just buff the parts with the "as cast" surface to get a little shine on them. I ran into some "issues" though with not being able to buff the compound off effectively. Have ZERO polishing experience, I had to forum jump to the caswell site and ask for help. Here's the thread. The problem was determined to be due to the rough “as cast” surface finish. The compound would get into the pores. As you buffed, it would slowly pull the compound up out of the pores. This not only caused the problem with me not being able to buff it off BUT, it also created a cross contamination issue when going through the 3 different buffing compounds / buffing wheel combo. Not a good thing when polishing and fortunately, they were able to tell me what I needed to do to get my buffing wheels cleaned up. Since you use a different wheel for each compound, it's critical that you don't cross contaminate.
So here’s where the blessing vs. the curse come in. Being someone who has one set of standards (doing it RIGHT), I tackled the job of getting rid of the “pores” on the casting by sanding prior to buff. My thread at the caswell forum covers the sanding details. Needless to say, 4 hours later, I had a finished piece and p.s….I started at 9:00 pm, on a workday. Here’s the before and after.
[ATTACH]3670[/ATTACH][ATTACH]3674[/ATTACH]
The process was painfully slow due both to my inexperience and that fact that sanding was done without power tools. (Man, we’re spoiled!!). I just didn’t have the right equipment to use. What would have helped tremendously is a small jitterbug sander and a narrow ½” vertical belt sander although I don't know if I trust myself with power yet. Instead, I used a piece of 1"x4" mirror with the sandpaper wrapped around it so that I was sure the surface would be dead flat. Doing it with finger pressure would not have keep the surface flat and that would have definitely showed up on the final part (at least to my eyes it would…..real picky).
Anyway, I wanted to update you guys. Polishing has been an interesting learning process. Whoda thunk it would have been so techy. But then, ANYTHING gets techy when you get into the details. It’s kept me absorbed for several days, that’s why I’ve made so few posts in our forum. Been too busy!!
Here's my other before and after of the feed stop.
[ATTACH]3672[/ATTACH][ATTACH]3673[/ATTACH]
See ya.
- Attachments
-
- Img_5181mod2.jpg (82.07 KiB) Viewed 7510 times
-
- Img_5181mod3.jpg (27.54 KiB) Viewed 7508 times
-
- Img_5181mod4.jpg (47.78 KiB) Viewed 7505 times
-
- Img_5181mod.jpg (42.59 KiB) Viewed 7508 times
-
- Img_5207MOD2.jpg (22.24 KiB) Viewed 7506 times
Mike
Sunny San Diego
Sunny San Diego
-
JPG

- Platinum Member
- Posts: 34632
- Joined: Wed Dec 10, 2008 7:42 pm
- Location: Lexington, Ky (TAMECAT territory)
If I send you MY parts, will you polish them FOR me?:Dmickyd wrote:I don't know if locating the metal polishing information at the caswellplating.com website was a blessing or a curse. If you saw the thread that I started in this forum "Polishing Aluminum - How To Guide",it kicked out to Caswells metal finishing polishing guide pdf filethat they had on their website.
Anyway, I've begun doing the aluminum polishing on my '55 Greenie. My plans are to do these parts (possibly excluding the Sleeve and Insert Assemblies (part ref. 11, 22).
[ATTACH]3669[/ATTACH]
Initially, I thought that I would just buff the parts with the "as cast" surface to get a little shine on them. I ran into some "issues" though with not being able to buff the compound off effectively. Have ZERO polishing experience, I had to forum jump to the caswell site and ask for help. Here's the thread. The problem was determined to be due to the rough “as cast” surface finish. The compound would get into the pores. As you buffed, it would slowly pull the compound up out of the pores. This not only caused the problem with me not being able to buff it off BUT, it also created a cross contamination issue when going through the 3 different buffing compounds / buffing wheel combo. Not a good thing when polishing and fortunately, they were able to tell me what I needed to do to get my buffing wheels cleaned up. Since you use a different wheel for each compound, it's critical that you don't cross contaminate.
So here’s where the blessing vs. the curse come in. Being someone who has one set of standards (doing it RIGHT), I tackled the job of getting rid of the “pores” on the casting by sanding prior to buff. My thread at the caswell forum covers the sanding details. Needless to say, 4 hours later, I had a finished piece and p.s….I started at 9:00 pm, on a workday. Here’s the before and after.
[ATTACH]3670[/ATTACH][ATTACH]3674[/ATTACH]
The process was painfully slow due both to my inexperience and that fact that sanding was done without power tools. (Man, we’re spoiled!!). I just didn’t have the right equipment to use. What would have helped tremendously is a small jitterbug sander and a narrow ½” vertical belt sander although I don't know if I trust myself with power yet. Instead, I used a piece of 1"x4" mirror with the sandpaper wrapped around it so that I was sure the surface would be dead flat. Doing it with finger pressure would not have keep the surface flat and that would have definitely showed up on the final part (at least to my eyes it would…..real picky).
Anyway, I wanted to update you guys. Polishing has been an interesting learning process. Whoda thunk it would have been so techy. But then, ANYTHING gets techy when you get into the details. It’s kept me absorbed for several days, that’s why I’ve made so few posts in our forum. Been too busy!!
Here's my other before and after of the feed stop.
[ATTACH]3672[/ATTACH][ATTACH]3673[/ATTACH]
See ya.
GEEZ they look good!
╔═══╗
╟JPG ╢
╚═══╝
Goldie(Bought New SN 377425)/4" jointer/6" beltsander/12" planer/stripsander/bandsaw/powerstation /Scroll saw/Jig saw /Craftsman 10" ras/Craftsman 6" thicknessplaner/ Dayton10"tablesaw(restoredfromneighborstrashpile)/ Mark VII restoration in 'progress'/ 10E[/size](SN E3779) restoration in progress, a 510 on the back burner and a growing pile of items to be eventually returned to useful life. - aka Red Grange

-
mickyd
- Platinum Member
- Posts: 2999
- Joined: Mon Feb 09, 2009 1:18 pm
- Location: San Diego, CA
- Contact:
Just wait till I get good at it! My then, I'll be donenuhobby wrote:Wow, almost starting to look like Billet+CNC'ed aluminum parts!
Mike
Sunny San Diego
Sunny San Diego
-
dusty

- Platinum Member
- Posts: 21368
- Joined: Wed Nov 22, 2006 6:52 am
- Location: Tucson (Wildcat Country), Arizona
I'd bet we can come up with enough parts for you to polish that you'd never again lose that keenly honed skill.mickyd wrote:Just wait till I get good at it! My then, I'll be doneThat's the problem with this kind of stuff. Just as you've completely honed the skills, your done with the project and by the time you do it again, you've lost the touch!!
"Making Sawdust Safely"
Dusty
Sent from my Dell XPS using Firefox.
Dusty
Sent from my Dell XPS using Firefox.
I've been doing the same to the Greenies (currently 2) that I am restoring. A lot of work. I've heard you can use a sanding wheel to smooth the alum before buffing. I'm looking for one now. The polished look really adds to the overall impression of the restored Shopsmith. Well worth the effort in my opinion.
Dave - Idaho
Greenie S#261612 - Mar 1954 / Greenie S#305336 - Oct 1955 / Gray S#SS1360 - ?
"Why do we drive on parkways and park on driveways?"
Greenie S#261612 - Mar 1954 / Greenie S#305336 - Oct 1955 / Gray S#SS1360 - ?
"Why do we drive on parkways and park on driveways?"
-
mickyd
- Platinum Member
- Posts: 2999
- Joined: Mon Feb 09, 2009 1:18 pm
- Location: San Diego, CA
- Contact:
Make sure to post pics bucksaw.bucksaw wrote:I've been doing the same to the Greenies (currently 2) that I am restoring. A lot of work. I've heard you can use a sanding wheel to smooth the alum before buffing. I'm looking for one now. The polished look really adds to the overall impression of the restored Shopsmith. Well worth the effort in my opinion.
I am going to try a flap sanding wheel (80grit) on a dremel tool for the next piece. They sell for about $8. It seems like it will lend itself better to "feeling" and seeing what your doing. Read the thread on the other forum about "Polishing contoured surfaces" and see how the guy describes the "feel' in post #5.
When I get the flap wheel mastered, I'll graduate to the next level, working my way up the amperage chain. Pretty soon, 15 amp, 2-1/4 HP ANGLE GRINDER shaving off a few 1/10,000th of an inch with the precision of a surgeon...boy it'll be a thing of beauty!!
Mike
Sunny San Diego
Sunny San Diego