I have recently been cleaning up winter damage to some trees on my property. I lost a cherry tree and had significant damage to some pear and apple trees. I also had an oak tree blow over.
I couldn't stand seeing all of this wood being sawed up into fire wood so I devised a way to turn some of it into lumber for future projects. Unfortunately some of the best pieces were too thick to saw on the Shopsmith bandsaw and I'm still trying to figure out how to use it.
I built a sled to hold the logs stable and establish the first two cuts. Then I set a fence to resaw the logs into the thickness I wanted. This worked out pretty well. I used a turner's bandsaw blade I bought from Highland Woodworking.
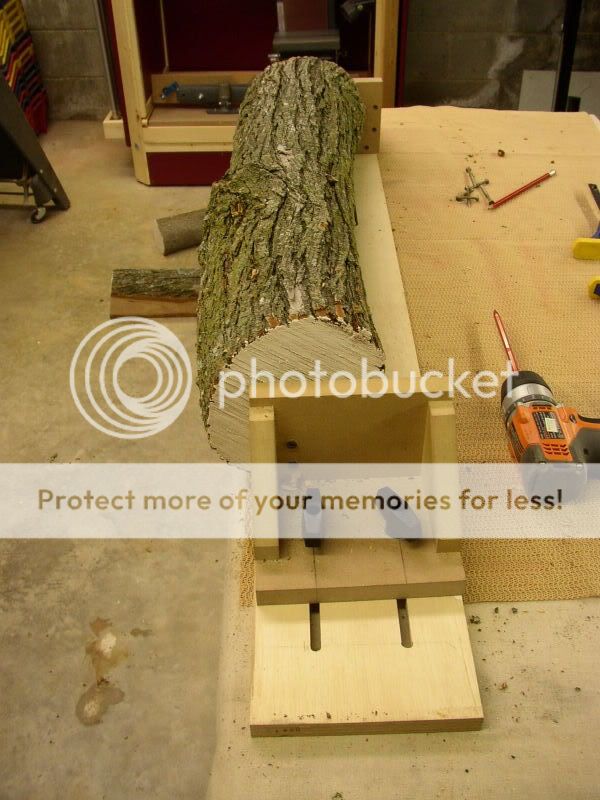
This is the sled I came up with. It is a 4' section of 3/4 plywood with slots routed to hold the MDF end blocks.
This picture shows a log mounted and ready to go. I just used screws through the end blocks to hold things stable. I may come up with a better clamping mechanism if I do this very much.
The actual cut. Not too shabby!! The edge of the sled rides along the 3/4" fence clamped to my saw table to get my first two cuts 90 degrees from each other.
The payoff. The stack on the left is red oak and on the right is pear. In about a year this should be ready for a project.
Nice job on the sawing jig. As for the larger logs, why not just chain saw them in half (or quarters, if really large) lengthwise and then they should fit your band saw. I'm sure some of the turners on the forum would love to have some of those fruit wood logs. I know I would.
I've been researching milling my own lumber and came across something interesting that might help you on the really large pieces. It's called an "Alaskan Chainsaw Mill". It's a contraption that attaches to a chainsaw. There is a company that makes them, but I imagine you could make your own fairly easily.
I tried to embed some YouTube videos, but it didn't work. So here are a few links instead. The first two links show the Alaskan Chainsaw Mill in action. The third one shows a little more detail about how the mill is made and how it works.
one note: when I had a tree milled, I learned that one is supposed to paint the end of the log when it first gets cut (or at least as soon as possible). that slows the drying process out the end grain and helps the lumber dry more uniformly. the person running the mill said that it reduced "case hardening" but I never got around to learning what that implied for wood.
FWIW,
Ivan
Mark V (84) w/ jigsaw, belt sander, strip sander
ER10 awaiting restoration
one note: when I had a tree milled, I learned that one is supposed to paint the end of the log when it first gets cut (or at least as soon as possible). that slows the drying process out the end grain and helps the lumber dry more uniformly. the person running the mill said that it reduced "case hardening" but I never got around to learning what that implied for wood.
FWIW,
Ivan
If you'll notice, I painted the ends of the logs before I milled them. Much easier that way than painting the end of each board. I then stacked and stickered them, put on a plywood cap and added weight on top. Hopefully they will dry pretty flat without too many checks.
Here is the mill I bought this past winter but I still don't have it sat up yet. Maybe this week if it will quit raining daily. http://www.woodmizer.com/us/sawmills/ma ... /lt10.aspx
It is much smaller than the mill I bought new years ago for some commercial sawing. It was able to saw 30" logs 24' long. This one is plenty big enough for my personal needs. I have maybe 300 logs from tornado damaged trees from my woods, stacked since last summer waiting to be sawed. I will have to watch the lumber closely for damage but then I have uses for all types of lumber here on the farm so I can just sort it as I go. Boards that have fine splits are still fine for lining horse stalls etc. I have about 15 acres of woods that is ready for some heavy cutting still standing.
They like to show this saw easily stored in a garage and that is true but I'm pretty tough and I'm here to tell you that there is more steel in this thing than you would want to be lifting around in big pieces. I bought mine with 21' of track so I can saw 16' rafters.
I intend for mine to stay in one spot and I will build a roof over it. The spot I "finally" settled on is under the shade on the east side of two huge old maple trees and is the coolest spot on the farm in summer. I need to move three 300 gallon fuel tanks on stands that I have had sitting in that spot for many years. Since I retired I just don't need them.
Here is the sawmill I used to own except mine had about 28' of track: http://www.kascomfg.com/_products/_sawm ... RATURE.pdf
It was a great saw and after using it for about 6 years I sold it for almost as much as I paid for it new. Paul Kaster, the founder of the company was an old family friend that I respected highly. I just don't need that much saw for personal use.
-
I'm really chomping at the bit to get sawing this spring. I first sawed some lumber on an old factory bandsaw that weighed about a ton and had 24" wheels. I built table extensions for logs up to 8' long and did all cutting free-hand except for a crude oak fence to use after getting the first two cuts (90 degrees) cut. Later I bought a homemade circle saw mill that I finally decided was just too crude and dangerous and too much modification needed to make it a good producer.
-
I have 3 old steel grain bins I no longer need and they have perforated steel floors used for drying grain usually down from about 25% down to below 15% for storage using forced natural air. If you get it down to 15% then it is possible to dry it on down below 10% during the winter. Of course with grain you do not want it much below 15% as it losses weight and therefore $$$ since even though they talk bushels you really are selling by the pound. I figure that I can dry lumber just fine in them using a small quantity of natural air then switch to solar heated air to finish it up. I won't need the high pressure fans I used for grain, I just need to keep a little air moving.
-
When I see one of those "firewood machines" that takes big logs and just whacks it into blocks and splits it into commercial firewood I about cry... Such a waste.
I have burned wood for about 45 years but I mostly burned the scraggly junk stuff and drift wood from the river. I also burned "tops" from sold trees and sawmill slabwood.
--
farmer
Francis Robinson
I did not equip with Shopsmiths in spite of the setups but because of them.
1 1988 - Mark V 510 (bought new), 4 Poly vee 1 1/8th HP Mark V's, Mark VII, 1 Mark V Mini, 1 Frankensmith, 1 10-ER, 1 Mark V Push-me-Pull-me Drillpress, SS bandsaw, belt sander, jointer, jigsaw, shaper attach, mortising attach, TS-3650 Rigid tablesaw, RAS, 6" long bed jointer, Foley/Belsaw Planer/molder/ripsaw, 1" sander, oscillating spindle/belt sander, Scroll saw, Woodmizer sawmill
tdubnik wrote:If you'll notice, I painted the ends of the logs before I milled them. Much easier that way than painting the end of each board. I then stacked and stickered them, put on a plywood cap and added weight on top. Hopefully they will dry pretty flat without too many checks.
glad to hear it.
I took a look at the pictures before I commented. the end of the log on the bandsaw looked painted but the other 2 pictures of end grain looked natural.
decided I would rather comment and have you already know it, than keep silent and risk your good work being diminished.
Mark V (84) w/ jigsaw, belt sander, strip sander
ER10 awaiting restoration