OK you have been warned reading along will only spoil the surprise later.
[ATTACH]4672[/ATTACH]
Tom I start with a groove in the sides and bottom of the cabinet for the back.
[ATTACH]4673[/ATTACH]
The back then slides into the groove.
[ATTACH]4674[/ATTACH]
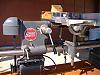
This is the upper part of the wedge bracket. It is 3/4 x 2 1/2 inches.
[ATTACH]4675[/ATTACH]
It is nailed and screwed into place in this position at the top of the cabinet.
[ATTACH]4676[/ATTACH]
This is the wall cleat part of the bracket. It is 1/2 X 2 1/2 inches
For tom_k/mo only.
Moderator: admin
-
mbcabinetmaker
- Platinum Member
- Posts: 1627
- Joined: Thu Jul 20, 2006 6:18 am
- Location: Greer SC
For tom_k/mo only.
- Attachments
-
- P1010187.jpg (121.2 KiB) Viewed 3467 times
-
- P1010188.jpg (105.1 KiB) Viewed 3469 times
-
- P1010189.jpg (99.53 KiB) Viewed 3468 times
-
- P1010190.jpg (111.33 KiB) Viewed 3469 times
-
- P1010193.jpg (95.97 KiB) Viewed 3465 times
-
mbcabinetmaker
- Platinum Member
- Posts: 1627
- Joined: Thu Jul 20, 2006 6:18 am
- Location: Greer SC
Continued
[ATTACH]4677[/ATTACH]
It attaches to the wall and the other bracket slides down onto it, wedging the two together.
[ATTACH]4678[/ATTACH]
This is how I normally send them out. This is where a simple printable instruction/diagram of how to remove it, level it and either screw it to the studs or attach with toggle bolts would be nice.
Thanks
Mark
- Attachments
-
- P1010192.jpg (92.01 KiB) Viewed 3463 times
-
- P1010194.jpg (97.22 KiB) Viewed 3463 times
-
wlhayesmfs
- Platinum Member
- Posts: 667
- Joined: Fri Jul 21, 2006 10:50 am
- Location: Broken Arrow OK
That is the way I have been putting up shop cabinets since I saw someone else do it that way. Sure is easier than trying to hold and level the cabinets.
Bill 
Broken Arrow OK
MKV, 510, MKVll, 50th Anniversary 520 with Jointech saw train, Bandsaw, scroll saw, joiner, 6" Sander,Stand Alone Pin Router and Router Table, Strip Sander, Jigsaw & (4) ER's plus Jigsaw for ER. DC SS RAS
Broken Arrow OK
MKV, 510, MKVll, 50th Anniversary 520 with Jointech saw train, Bandsaw, scroll saw, joiner, 6" Sander,Stand Alone Pin Router and Router Table, Strip Sander, Jigsaw & (4) ER's plus Jigsaw for ER. DC SS RAS
-
osx-addict
- Gold Member
- Posts: 386
- Joined: Thu Feb 28, 2008 1:56 pm
- Location: Los Angeles, CA
They frequently do that here at work (a large aerospace co) to hold cabinets, large pictures,etc.. There's a set of cleats like that still attached to one of the walls down the way a bit but w/o anything hanging on it.. (not sure why tho)..
Rick
S/W of Los Angeles, CA
1983 Mark V model 510 (SN#140061)
S/W of Los Angeles, CA
1983 Mark V model 510 (SN#140061)
-
JPG

- Platinum Member
- Posts: 35457
- Joined: Wed Dec 10, 2008 7:42 pm
- Location: Lexington, Ky (TAMECAT territory)
Costs MONEY to remove and patch the holes!;)osx-addict wrote:They frequently do that here at work (a large aerospace co) to hold cabinets, large pictures,etc.. There's a set of cleats like that still attached to one of the walls down the way a bit but w/o anything hanging on it.. (not sure why tho)..
MARK: What is the UPPER wedge nailed/screwed to? The back? The sides? The top? Is the back ever 'permanently' attached to the sides? Pretend I like burning sul.. black gunpowder!
╔═══╗
╟JPG ╢
╚═══╝
Goldie(Bought New SN 377425)/4" jointer/6" beltsander/12" planer/stripsander/bandsaw/powerstation /Scroll saw/Jig saw /Craftsman 10" ras/Craftsman 6" thicknessplaner/ Dayton10"tablesaw(restoredfromneighborstrashpile)/ Mark VII restoration in 'progress'/ 10E[/size](SN E3779) restoration in progress, a 510 on the back burner and a growing pile of items to be eventually returned to useful life. - aka Red Grange
-
mbcabinetmaker
- Platinum Member
- Posts: 1627
- Joined: Thu Jul 20, 2006 6:18 am
- Location: Greer SC
Mark did a very good job of showing us this type of cleat. I have used variances of these cleats for ALL of my wall cabinets in the shop and a couple in the house, but I never knew what the name of this cleat was.
Found an article in "Fine Woodworking" Magazine about this cleat system. It is called a "French Cleat". The article is in issue #201 - December 2008 - page 56.
You may also be able to find more about the variances of these cleats on the INTERNET. (I don't know, I haven't tried)
Thanks, Mark!:) for your photos and explanations:D
BTW - I've used 1/4" backs on all of my wall cabinets and they are holding up fine. Went back and got a closer count of the magazines in my library cabinet. Close to 350. That's a lot of weight, especially when you add the 3/4" ply construction and the tools hanging on the inside and outside.
Octogenarian's have an earned right to be a curmudgeon.
Chuck in Lancaster, CA
Chuck in Lancaster, CA
-
JPG
- Platinum Member
- Posts: 35457
- Joined: Wed Dec 10, 2008 7:42 pm
- Location: Lexington, Ky (TAMECAT territory)
Black Smoke? Tom must be around here someplace!:D Consider it cleared! Thanks!mbcabinetmaker wrote:JPG
OK lets clear the black smoke!:D
Mark
╔═══╗
╟JPG ╢
╚═══╝
Goldie(Bought New SN 377425)/4" jointer/6" beltsander/12" planer/stripsander/bandsaw/powerstation /Scroll saw/Jig saw /Craftsman 10" ras/Craftsman 6" thicknessplaner/ Dayton10"tablesaw(restoredfromneighborstrashpile)/ Mark VII restoration in 'progress'/ 10E[/size](SN E3779) restoration in progress, a 510 on the back burner and a growing pile of items to be eventually returned to useful life. - aka Red Grange
╟JPG ╢
╚═══╝
Goldie(Bought New SN 377425)/4" jointer/6" beltsander/12" planer/stripsander/bandsaw/powerstation /Scroll saw/Jig saw /Craftsman 10" ras/Craftsman 6" thicknessplaner/ Dayton10"tablesaw(restoredfromneighborstrashpile)/ Mark VII restoration in 'progress'/ 10E[/size](SN E3779) restoration in progress, a 510 on the back burner and a growing pile of items to be eventually returned to useful life. - aka Red Grange
-
robinson46176

- Platinum Member
- Posts: 4182
- Joined: Mon Mar 09, 2009 9:00 pm
- Location: Central Indiana (Shelbyville)
JPG40504 wrote:Black Smoke? Tom must be around here someplace!:D Consider it cleared! Thanks!
Hey it could be me... I like front stuffers too...
I even have a Yahoo groups list called "Budget Muzzeloading".
I just have never used a ShopSmith for anything to do with my noise makers. I guess I could make a nice cabinet but I keep them in a safe. Not much security with a glass front cabinet.
I guess I could make a lathe turned wooden "clay pigeon". With my skills at skeet one should last forever.
--
farmer
Francis Robinson
I did not equip with Shopsmiths in spite of the setups but because of them.
1 1988 - Mark V 510 (bought new), 4 Poly vee 1 1/8th HP Mark V's, Mark VII, 1 Mark V Mini, 1 Frankensmith, 1 10-ER, 1 Mark V Push-me-Pull-me Drillpress, SS bandsaw, belt sander, jointer, jigsaw, shaper attach, mortising attach, TS-3650 Rigid tablesaw, RAS, 6" long bed jointer, Foley/Belsaw Planer/molder/ripsaw, 1" sander, oscillating spindle/belt sander, Scroll saw, Woodmizer sawmill