Restoration Progress On My 1952 ER10

Forum for Maintenance and Repair topics. Feel free to ask questions or contribute.

Moderator: admin

Post Reply

What color to paint my ER10? (post #216)

Poll ended at Sat Nov 21, 2009 12:35 pm

Other (post you answer)
18
50%
Other (post you answer)
13
36%
Other (post you answer)
5
14%
 
Total votes: 36

User avatar
mickyd
Platinum Member
Posts: 2999
Joined: Mon Feb 09, 2009 1:18 pm
Location: San Diego, CA
Contact:

Post by mickyd »

tom_k/mo wrote:Mike, great job for a first attempt. What is the material you're using to make the new nameplate out of?

Using .032" brass sheet. Original nameplate is .032" aluminum. The etch photo is in b&w so that I could get better contract to show the etching.
Mike
Sunny San Diego
User avatar
mickyd
Platinum Member
Posts: 2999
Joined: Mon Feb 09, 2009 1:18 pm
Location: San Diego, CA
Contact:

Post by mickyd »

Before I put too much effort into the motors armature shaft bearing that was frozen into the back motor cover, I electrical tested the motor to see if it was any good. When I bought the ER, the guy said that he thought the motor was bad. I performed the continuity and resistance checks of the 2 motor winding pairs per jpg’s procedure. Everything was disconnected from the wires prior to test. The tests turned out good.!!

Winding pair #1 – White/Black armature wires that go to respective posts on terminal plate
Continuity =.003 ohms
Resistance = ~5M ohms to the frame

Winding pair #2 – Black/black armature wires, one to the capacitor, one to the terminal plate
Continuity = .009 ohms
Resistance = ~5M ohms to the frame

Next task was to unfreeze the rear motor bearing that was stuck in the back cover (shown at the end of post 47)

Was going to wait for the “Kroil” to arrive in a week but jpg coaxed me into trying out Evapo-Rust. Went out and bought a quart and filled up the bearing cavity. Left it for 24 hrs. Rust was so thick around the bearing / cover that when I look at it after 24 hrs., it looked unchanged. Plus all of the Evapo-Rust was GONE. (guess that’s why they call it EVAPO-Rust:D). Using a nylon mallet tapping around the outer lip of the motor cover broke the bearing loose from the mating hole. That now exposed the terminal plate and the back side of the armature that holds the centrifugal mechanism that control it.
.
.
[ATTACH]4921[/ATTACH]
.
.
.
[ATTACH]4922[/ATTACH]
.
.
.
[ATTACH]4923[/ATTACH]
.
.
.
[ATTACH]4924[/ATTACH]

I'll be documenting the wiring for the terminal plate later post. (Note: positive post is not shown. It's soldered to the capacitor)

I put the back motor cover is in the electrolysis tank after I disassembled. Going to leave it in 24 hours. Due out tonight.
Attachments
Img_6289mod.jpg
Img_6289mod.jpg (86.77 KiB) Viewed 7438 times
Img_6297mod.jpg
Img_6297mod.jpg (81.38 KiB) Viewed 7439 times
Img_6292mod1.jpg
Img_6292mod1.jpg (59.82 KiB) Viewed 7438 times
Img_6293mod1.jpg
Img_6293mod1.jpg (79.5 KiB) Viewed 7437 times
Mike
Sunny San Diego
User avatar
mickyd
Platinum Member
Posts: 2999
Joined: Mon Feb 09, 2009 1:18 pm
Location: San Diego, CA
Contact:

Post by mickyd »

Back motor cover came out of the electrolysis bath. Now this looks a little better doesn't it? (Wonder how many would have just thrown the motor away?)


CAUTIONARY NOTE: YOU MUST REMOVE THE ALUMINUM NAMEPLATE PRIOR TO ELECTROLYSIS IF YOU PLAN ON SAVING IT.


[ATTACH]4941[/ATTACH]. . [ATTACH]4942[/ATTACH]
Attachments
Img_6295mod.jpg
Img_6295mod.jpg (83.16 KiB) Viewed 7503 times
IMG_6322.JPG
IMG_6322.JPG (53.86 KiB) Viewed 7499 times
Mike
Sunny San Diego
User avatar
tom_k/mo
Platinum Member
Posts: 856
Joined: Mon Jul 14, 2008 3:58 pm
Location: St. Louis, MO
Contact:

Post by tom_k/mo »

Boy Mike, it is amazing what that electrolysis process is capable of. You are literally giving those parts a second chance at life.
ShopSmith MarkV-520 with Belt Sander, Jointer, Band Saw, Strip Sander, Scroll Saw and Biscuit Jointer SPTs and a DC-3300...
Woodworking Hobbyist (Check out all my Woodworking Plans (http://vbwhiz.isa-geek.net/plans)
Aspiring Sandcarver: Breaking glass one grain at a time.
Black Powder Shooter (love the smell of burning sulfur).
User avatar
mickyd
Platinum Member
Posts: 2999
Joined: Mon Feb 09, 2009 1:18 pm
Location: San Diego, CA
Contact:

Failed chemical etch prototype nameplate

Post by mickyd »

Update on the nameplate I am recreating. Still in prototype mode for sure. In my previous postyou saw the unpainted, crudely etched first off sample. Crude as it was, it was a starting point. I painted the entire surface with Rustoleum gloss red enamel spray paint. To get the raised lettering to show up, the next step after painting was sanding the entire surface, exposing the brass, using a piece of glass to hold the sandpaper perfectly flat. I used double sided tape on the glass and adhered the sandpaper to one piece of glass and the nameplate to another piece. Started with 220 grit DRY and sanded until I started seeing bear metal of the raised lettering. It took 3 quarter sheets to get there. Sandpaper would load up with paint. Went to 400 grit DRY next. Went though 4 quarter sheets (same load up problem) and still wasn’t down to base metal everywhere. Some of the large lettering,along with a couple other areas still had some localized areas with a bit of paint left on them . Decided to try 400 grit WET thinking that it would prevent the load up but within a few swipes, it took an area of the background down to bear metal!!!! Background is supposed to STAY PAINTED. Apparently what happens is the wet gritty “slurry” that forms rides over the grit of the sandpaper and in effect DOUBLING the overall thickness. That’s MY story and I am sticking to it.

From here, it only got worse. The wet sanding had also started to take the gloss off the background paint since the “slurry” was obviously lightly scraping the entire painted surface. When it was wet with water, you couldn’t see it but it was real obvious when it dried. Figured no biggie since I planned on putting a clear gloss overcoat over the entire nameplate anyway to stop the oxidation of the brass. Got out my can of clear overcoat, shook for the prescribed 2 minutes, sprayed it onto the nameplate and the red enamel spray paint immediately started bubbling up. Thought my contacts were getting blurry so I blinked a few times but the bubbling was even worse. Then I realized something I used to know but since forgot…… The overcoat I was using was clear gloss lacquer. The red spray paint I used was enamel. Enamel can only be covered by enamels or acrylics. Lacquer overcoat is incompatible with enamel

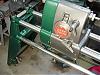
So, here is a photo of my disaster 1st prototype. Looks terrible but learned a lot. Figured since I post my successes, I should also post my failures!!
.
.
.
.
.
.
.
.
[ATTACH]4952[/ATTACH]


Since it was still early in the evening, I started my 2nd prototype (on the reverse side of this first disaster) with all this new found experience and knowledge. Got it all the way through the painting stage and am VERY happy with the result so far. The etching came out MUCH BETTER, but still not perfect. I’ll post later today or tonight and show you the results.
.
.
.
Attachments
IMG_6308mod.jpg
IMG_6308mod.jpg (111.86 KiB) Viewed 7386 times
Mike
Sunny San Diego
osx-addict
Gold Member
Posts: 386
Joined: Thu Feb 28, 2008 1:56 pm
Location: Los Angeles, CA

Post by osx-addict »

Mike.. You are a man of MANY talents! I would not have the patience to do much of what you're doing.. The results are 100% awesome and you certainly have a vision of what can be done and nothing will stop you! Keep up the great work!
Rick
S/W of Los Angeles, CA
1983 Mark V model 510 (SN#140061)
User avatar
bucksaw
Gold Member
Posts: 282
Joined: Mon Jan 12, 2009 7:17 pm
Location: Boise, ID

Post by bucksaw »

I'm not sure if this would work for you, but I would have wrapped the glass with a cloth (like shirt fabric that is really flat) and wet it down with acetone and carefully wiped off the unwanted paint while it was still a little tacky. That is how I handle the speed dial, etc on the headstock. On some of the parts I use a q-tip to remove the unwanted paint in the hard to get at places.
Dave - Idaho
Greenie S#261612 - Mar 1954 / Greenie S#305336 - Oct 1955 / Gray S#SS1360 - ?

"Why do we drive on parkways and park on driveways?" :cool:
User avatar
mickyd
Platinum Member
Posts: 2999
Joined: Mon Feb 09, 2009 1:18 pm
Location: San Diego, CA
Contact:

Post by mickyd »

bucksaw wrote:I'm not sure if this would work for you, but I would have wrapped the glass with a cloth (like shirt fabric that is really flat) and wet it down with acetone and carefully wiped off the unwanted paint while it was still a little tacky. That is how I handle the speed dial, etc on the headstock. On some of the parts I use a q-tip to remove the unwanted paint in the hard to get at places.

Good idea bucksaw. Ill try that this weekend. Sanding was a Pain!
Mike
Sunny San Diego
User avatar
mickyd
Platinum Member
Posts: 2999
Joined: Mon Feb 09, 2009 1:18 pm
Location: San Diego, CA
Contact:

Post by mickyd »

It's getting better all the time.

This series of photos will show you what went into the making of the 2nd prototype of the ER nameplate. I'm narrowing down the variables. I figure it will take me one or two more tries to get one that "meets standard".
.
.
.
Here' what the Press-n-Peel (aka PNP) blue transfer sheet looks like after you iron it on and remove from the sheet stock. Where it is clear is where there was laser printer toner adhered to it that is now transfered onto the stock. The toner is what blocks the etching chemical from attacking the metal. You'll notice on the P and H that there is a black spot of toner that didn't stick to the sheet stock. You also see black around some of the small lettering and also where the circle around the copyright symbol isn't complete. This transfer step is the number one critical step in the whole process. If the entire transfer doesn't come off 100%, you have to touch up the image on the sheet stock.
.
[ATTACH]5005[/ATTACH]
.
.
.
Here's the brass sheet stock with the toner mask on it. If when you peel off the PNP there are areas where the toner remained on the PNP, they can get touched up with any kind of lacquer. In my case, I used my wife's nail polish (SSSSHHHHH!!) and a very fine paint brush. There was no way for me to accurately touch up the circle around the copyright symbol with the smallest brush I have so I left it. I knew I'd be making another one.
.
[ATTACH]5006[/ATTACH]
.
.
.
Here's after etching with 1/2 of the plate wiped off. You use fine steel wool under running water to remove the adhered toner. After you done here, it's off to the paint shop.
.
[ATTACH]5007[/ATTACH]
.
.
.
Finally, the painted part was sanded with the flat glass and sandpaper to remove the paint from the lettering. This is where it's a real pain. Not all the lettering cleans up at exactly the same time and you'll find yourself sanding through the background paint exposing the metal where you don't want to expose it. I did that again here but then crudely masked off all the lettering an shot 2 thin coats to cover the areas. The problem here is the paint is now up to the same level as the lettering. No biggie but that's not the way it should be. The lettering should be raised.
.
[ATTACH]5008[/ATTACH]
.
.
.
For my 3rd prototype (which hopefully may even be my final version), I am going to concentrate on the areas that are found to be most important, flatness of the plate, 100% transfer of the toner after ironing, and getting as much of the paint off the lettering before it dries (like bucksaw suggested) to reduce the amount of sanding that needs to be done. Don't think I'll do it today though. I have plenty of outdoor work to do to keep me busy.
Attachments
IMG_6310mod.JPG
IMG_6310mod.JPG (73.7 KiB) Viewed 7348 times
Img_6312mod.jpg
Img_6312mod.jpg (72.91 KiB) Viewed 7345 times
IMG_6316mod.JPG
IMG_6316mod.JPG (68.27 KiB) Viewed 7344 times
IMG_6324mod.JPG
IMG_6324mod.JPG (79.87 KiB) Viewed 7344 times
Mike
Sunny San Diego
User avatar
mickyd
Platinum Member
Posts: 2999
Joined: Mon Feb 09, 2009 1:18 pm
Location: San Diego, CA
Contact:

Post by mickyd »

Here's pics of my favorite process. I had to put the entire assembly of way tubes, tailstock, carriage, and baseplate swing arm into electrolysis tank since they were all frozen solid into one nasty homogeneous piece. Nothing would move.

This picture shows the piece of sheet metal on the bottom of the tank (anode). The arrow points to the threaded rod that stays up above the electrolyte solution and that's used to connect the positive lead of the battery charger to.

[ATTACH]5012[/ATTACH]
.
.
.
15 gallons of the electrolyte is added to the tank (1/2 cup baking soda per 5 gallons water and the soda was cooked at 300* for an hour in the oven turns it into washing soda and then just add straight tap water). This is the same batch I have been using for the past year for cast iron pans, Greenie parts, tools etc.). Make it once and it keeps forever. I have three 5 gallon paint buckets that I store it in. As water evaporate, just add more water. You never have to add more washing soda.

The red positive lead connects to the exposed threaded rod and the black negative lead is connected to a c-clamp that is tightened around one of the way tubes (after a localized wire brushing to bring expose clean metal). The assembly is held up off of the sheet metal with a couple of plastic food containers. The assembly CANNOT touch the sheet metal or else you'll short out your battery charger.

[ATTACH]5013[/ATTACH]
.
.
.
Here's the assembly has been in for about 3 hours. I left it in a total of 24 hours before removing it an rinsing it off.

[ATTACH]5014[/ATTACH]
.
.
.
All the rust on the tubes is gone. What was left on the tubes is the black crud that washes / brushes off with ease. I was able to remove the frozen components with the help of a rubber mallet to get them moved off of the position they were froze in. I wasn't able to remove them toward the tailstock side because the end of on of the tubes have somehow been slightly deformed and I wasn't able to file it down since it was so close to the tailstock holes. Looks like the previous owner may have taken a hammer to the tube......probably to try and unfreeze the tailstock.!!!! Hitting in the opposite direction, once the components hit the area where the rust was removed, they slide pretty freely.

The tubes are fairly pitted. We'll see what they come out looking like after I sand them. Now I have to work on a setup so that I can turn the tubes on my Mark 5 instead of having to use one of the various drill setupsthat have been used in the past. Plans are to use a roller setup similar to jpg's with a wooden mounting plate(so I don't have to drill into my Mark 5's tailstock.

Couple notes on the electrolysis.
  1. This electrolysis tank was setup on the bench of the ER. This is a better setup than I usedlast time in that I was able to siphon the liquid back into the buckets since the whole setup is up off the ground. Last time, I had to use a pitcher. (so I guess this make the setup revision B).
  2. Supposedly, electrolysis is a "line of sight" rust removal method. The area it cleans must be in the view of the anode sheet metal. It supposedly doesn't go around corners. For whatever reason, this didn't apply to the tubes. It cleaned the tops of the tubes even though there is no direct "line of sight" to the anode. Same thing happened on the Greenie. Don't understand why, just know it did
Attachments
IMG_6252mod.JPG
IMG_6252mod.JPG (51.65 KiB) Viewed 7419 times
Img_6283mod1.jpg
Img_6283mod1.jpg (73.97 KiB) Viewed 7417 times
Img_6284mod.jpg
Img_6284mod.jpg (44.87 KiB) Viewed 7413 times
Mike
Sunny San Diego
Post Reply