
Here's before and after photos of the jigsaw that came with the Greenie. Paint scheme remains the same with the Rustoleum Hammered Verde Green and Silver.
There were NO mechanical issues found. I replaced the bearing that was discussed a few posts ago but knowing what I do now, I really didn't need to. The original one had only a very slight feel to it that it was worn / dry but knowing the function now, I wouldn't have replaced it. $25 that could have gone to my ER10 resto project I started last night:( . That's story will come later!!!
.
.
[ATTACH]4794[/ATTACH]
.
.
[ATTACH]6060[/ATTACH]
.
.
.
.
[ATTACH]4796[/ATTACH]
.
.
[ATTACH]4802[/ATTACH]
.
.
.
.
Notice the color of the paint on the bottom of the worktable below. I didn't paint that yet is matches very close to the Hammered Verde Green.
[ATTACH]4798[/ATTACH]
This completes the entire Greenie restoration project. The only left to do before making sawdust is alignments AND total up the entire bill for this project from initial purchase through the jigsaw bearing. I kept good records in Microsoft Money so it should be as easy as hitting the print button. I think (know) it cost me more that I initially figured (couple hundred $$ in non recurring expenses for tools that I didn't have in my collection). I'll let you know the bottom line $$ with some breakdown of the details.
Restoration Progress On My 1955 Greenie
Moderators: HopefulSSer, admin
-
judaspre1982
- Platinum Member
- Posts: 1237
- Joined: Tue Jul 08, 2008 10:10 pm
=====================
Last edited by judaspre1982 on Thu May 18, 2017 6:21 pm, edited 1 time in total.

-
JPG

- Platinum Member
- Posts: 34642
- Joined: Wed Dec 10, 2008 7:42 pm
- Location: Lexington, Ky (TAMECAT territory)
NAY! Better!!!!fjimp wrote:Mike you really are given to fine work. Congratulations it looks like new. fjimp
╔═══╗
╟JPG ╢
╚═══╝
Goldie(Bought New SN 377425)/4" jointer/6" beltsander/12" planer/stripsander/bandsaw/powerstation /Scroll saw/Jig saw /Craftsman 10" ras/Craftsman 6" thicknessplaner/ Dayton10"tablesaw(restoredfromneighborstrashpile)/ Mark VII restoration in 'progress'/ 10E[/size](SN E3779) restoration in progress, a 510 on the back burner and a growing pile of items to be eventually returned to useful life. - aka Red Grange

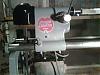
The coupler is spring loaded on the headstock side and will put pressure on the Jigsaw drive hub trying to force the jiqsaw shaft into the housing. I would believe the washers would wear over time and allow the jigsaw shaft to move inward putting pressure and wear on the plastic like block that converts rotary force into up & down force and possibly cracking/breaking that block. This bearing should be replaced if it feels defective, otherwise it can score the shaft and/or housing and oil seal.mickyd wrote:The "mystery" bearing jpg is referring to is the one mounted on the jigsaws drive shaft, directly outside the housing, facing the headstock. I had already ordered a replacement bearing prior to questioning what it was there for ($25 with shipping....ouch). I couldn't understand what the bearings function was since for one, it's a slip fit on the drive shaft and two, the outer diameter is just hanging out in space. See photo below.
[ATTACH]4763[/ATTACH]
FYI - This bearing is NOT shown in the jigsaw owner manuals exploded view or parts list. Instead, it shows a stack of 2 washers with a retaining ring (aka snap ring).
I ask Bill Mayo what the bearing was for and he said that it serves as a “thrust bearing”. If a force is applied to the drive shaft toward the jigsaw, the side of the bearing will contact the face of the jigsaw housing and allow the shaft to continue to rotate smoothly. I can see why they changed the design from two washers to a bearing for this reason BUT it would seem that washers may work just as well since with proper positioning of the headstock to jigsaw, the coupler should not cause the shaft to push in toward the housing. Maybe I’m wrong but I’ll find out when I actually use the thing. Washers are a tad cheaper than that bearing also!!!
I have available all jigsaw parts, bushings, seals and bearing. I am happy to answer any question anyone has about the jigsaw or Shopsmith equipment.
Bill Mayo bill.mayo@verizon.net
Shopsmith owner since 73. Sell, repair and rebuild Shopsmith, Total Shop & Wood Master headstocks, SPTs, attachments, accessories and parts. US Navy 1955-1975 (FTCS/E-8)
Shopsmith owner since 73. Sell, repair and rebuild Shopsmith, Total Shop & Wood Master headstocks, SPTs, attachments, accessories and parts. US Navy 1955-1975 (FTCS/E-8)
-
JPG
- Platinum Member
- Posts: 34642
- Joined: Wed Dec 10, 2008 7:42 pm
- Location: Lexington, Ky (TAMECAT territory)
billmayo wrote:The coupler is spring loaded on the headstock side and will put pressure on the Jigsaw drive hub trying to force the jiqsaw shaft into the housing. I would believe the washers would wear over time and allow the jigsaw shaft to move inward putting pressure and wear on the plastic like block that converts rotary force into up & down force and possibly cracking/breaking that block. This bearing should be replaced if it feels defective, otherwise it can score the shaft and/or housing and oil seal.
I have available all jigsaw parts, bushings, seals and bearing. I am happy to answer any question anyone has about the jigsaw or Shopsmith equipment.
Would not an actual thrust bearing be more suitable?
╔═══╗
╟JPG ╢
╚═══╝
Goldie(Bought New SN 377425)/4" jointer/6" beltsander/12" planer/stripsander/bandsaw/powerstation /Scroll saw/Jig saw /Craftsman 10" ras/Craftsman 6" thicknessplaner/ Dayton10"tablesaw(restoredfromneighborstrashpile)/ Mark VII restoration in 'progress'/ 10E[/size](SN E3779) restoration in progress, a 510 on the back burner and a growing pile of items to be eventually returned to useful life. - aka Red Grange
╟JPG ╢
╚═══╝
Goldie(Bought New SN 377425)/4" jointer/6" beltsander/12" planer/stripsander/bandsaw/powerstation /Scroll saw/Jig saw /Craftsman 10" ras/Craftsman 6" thicknessplaner/ Dayton10"tablesaw(restoredfromneighborstrashpile)/ Mark VII restoration in 'progress'/ 10E[/size](SN E3779) restoration in progress, a 510 on the back burner and a growing pile of items to be eventually returned to useful life. - aka Red Grange

Restoration Progress On My 1955 Greenie
Yes, however the bearing being used is a bearing used in other Shopsmith equipment and is many times cheaper than a thrust bearing which would require new specifications and ordering&supplier. Just got around to reading your comment.JPG40504 wrote:Would not an actual thrust bearing be more suitable?
Bill Mayo bill.mayo@verizon.net
Shopsmith owner since 73. Sell, repair and rebuild Shopsmith, Total Shop & Wood Master headstocks, SPTs, attachments, accessories and parts. US Navy 1955-1975 (FTCS/E-8)
Shopsmith owner since 73. Sell, repair and rebuild Shopsmith, Total Shop & Wood Master headstocks, SPTs, attachments, accessories and parts. US Navy 1955-1975 (FTCS/E-8)

-
nelsonlake81
- Gold Member
- Posts: 53
- Joined: Sat Jul 25, 2009 11:08 pm
- Location: Lake Holiday Sandwich IL