On another thread I shared some pics of the '54 "greenie" I picked up for free. The guy I got it from had tried to make it a functional unit but gave up and just wanted to get rid of it. It included an '82 1-1/8 hp poly-v headstock on it (single brg quill). I was told the original headstock was damaged beyond repair. It was pretty messed up but the motor did run. Anyway, with less than $ 60.00 invested so far, I now have the original headstock repaired, rewired, and running good. The newer headstock is a little rough on the outside but everything on it works well. Now I have a spare headstock for both of my "goldies" (One Gilmer and one poly-v). The next step will be a complete teardown, cleanup, and painting.
I am thinking converting the "greenie" into a mini unit mainly for a sharpening/sanding station. I am curious as to what the optimum bed length might be recommended for best usage from those who have done this.
Many thanks, John McCrossen
[attach]6139[/attach]
What I came home with
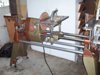
[attach]6137[/attach]
Repaired original headstock mounted on way tubes
[attach]6135[/attach]
Repaired headstock front side
[attach]6136[/attach]
Repaired headstock back with access hole added
'54 Greenie
Moderator: admin
-
johnmccrossen
- Gold Member
- Posts: 173
- Joined: Wed Feb 21, 2007 8:09 pm
- Location: Washington
'54 Greenie
- Attachments
-
- 100_0814.jpg (126.76 KiB) Viewed 11631 times
-
- 100_0815.jpg (130.61 KiB) Viewed 11627 times
-
- 100_0816.jpg (150.27 KiB) Viewed 11629 times
-
- 100_0817.jpg (172.44 KiB) Viewed 11322 times
-
- 100_0774.jpg (133.07 KiB) Viewed 11633 times
John McCrossen
Everett, Wa.
1954 Mk 5 SN 269454, 1955 Mk 5 SN 316013, 1960 Mk 5 SN 360792, 1962 Mk 5 SN 380102, Magna band saw, (2) jointers, (1) belt sander, (1) air compressor, (1) jig saw, (1) strip sander, (1) 20" scroll saw, DC 3300 dust collector, Sawsmith RAS, Craftsman table saw, 13" DeWalt planer, Triton 3 1/4 HP plunge router & table
-
judaspre1982
- Platinum Member
- Posts: 1237
- Joined: Tue Jul 08, 2008 10:10 pm
-
JPG

- Platinum Member
- Posts: 35600
- Joined: Wed Dec 10, 2008 7:42 pm
- Location: Lexington, Ky (TAMECAT territory)
Re length: If you cut the way tubes so one 'half' is 3/4" longer than the other half, you only need to cut TWO tubes. This gives you a short unit that does not have room for the carriage and table.(room yes, but limited usefulness) It could function very well as a sanding station(beltsander one end, strip sander or disc sander on the other)[or some other combination] The extension tables serve as a table for the disc sander(It CAN be used on either end). Or a handy spt storage station.
I believe the lower bench tubes are probably larger in diameter(1 7/8") than the way tubes(1 3/4"). If they ARE the same diameter(1 3/4), you can cut the bench tubes rather than the way tubes, thus giving an additional 3/8" length. If the tubes ARE different sizes, either cut both to the desired length or shim the way tubes(half) 1/16" when mounting in the bench tube 'sockets'.
P.S. The shims are NOT necessary IF you do not need to maintain the 'normal' ctr to ctr distance of the bench tubes.
PPS Could some one more familiar with the Gilmer drive speak to the apparent rearward position of the belt on the main shaft pulley?
╔═══╗
╟JPG ╢
╚═══╝
Goldie(Bought New SN 377425)/4" jointer/6" beltsander/12" planer/stripsander/bandsaw/powerstation /Scroll saw/Jig saw /Craftsman 10" ras/Craftsman 6" thicknessplaner/ Dayton10"tablesaw(restoredfromneighborstrashpile)/ Mark VII restoration in 'progress'/ 10E[/size](SN E3779) restoration in progress, a 510 on the back burner and a growing pile of items to be eventually returned to useful life. - aka Red Grange
-
JPG
- Platinum Member
- Posts: 35600
- Joined: Wed Dec 10, 2008 7:42 pm
- Location: Lexington, Ky (TAMECAT territory)
johnmccrossen wrote:On another thread I shared some pics of the '54 "greenie" I picked up for free. The guy I got it from had tried to make it a functional unit but gave up and just wanted to get rid of it. It included an '82 1-1/8 hp poly-v headstock on it (single brg quill). I was told the original headstock was damaged beyond repair. It was pretty messed up but the motor did run. Anyway, with less than $ 60.00 invested so far, I now have the original headstock repaired, rewired, and running good. The newer headstock is a little rough on the outside but everything on it works well. Now I have a spare headstock for both of my "goldies" (One Gilmer and one poly-v). The next step will be a complete teardown, cleanup, and painting.
I am thinking converting the "greenie" into a mini unit mainly for a sharpening/sanding station. I am curious as to what the optimum bed length might be recommended for best usage from those who have done this.
Many thanks, John McCrossen
[attach]6139[/attach]
What I came home with
[attach]6137[/attach]
Repaired original headstock mounted on way tubes
[attach]6135[/attach]
Repaired headstock front side
[attach]6136[/attach]
Repaired headstock back with access hole added
For those who have followed the previous posts re the protrusion of the quill lock sleeve, I call your attention to the second and third pix.
╔═══╗
╟JPG ╢
╚═══╝
Goldie(Bought New SN 377425)/4" jointer/6" beltsander/12" planer/stripsander/bandsaw/powerstation /Scroll saw/Jig saw /Craftsman 10" ras/Craftsman 6" thicknessplaner/ Dayton10"tablesaw(restoredfromneighborstrashpile)/ Mark VII restoration in 'progress'/ 10E[/size](SN E3779) restoration in progress, a 510 on the back burner and a growing pile of items to be eventually returned to useful life. - aka Red Grange
╟JPG ╢
╚═══╝
Goldie(Bought New SN 377425)/4" jointer/6" beltsander/12" planer/stripsander/bandsaw/powerstation /Scroll saw/Jig saw /Craftsman 10" ras/Craftsman 6" thicknessplaner/ Dayton10"tablesaw(restoredfromneighborstrashpile)/ Mark VII restoration in 'progress'/ 10E[/size](SN E3779) restoration in progress, a 510 on the back burner and a growing pile of items to be eventually returned to useful life. - aka Red Grange
-
judaspre1982
- Platinum Member
- Posts: 1237
- Joined: Tue Jul 08, 2008 10:10 pm
Drip/Rust stains on inside of legs
===================
Last edited by judaspre1982 on Mon May 15, 2017 4:50 pm, edited 1 time in total.
-
JPG
- Platinum Member
- Posts: 35600
- Joined: Wed Dec 10, 2008 7:42 pm
- Location: Lexington, Ky (TAMECAT territory)
Since you HAVE opened that can again, did we ever reach a GOOD conclusion re cause????judaspre1982 wrote:Also notice in pic #2 the rust/ drip stains on the bench legs. Those rust spots seem to be on a lot of the Greenies http://www.shopsmith.net/forums/showpos ... stcount=14---- Dave
╔═══╗
╟JPG ╢
╚═══╝
Goldie(Bought New SN 377425)/4" jointer/6" beltsander/12" planer/stripsander/bandsaw/powerstation /Scroll saw/Jig saw /Craftsman 10" ras/Craftsman 6" thicknessplaner/ Dayton10"tablesaw(restoredfromneighborstrashpile)/ Mark VII restoration in 'progress'/ 10E[/size](SN E3779) restoration in progress, a 510 on the back burner and a growing pile of items to be eventually returned to useful life. - aka Red Grange
╟JPG ╢
╚═══╝
Goldie(Bought New SN 377425)/4" jointer/6" beltsander/12" planer/stripsander/bandsaw/powerstation /Scroll saw/Jig saw /Craftsman 10" ras/Craftsman 6" thicknessplaner/ Dayton10"tablesaw(restoredfromneighborstrashpile)/ Mark VII restoration in 'progress'/ 10E[/size](SN E3779) restoration in progress, a 510 on the back burner and a growing pile of items to be eventually returned to useful life. - aka Red Grange

'54 Greenie
This belt position will fray and damage the Gilmer belt as shown in the picture. I investigated the reason and found that the 2 clips holding the eccentric bushing sets the idler shaft too far back in the headstock. What I first did to solve this problem was to trash the clips, drill and tap a hole above the back of the eccentric bushing (with a jig) just like the later headstocks. I use a screw and body washer to keep the eccentric bushing and idler shaft inside the headstock. I set the eccentric bushing againest the body washer and move the idler shaft with the Gilmer belt forward while turning the quill shaft the same direction (important) as the motor does. I go for about 1/8" gap between the Gilmer belt and the drive sleeve pulley shoulder. Due to manufacting tolerances of these sand cast housings, the idler shaft bearing can end up againest the body washer to as much as 1/4" inward from the washer. I tighten the eccentric bushing set screw (not too tight) and adjust the Gilmer belt of 1/8"-1/4" deflection.JPG40504 wrote: Could some one more familiar with the Gilmer drive speak to the apparent rearward position of the belt on the main shaft pulley?
If there is no set screw in the eccentric bushing, I discard it and use a split eccentric bushing with a set screw (latest ones I got from Shopsmith). No screw hole, screw or body washer is need when using the split eccentric bushing. Just slide the eccentric bushing and idler shaft inward until the belt is operating away from the drive sleeve shoulder while turning the quill shaft or operating the motor. Just tighten the casing bolt below the eccentric bushing will hold it.
I operate the headstock for some time to may sure the Gilmer belt is not touching or creaping toward the drive sleeve pulley shoulder.
Don't forget, there is a clutch inside most Gilmer Drive Sleeve assemblys. I test/adjust the torque to 10-20 ft. pds. for slippage of the clutch. This clutch should save the Gilmer belt from loosing its teeth if the quill shaft was to jam. However, a really old Gilmer belt may still need replacing if a jam occurs. All Gilmer Drive Shopsmith owners should keep a spare Gilmer belt.
Bill Mayo bill.mayo@verizon.net
Shopsmith owner since 73. Sell, repair and rebuild Shopsmith, Total Shop & Wood Master headstocks, SPTs, attachments, accessories and parts. US Navy 1955-1975 (FTCS/E-8)
Shopsmith owner since 73. Sell, repair and rebuild Shopsmith, Total Shop & Wood Master headstocks, SPTs, attachments, accessories and parts. US Navy 1955-1975 (FTCS/E-8)
-
judaspre1982
- Platinum Member
- Posts: 1237
- Joined: Tue Jul 08, 2008 10:10 pm
========================
Last edited by judaspre1982 on Mon May 15, 2017 4:50 pm, edited 1 time in total.
-
robinson46176

- Platinum Member
- Posts: 4182
- Joined: Mon Mar 09, 2009 9:00 pm
- Location: Central Indiana (Shelbyville)
judaspre1982 wrote:No, it is still a mystery----Dave
 ----Dave
I have a batch of those among some I bought... I always attributed it to condensation from temperature changes in the shop. I have walked into my farm shop many times in the spring and have had streams of water running down most of the metal surfaces because they were still cold from the night and the shop would warm up suddenly. Sometimes the concrete part of the floor will look like it was hosed when the temperature warmed quickly.
Oh, yeah... I just remembered too, I had very similar marks on my stand alone jointer and my Foley Belsaw planer that turned out to be due to a couple of competing tom cats marking them when they got into the shop. Fixing the toms fixed that particular problem.
--
farmer
Francis Robinson
I did not equip with Shopsmiths in spite of the setups but because of them.
1 1988 - Mark V 510 (bought new), 4 Poly vee 1 1/8th HP Mark V's, Mark VII, 1 Mark V Mini, 1 Frankensmith, 1 10-ER, 1 Mark V Push-me-Pull-me Drillpress, SS bandsaw, belt sander, jointer, jigsaw, shaper attach, mortising attach, TS-3650 Rigid tablesaw, RAS, 6" long bed jointer, Foley/Belsaw Planer/molder/ripsaw, 1" sander, oscillating spindle/belt sander, Scroll saw, Woodmizer sawmill
-
JPG
- Platinum Member
- Posts: 35600
- Joined: Wed Dec 10, 2008 7:42 pm
- Location: Lexington, Ky (TAMECAT territory)
I had previously made reference to canines as a 'cause'! It may be better than I originally thought!:Drobinson46176 wrote:I have a batch of those among some I bought... I always attributed it to condensation from temperature changes in the shop. I have walked into my farm shop many times in the spring and have had streams of water running down most of the metal surfaces because they were still cold from the night and the shop would warm up suddenly. Sometimes the concrete part of the floor will look like it was hosed when the temperature warmed quickly.
Oh, yeah... I just remembered too, I had very similar marks on my stand alone jointer and my Foley Belsaw planer that turned out to be due to a couple of competing tom cats marking them when they got into the shop. Fixing the toms fixed that particular problem.
╔═══╗
╟JPG ╢
╚═══╝
Goldie(Bought New SN 377425)/4" jointer/6" beltsander/12" planer/stripsander/bandsaw/powerstation /Scroll saw/Jig saw /Craftsman 10" ras/Craftsman 6" thicknessplaner/ Dayton10"tablesaw(restoredfromneighborstrashpile)/ Mark VII restoration in 'progress'/ 10E[/size](SN E3779) restoration in progress, a 510 on the back burner and a growing pile of items to be eventually returned to useful life. - aka Red Grange
╟JPG ╢
╚═══╝
Goldie(Bought New SN 377425)/4" jointer/6" beltsander/12" planer/stripsander/bandsaw/powerstation /Scroll saw/Jig saw /Craftsman 10" ras/Craftsman 6" thicknessplaner/ Dayton10"tablesaw(restoredfromneighborstrashpile)/ Mark VII restoration in 'progress'/ 10E[/size](SN E3779) restoration in progress, a 510 on the back burner and a growing pile of items to be eventually returned to useful life. - aka Red Grange