My top is 3/4 MDF laminated on both sides with 1/8" PVC (i think) coating on one side. The stuff used for cabinet backs in some places.
RE your top design: Why not simply use a piano hinge on one side? Or, as someone suggested, use rare earth magnets and shim with metal shims.
A two piece top will be a bear to get aligned with the drum, I would think.
How would you do this?
Moderator: admin
Gene,
I have 6 5'x9' sheets of the 3/4" MDF laminated on both sides. When I worked at Lowes it was left over from a reset and was going to be thrown away. I was considering using that for the box and top, but I was concerned about weight.
I think if I do make it I will go with a one piece design with a piano hinge on one side.
Since the box rests on the main table it could be slid forward and back to align the drum from side to side in the slot. When the drum is centered the box could be clamped to the table. The drum could be centered lengthwise in the slot by using the table carriage.
Sincerely,
Ron
>>>
The 1/2 " of static adjustability could be increased by relocating the hanger bolts to the dust rails or the external stability rails where the guide holes for the hanger bolt tops aren't limited to the 3/4 in thickness of the top.
The way tubes and ?1 3/4" ? diameter semicircles in the "end" panels would orient the case consistently and oncenter if the case end panels are cut accurately and held in place by tightening a case hold down (1 x 2 ) under the Way Tubes.
Excellent suggestion: Could use Hanger bolts into case edge and Burrs on upper portion of the hanger bolts to provide about 1/2 inch of static adjustability and dynamic adjustability from the length of hanger bolt lengths ( 1 1/2 " to 3"). Slot in top could be aligned once, leveled occasionally. Top aligns on drop in and latch down if magnetic hold is insufficient. The videos don't show a hinged top getting in the way and a lot of the sandpaper changes occur without tipping the top up. A removable top is suggested to decrease the weight of the components and increase accessibility.pkni wrote:My top is 3/4 MDF laminated on both sides with 1/8" PVC (i >>>think) coating on one side. The stuff used for cabinet backs in some >>>places.
GOOD Choice
>>>RE your top design: Why not simply use a piano hinge on one side? Or, as >>>someone suggested, use rare earth magnets and shim with metal shims.
>>>A two piece top will be a bear to get aligned with the drum, I would think.
The 1/2 " of static adjustability could be increased by relocating the hanger bolts to the dust rails or the external stability rails where the guide holes for the hanger bolt tops aren't limited to the 3/4 in thickness of the top.
The way tubes and ?1 3/4" ? diameter semicircles in the "end" panels would orient the case consistently and oncenter if the case end panels are cut accurately and held in place by tightening a case hold down (1 x 2 ) under the Way Tubes.
MK V 520; MK V 510 w/PP DIY Upgrade; MK 5 500; Jointer; Bandsaw; Sliding Table; Conical Sanding Disk; Sharpening Guide, Lathe Duplicator, Jigsaw, Scrollsaw, Beltsander, Ring Master, Biscuit Joiner.
(I posted this exact same post on another thread - but this thread my be more relative)
ALrighty Guys!! I'm reviving a couple of these V-Drum/Sandflee retrofits for the SS threads!!!
Here's what I have not seen yet - someone powering the sander DIRECTLY (not using the link belt) from the SS head (maybe using the plastic coupler?)
I wanted to find some ideas but just haven't seen anyone doing it! Hello? Easy project with great returns. We have this great variable speed motor - seems like this machine is a great sander so far with my Conical disk! haha
you know how the planer is connected to the SS headstock? Well, why not this sander idea???
I'm going to keep looking - feel free to redirect me. If I end up building this thing, I'll post my plans and pix.
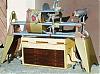
I did see your setup CuriousGeorge... but don't understand why you didn't just build it to rest on the Tubes, like the planer does. I'm even thinking of using the underside holders from the planer to hold my box in place!
One thing that may be an issue for me is that the coupler takes another 6 or so inches off my overall length. I want to make a 30" but will probably end up having the 36" rod I purchased sticking out the end. I think I will build a MOP to go on that end... or something. I'm using separate bearings, though, not the lathe centers.
ALrighty Guys!! I'm reviving a couple of these V-Drum/Sandflee retrofits for the SS threads!!!
Here's what I have not seen yet - someone powering the sander DIRECTLY (not using the link belt) from the SS head (maybe using the plastic coupler?)
I wanted to find some ideas but just haven't seen anyone doing it! Hello? Easy project with great returns. We have this great variable speed motor - seems like this machine is a great sander so far with my Conical disk! haha
you know how the planer is connected to the SS headstock? Well, why not this sander idea???
I'm going to keep looking - feel free to redirect me. If I end up building this thing, I'll post my plans and pix.
I did see your setup CuriousGeorge... but don't understand why you didn't just build it to rest on the Tubes, like the planer does. I'm even thinking of using the underside holders from the planer to hold my box in place!
One thing that may be an issue for me is that the coupler takes another 6 or so inches off my overall length. I want to make a 30" but will probably end up having the 36" rod I purchased sticking out the end. I think I will build a MOP to go on that end... or something. I'm using separate bearings, though, not the lathe centers.
-
curiousgeorge

- Platinum Member
- Posts: 880
- Joined: Tue Feb 27, 2007 1:00 am
- Location: Fort Worth, Texas
well - I got my bearings and 36" keyed shaft yesterday!! So I started laying my design out.
I want to get as much length in the drum as possible, so it's actually hanging over one end. If a little sticks out, I'm OK with that - I'll just put a Sanding Mop on the exposed end!
Also, I took the Plastic Tool connecter thing off the bandsaw and will have it on the shaft. One more step, oh well. I also change the Head connector over to the other side so the SS controls are at my left hand the the drum will turn towards me...
I'm using all stuff that I just have around the shop... bolts, knobs, etc. But so far, the 2 bearings with grease zerks and the 36" shaft were $40 (that includes S&H) - I just ordered the sandpaper yesterday - got 2 rolls (80 and 180grit) - about $35 (Klingspor) - all the lumber I had... actually I'm going to use that pine board that I got with the SHOPSMITH years ago and never used!!! It's a little warped, but that won't matter. I'm also going to use a bunch of cut-offs from other projects. I'll proly get the counter top part from IKEA and their "As-is" section.
I already have a piano hinge (found about 5 nice ones at a garage sale for a couple bucks!)
I need to buy the Velcro® backing - about $10-12... I might have some somewhere leftover from a project on my boat...
So I'm thinking that if I were to have to buy the hardware (bolts, washers, screws, hinge, etc) and lumber and top, the items purchase above... I would probably spend about $125 - $140...
SO - buying it already to go, with pilot holes and all the parts in one nice box for the price on Stockroom Supply (24" = $309 and 30" = $339 plus S&H which I think I saw is free if you spend over $200!) - might be a good deal - since I've put considerable time, planning, searching into it. Granted, my completed box will be one of a kind and fit on my SS... I do have an old A/C motor laying around if I wanted to make it standalone. It's RPM's are only 1075 - I wonder if that's enough.
Hmmm - The box does NOT come with it - it comes with plans:
"The Works includes the drum of choice, bearings, 2 - 10yd rolls of sandpaper, 2 balanced pulleys, Linkbelt, and a plan to build the box. Sizes of bearings, pulleys, and length of linkbelt will vary according to the size of drum ordered."
So if I were to buy the pulleys and linkbelt, too, might wanna add those costs as well. Harbor Freight has the link belt $23:
http://www.harborfreight.com/catalogsea ... =link+belt
Grizzly has the pully (2 x $7.95 on Amazon)
http://www.amazon.com/Grizzly-G5425-Sin ... B0000DD3FN
These were quick Google searches, so "results may vary!"
Still, looks like you keep a personal box build to about $200 plus a motor.
Anyway - I plan to try and make plans for SS owners if they want. I'll include my price lists... that's IF I EVER get time to do it after I build this thing!