upgrades
Moderators: HopefulSSer, admin


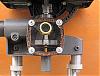
While my live center comes in the mail and the tool post grinder attachment gets painted I thought I would share this recent addition. The piece of steel in the chuck is just for mock up to take the pic. This is a combo steady rest/follower rest. I borrowed ideas from both concepts. Again, my focus is on soft metals.
[ATTACH]11509[/ATTACH]
[ATTACH]11510[/ATTACH]
[ATTACH]11511[/ATTACH]
This makes the work rock solid when turning. I can't wait to combine this with a metal working live center. The spindle shows very little deflection even this far out of the chuck. Of course, I've been able to turn wood perfectly. I simply clamp a piece of steel stock mounted perpendicular and use it as a tool rest.
It's becomming more fun to see what I can do with this machine than it is to have an actual project right now. My garage is freezing.
- Attachments
-
- P1010171.JPG (119.67 KiB) Viewed 5507 times
-
- P1010172.JPG (118.98 KiB) Viewed 5302 times
-
- P1010173.JPG (115.64 KiB) Viewed 5312 times
Here is the tool post grinder attachment I mentioned. The cross slide needs to move back about 1 1/2 inches to be able to drop the grinder in on center and to align the steady rest.
[ATTACH]11584[/ATTACH]
I can use the cross slide to sneak up on any size work.
[ATTACH]11585[/ATTACH]
[ATTACH]11586[/ATTACH]
The grinder is set to spin against the rotation of the shopsmith. I can, however, switch sides so the grinding wheel spins with the rotation. I am using a morse taper 2 extension in the tailstock to allow the cross slide with the tool holder to reach the end of the piece.
- Attachments
-
- P1010170.JPG (120.87 KiB) Viewed 5323 times
-
- P1010171.JPG (113.98 KiB) Viewed 5249 times
-
- P1010172.JPG (119.41 KiB) Viewed 5295 times
Most recent light addition. The light was a $9 ebay find. The idea is straight out of PTWFE. I believe the 1980's edition. Should be within the first few pages.
[ATTACH]11733[/ATTACH]
[ATTACH]11734[/ATTACH]
[ATTACH]11735[/ATTACH]
The blocks are 2 3/4 inch laminated pieces. Obviously each block has wedges removed from the piece for the way tubes. One bolt holds them in place. A 15/32 hole holds the light post in a friction fit. The blocks can be moved to the other side of the headstock to light the bandsaw etc when in use. Finally a light that works exactly like I want it to.
- Attachments
-
- P1010171.JPG (115.2 KiB) Viewed 5166 times
-
- P1010172.JPG (110.17 KiB) Viewed 5149 times
-
- P1010175.JPG (105.6 KiB) Viewed 5181 times
-
terrydowning

- Platinum Member
- Posts: 1678
- Joined: Mon Jul 19, 2010 3:26 pm
- Location: Windsor, CO
I enjoyed seeing your mods. Thanks for posting.
You might like some of mine:
EERF sanding machine http://www.shopsmith.net/forums/showthread.htm?t=5468
Window on jigsaw http://www.shopsmith.net/forums/showthread.htm?t=5273
Drill sharpener http://www.shopsmith.net/forums/showthread.htm?t=5658
Aux. power unit. http://www.shopsmith.net/forums/showthread.htm?t=6453
Peter
a 510,a Mini, dedicated SS drillpress, SS spt's, home made SS belt grinder, SS piston air system, Southbend 10k lathe, mill/drill, Taig
a 510,a Mini, dedicated SS drillpress, SS spt's, home made SS belt grinder, SS piston air system, Southbend 10k lathe, mill/drill, Taig
Here is a followup to using the table in drill press mode. I got the xy slide which I use in lathe position but the goal was to be able to mount it to the table (hence the cast iron table and more weight) to be used for light milling. I'm still talkin light metal but heck, you never know. I just had a need to use the SS in this position with the sanding disks and, of course, when you apply downward spindle pressure the table flexes. So, here's my fix.
Table at right angle to way tubes
[ATTACH]13420[/ATTACH]
Centered a pipe flange to the spindle. Now here I did attempt to get a couple spot welds to hold it in place. But, they cracked (not surprised) so I moved straight to the bolts.
[ATTACH]13421[/ATTACH]
[ATTACH]13422[/ATTACH]
Flange mounted and shimmed with folded foil.
[ATTACH]13423[/ATTACH]
- Attachments
-
- 1.JPG (53.24 KiB) Viewed 5013 times
-
- 2.JPG (55.46 KiB) Viewed 5011 times
-
- 3.JPG (46.18 KiB) Viewed 5008 times
-
- 4.JPG (45.93 KiB) Viewed 5011 times
Here is where I hope to be with the xy when it's mounted. Just checking for any deflection.
[ATTACH]13424[/ATTACH]
So how I seem to be able to make this work repeatably is to have the unit in lathe position, move table towards headstock and tilt table to drill press position. Insert 3rd leg into flange and wedge table into position. Raise the until to drill press (table should be high). Unwedge table while holding it and slowly drop table until leg touches ground. Other guys on here use a couple other methods, boards etc. But whatever method you use it does take all of the deflection out of the table. Now on to mounting the cross slide.
- Attachments
-
- 5.JPG (52.73 KiB) Viewed 5065 times
I was just asked about the Steady/Follower rest. I use the term interchangably since it follows close enough to being right behind the cutter.
Here are the specs:
[ATTACH]13454[/ATTACH]
[ATTACH]13455[/ATTACH]
[ATTACH]13456[/ATTACH]
Here are the specs:
[ATTACH]13454[/ATTACH]
[ATTACH]13455[/ATTACH]
[ATTACH]13456[/ATTACH]
- Attachments
-
- p1010276.JPG (42.06 KiB) Viewed 4975 times
-
- p1010278.JPG (38.87 KiB) Viewed 4965 times
-
- p1010281.JPG (48.04 KiB) Viewed 4969 times