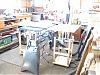
Forgive the mess. These are photos of my basic unit with extra carriage and table. Also shown is the Overarm Pin Router. For the OPR, I have ordered another table from Jessem like the cluttered one on the right. 1" solid phenolic and plate opening to accept my RouterLift FX with 890(2 1/4hp)VSS series PC. I will install two "T" tracks on the bottom on 18 3/4" centers and it will slide on and adjust just like the SS except flat as can be and designed to stay flat with router and lift assembly left in all of the time. Center plates are in std. template(PC), solid and 2 other diameter holes. The Upper router in the OPR is a PC 690VSR, 1 3/4 hp. The FX in the regular table just lifts out and drops right into the new table.
Actually, the main reason I am posting is to show what I consider a requirement for safety. These switches are around $30 from Rockler- I can hit either one with my knee or easily slap with my hand. On the Mark V I just drumsanded a nice piece of oak and epoxied to the headstock. I made sure I did not cover any fasteners and Speed Control is still easy to adjust. On the Jessem to the right, there is a slam bar switch on the right side- it has served well but it may get the Stopsign switch as well. Comments welcome.mt( i have to add photos as edit-sorr[img][IMG]http://i85.photobucket.com/albums/k65/e ... 0001-6.jpg[/img][/IMG]y.[img][IMG]http://i85.photobucket.com/albums/k65/e ... 0003-5.jpg[/img][/IMG][img][IMG]http://i85.photobucket.com/albums/k65/e ... 0004-7.jpg[/img][/IMG]
[img][IMG]http://i85.photobucket.com/albums/k65/e ... 0006-6.jpg[/img]
My Basic Set-up And Safety Switch
Moderator: admin
-
chiroindixon
- Gold Member
- Posts: 246
- Joined: Thu Jul 20, 2006 1:42 pm
- Location: QCA Iowa
Try this instead
I stole an idea from David Marks taking the same switch and mounting it with a "kick bar". Hands stay on work and I do not have to fumble to hit that switch, which may be covered by workpiece. I'm like you, safety is an issue. Using a dust collector floor switch ain't smart.
Go to the "Shopsmith safety switch" thread here, or on ssug.org. Both sites have photos, on ssug.org site, hit the "top rated". Both pictures will show up.
BTW...where are you in Iowa? I'm near the Quad Cities...
Doc
Go to the "Shopsmith safety switch" thread here, or on ssug.org. Both sites have photos, on ssug.org site, hit the "top rated". Both pictures will show up.
BTW...where are you in Iowa? I'm near the Quad Cities...
Doc
mtobey
I am intrigued with your addition of the Jessem table to your stand alone OPR. I have a similar unit and would like to change out the Shopsmith table with something better. (I am not too impressed with their proprietary router plate or particle board center.) I have a few questions regarding your adaptation experience:
Did you attach the t-track rails from the old table to the underside of the Jessem table to attach it to the OPR stand? If not, how did you do this?
What are the dimensions of your Jessem table? Was it custom made to the same size as the Shopsmith one? Did you have a problem centering the overhead router arm with the center of the router plate?
I also surmised from looking at your pictures that you have a table carriage mounted on each side of your headstock on your Mark V. Would you care to elaborate on the advantages you have experienced with this modification?
Thank you for your input.
Sarge
-
dusty

- Platinum Member
- Posts: 21530
- Joined: Wed Nov 22, 2006 6:52 am
- Location: Tucson (Wildcat Country), Arizona
My Basic Set-up And Safety Switch
mtobey
I believe your incorporation of a safety switch is a very good idea. Maybe a future version of the 520 will incorporate this feature. I certainly believe it is warranted.
Do you have it wired so that the standard switch also works or are they in series (ie both switches must be on to work; either switch will cut it off).
I share psargeant's curiousity about dual main carriages. If I understand, you have a carriage on either side of the headstock (I presume each with a main table).
Obviously, a lot of table space, both adjustable, both tilt, both accept all fences and the miter gauge. But why.
What does this configuration allow you to do that can't be done with a standard configuration?
What does it prevent you from doing, if anything?
Do you bother to align the auxilliary table to the main table?
Can you still go to the drill press mode? I suspect you remove the auxilliary table to reduce weight.
Do you set-up in the lathe mode often? I suspect not.
A couple pictures would be appreciated.
"Making Sawdust Safely"
Dusty
Sent from my Dell XPS using Firefox.
Dusty
Sent from my Dell XPS using Firefox.
Rockler Safety Switch
This weekend I dropped into my local Rockler store and looked at the safety switch shown in mtobey's photos. It it looks like a great idea espcially when you have a cross cutting sled in operation - it's really difficult to reach the switch.
I didn't purchase it because it's rated for 15 amp and I'm running my SS on a 20 amp dedicated circuit. Does anyone, with an electrical background, know if this would be a problem?
Berry
I didn't purchase it because it's rated for 15 amp and I'm running my SS on a 20 amp dedicated circuit. Does anyone, with an electrical background, know if this would be a problem?
Berry
-
dusty
- Platinum Member
- Posts: 21530
- Joined: Wed Nov 22, 2006 6:52 am
- Location: Tucson (Wildcat Country), Arizona
Circuit Overload Protection
berry, the 15A circuit breaker from Rockler would be fine. Being rated at 5 amps less than your service line (at 20 amps) does not pose a hazard of any sort because your dedicated line is for a load that is rated at 15 amps.
I have operated on a dedicated 15 amp circuit for years. I very, very seldom have to reset the circuit breaker. If I bind the blade or find myself in a very difficult cut (wet wood) the breaker is likely to trip. I try to avoid those circumstances. Even a 20a circuit is likely to trip under those suggested conditions.
The Rockler style breaker is a good idea. I would not be surprised to see it incorporated into the Shopsmith as a standard.
"Making Sawdust Safely"
Dusty
Sent from my Dell XPS using Firefox.
Dusty
Sent from my Dell XPS using Firefox.
[img][IMG]http://i85.photobucket.com/albums/k65/e ... 0004-8.jpg[/img][/IMG]A rookie like me should not be giving advice to you SS vets. I'll answer questions, though.
First the Jessem RT and mounting. Jessems are solid phenolic. They just do not warp, period( don't know about the tropics). The Jessem plate is 9+" x 11+ ", is also phenolic and stays flat even with a lift and router left in it all of the time. I epoxied the standard "T" female miter receivers to the bottom of the RT on 18 3/4" centers( in my opinion routing them into the bottom would impact the stability of the table). I then used 3" long sliders and a 3/8" spacer to raise the table above the capscrew on the OPR mounting bracket for the tube at the rear. I use jig knobs to tighten and loosen and with the slots on the big grey "U" channel and with the sliders I can easily line up the centers of the upper router bit and , in my case, the second big router underneath. I will post pics. So, the pin can be above or below. A Jessem table is a bit less than $200- around $240 with plate. Note that the top of the table has a standard 3/4" "T" slot-- mine is cut undersized and I am working with Jessem to exchange. The oddball miter slot dimensions of the SS drive me nuts. There are so many great accessories out there that would take hack job mods to make them work. I will likely have a friend mill mine out to relative industry standard. The SS accessory bar at $18+ wiggles anyway and is a waste of money.It has no provision for expansion. This issue is like a big wart on the end of the nose of a lovely woman. With the HD materials and overall precision of a SS, it is just a shame.
Two tables and carriages. The Strip Sander and the headstock won't connect with the leftside carriage. For sharpening which is my reason for buying one, the Strip unit goes on the right side anyway to rotate away. Jointer and belt sander drives connect fine. As for why two tables- more support never hurts and I have two of the clamp on 7" extensions as well to give more support front to back as well( at the least, measuring and marking tools and my Diet Coke or coffee are close at hand). I have one of the upgrade rip fences and will be ordering a second one- and an Incra Miter Express will, I hope, be here tomorrow. I am a control freak, I guess. The wood and metal planes I am making won't tolerate much more than .002 - any more and the gap is noticeable. I use the table saw like a jointer sometimes. I have a BB 3/4" ply
sacrificial fence for the rip fence and a Freud Glue-Line Rip blade is buried in the sub fence. With the quill I can make .002 cuts to fit the infill wood into the brass plane bodies with no visible gap.
I have three SS miter gauges with clamps on each. I have already done a few crosscut jigs that bolt up to the gauges, and many more will come. The Incra unit (Express)will use the Incra V27 sitting next to me as I type. My tablesaw has an Incra 2000. Incra stuff is consistently precise-money well spent for a company that is innovative and has high standards for tolerances.
A year ago one of my former law partners who has done woodworking for 40 years lopped off all but a bit of pinkie and thumb on his left hand.When I was building and driving dirt track stocks, midgets and sprints, I never compromised on a kill switch- you should not ever, ever have to wave your hand around trying to find the switch. Both switches have to be on and like reible, I shut both when adding or removing anything that can rotate a sharp implement. I can easily reach the OPR Stopsign with my left knee and could do the same on the SS if I had to.I am left-handed but, of course, have to function with right handed tool designs. Because of that, if I get really stupid, my left hand is unlikely to be mauled( I have always grinned at the thought of left-handed bait casting fishing reels. The inventor was a lefty or dyslexic or had a cruel sense of humor because they are left-handed- older righties were taught to cast and swap hands to crank-ha,ha,ha!-- my folks made me do that with tableware, but I'll be damned if I'm going to do that when I'm fishin'.)
Well, I think that covers it- I have to finalize and then add pics by edit.MT[img][IMG]http://i85.photobucket.com/albums/k65/e ... 0005-9.jpg[/img][/IMG][img][IMG]http://i85.photobucket.com/albums/k65/e ... 0003-6.jpg[/img][/IMG][img][IMG]http://i85.photobucket.com/albums/k65/e ... 0002-8.jpg[/img][/IMG]
1983 Mark V- beltsander, jigsaw, Stripsander,jointer, bandsaw-double carriage and tables with molders and drums, Over Arm Pin Routers(Freestanding x 2)Second Mark V.
-
foxtrapper
- Gold Member
- Posts: 439
- Joined: Fri Feb 16, 2007 10:05 am
I've seen a very simple and effective emergency off switch modification. It was nothing more than a stout piece of plexiglass about the size of a cigarette pack mounted via a hinge over the standard switch.
You reached under the plexiglass to flip the switch on. You merely bopped the plexiglass to turn the switch off.
I'll try and get a picture of it next week.
You reached under the plexiglass to flip the switch on. You merely bopped the plexiglass to turn the switch off.
I'll try and get a picture of it next week.