[quote="keakap"]can I guess?
laminate a turning block, say 4" sq.]
I be waiting for 'how it be used', not 'how it was made'!:rolleyes:
He done did that!;)
Getting Accustomed to the Table Saw
Moderators: HopefulSSer, admin
-
JPG

- Platinum Member
- Posts: 34643
- Joined: Wed Dec 10, 2008 7:42 pm
- Location: Lexington, Ky (TAMECAT territory)
╔═══╗
╟JPG ╢
╚═══╝
Goldie(Bought New SN 377425)/4" jointer/6" beltsander/12" planer/stripsander/bandsaw/powerstation /Scroll saw/Jig saw /Craftsman 10" ras/Craftsman 6" thicknessplaner/ Dayton10"tablesaw(restoredfromneighborstrashpile)/ Mark VII restoration in 'progress'/ 10E[/size](SN E3779) restoration in progress, a 510 on the back burner and a growing pile of items to be eventually returned to useful life. - aka Red Grange
Hi Underdog,
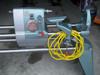
Here are some pics to show what I meant by spacer block and to show how I use the gauge to set a cut up too. I'm sorry that I wasn't clear with my earlier post.
[ATTACH]12597[/ATTACH]
To measure for my cut I'll have the spacer set up by the blade so I can measure to it.
[ATTACH]12598[/ATTACH]
After the measurement is made I'll slide the spacer toward the front of the fence to allow clearance before the blade contacts the wood. Naturally I'll have to use the miter gauge to make the cut.
Setting up a cut with the gauge:
[ATTACH]12599[/ATTACH]
The block of wood that straddles the adjustable bar is used to align the blade to. I extend the bar past the block the desired distance and that's the length of the cut. I'll slide the fence with the spacer to kiss the end of the bar and I'm ready to cut.
Another benefit to the gauge is that if I need to move the fence for any reason, it's easy to place the fence in the same spot.
I also use the gauge to align the fence (or check alignment) and to check that the table is square to the blade.
- Attachments
-
- DSC04918.JPG (217.63 KiB) Viewed 2474 times
-
- DSC04919.JPG (224.61 KiB) Viewed 2480 times
-
- DSC04920.JPG (236.81 KiB) Viewed 2476 times
-
tomsalwasser

- Platinum Member
- Posts: 928
- Joined: Mon Feb 08, 2010 2:09 pm
-
tomsalwasser
- Platinum Member
- Posts: 928
- Joined: Mon Feb 08, 2010 2:09 pm
I'd be OK with that! Actually I've been looking around for a local source, the only suitable 1 inch od tubing I could find is at West Marine, but it's Stainless Steel and very pricey. They use it for railings on large sailboats and yachts. If I don't find any I will order 5" from SS, but I actually would like 6' tubes for what I have in mindkeakap wrote:If I worked for Shopsmith I would immediately send tom a set of 5' connector tubes to see what he could do with 'em!
Best,
Tom

Additional note for those that used the rip fence to gauge a cross cut - and even if you now use a fence separation block.
The only reason to incorporate the rip fence into a cross cut operation, with a separation block is if you need to make repeated cuts of the same length. Other than repeated cuts, it takes less steps to measure and mark the board. Then saw on the proper side of the mark.
It is safer to leave the rip fence out of THRU cross cuts unless really needed. The rip fence can be safely used against the end of a board when making NON THRU cuts. like dados. It is the THRU CUTS that are the dangerous ones.
When using a cross cut sled, (assuming the edge or center of the sled touches the blade) all that is necessary after marking the measured distance, is to place that mark on the saw kerf line of the sled.
Octogenarian's have an earned right to be a curmudgeon.
Chuck in Lancaster, CA
Chuck in Lancaster, CA
-
tomsalwasser
- Platinum Member
- Posts: 928
- Joined: Mon Feb 08, 2010 2:09 pm
Good point Chuck. I am making a dozen dresser drawers and I was rough cutting a pile of 96" x 18" MDF down to size. They were cut offs I bought from the Home Depot "Cull Cart" for 50 cents each. I used the fence to avoid repeated measuring. This is a process I do frequently.charlese wrote:The only reason to incorporate the rip fence into a cross cut operation with a separation block is if you need to make repeated cuts of the same length.
As embarrassing as it is to be called out, I learned something here and I hope others did too. As others have mentioned, I've done this for years and never had a problem. But I knew right away what Dusty was talking about because I've seen Norm Abram use a relief spacer many times so I know it's a best practice.
Best,
Tom