Near the end of this older thread, I show a "faceplate" I made:https://forum.shopsmith.com/viewtopic.php?t=7813
Today I finished an 3" wide inflatable sanding drum to mount on one of them, based on an article by Frank Gregg in American Woodworker of June 1997.
[ATTACH]13757[/ATTACH]
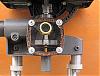
It uses standard 3x21 sanding belts and a 2.80/2.50-4.00 lawn mower inner tube, quite clever of Mr. Gregg I think. I used a 5/8" center hole instead of his 1/2"; 5/8" MDF, so four layers instead of his five; and 1-7/8" dia. valve access holes. I am about to turn the inner tube seat in this photo:
[ATTACH]13758[/ATTACH]
After turning it looked like this:
[ATTACH]13759[/ATTACH]
I used a piece of 5/8" shaft to keep things lined up and for marking out:
[ATTACH]13760[/ATTACH]
Here it is ready for the inner tube:
[ATTACH]13761[/ATTACH]
A couple more photos are in the next message.
home made inflatable sanding drum
Moderator: admin
home made inflatable sanding drum
- Attachments
-
- 0 inflateable drum.jpg (76.56 KiB) Viewed 46630 times
-
- 1 before turning.jpg (123.73 KiB) Viewed 46261 times
-
- 2 after turning.jpg (133.2 KiB) Viewed 46269 times
-
- 3 holes marked out.jpg (129.48 KiB) Viewed 46254 times
-
- 4 ready for tube.jpg (103.72 KiB) Viewed 46256 times
Peter
a 510,a Mini, dedicated SS drillpress, SS spt's, home made SS belt grinder, SS piston air system, Southbend 10k lathe, mill/drill, Taig
a 510,a Mini, dedicated SS drillpress, SS spt's, home made SS belt grinder, SS piston air system, Southbend 10k lathe, mill/drill, Taig
You should hole saw the inner tube valve access holes last in the sequence of assembly steps, to keep the 5/8" center hole till no longer needed for centering. Here is the inner tube, bought at a local riding mower repair shop, installed. You can see the fill valve in the access hole:
[ATTACH]13762[/ATTACH]
I cut off the protruding 1/4" bolts and screwed the floor flange based faceplate to it. I preferred to mount it on the same one it was turned on, but managed somehow to hole saw the inner tube valve access holes in the wrong half of the pieces, and the 1/4" bolts would not fit through the two holes in that faceplate, due to not drilling exactly perpendicular, so I used the floor flange one. All is ok in the end. It revolves reasonably smoothly and works fine as a sanding drum. I did not center the belt well for the photo below:
[ATTACH]13763[/ATTACH]
I may cut the 1/4" plywood rims down some; they barely fit inside the 3x21 belt!
- Attachments
-
- 5 inner tube installed.jpg (89.38 KiB) Viewed 46301 times
-
- 6 finished.jpg (164.08 KiB) Viewed 46689 times
Peter
a 510,a Mini, dedicated SS drillpress, SS spt's, home made SS belt grinder, SS piston air system, Southbend 10k lathe, mill/drill, Taig
a 510,a Mini, dedicated SS drillpress, SS spt's, home made SS belt grinder, SS piston air system, Southbend 10k lathe, mill/drill, Taig

Just completed it today, so no real use yet. I am thinking of trying my hand at intarsia, like you see here:http://www.sawbird.com/
Peter
a 510,a Mini, dedicated SS drillpress, SS spt's, home made SS belt grinder, SS piston air system, Southbend 10k lathe, mill/drill, Taig
a 510,a Mini, dedicated SS drillpress, SS spt's, home made SS belt grinder, SS piston air system, Southbend 10k lathe, mill/drill, Taig