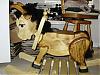
After finishing up with a number of Lincoln Logs, we needed some type of container(s) in order to give them as a gift to Daughter in law.
DIL is a elementary teacher who has many supplies. These supplies take up a whole wall in their garage. She likes and needs firm boxes that will stack.
These boxes were made from 1/4" poplar with box joints. Started with a 1" X 10" length board. It was ripped into two 5" wide boards then re-sawed in half and the two haves were planed to 1/4" and edge glued together to make 1/4" X 10" boards. One part of the original board was made into a 1/2" board for the tops and bottoms of the boxes. These 1/2" boards were cut to size and rabbeted.
The two boxes measure 12" length, 9+" wide and 10" tall.
[ATTACH]13755[/ATTACH]
[ATTACH]13756[/ATTACH]
A Couple of wood boxes
Moderator: admin
A Couple of wood boxes
- Attachments
-
- HPIM2462.jpg (108.78 KiB) Viewed 3149 times
-
- HPIM2467.jpg (163.58 KiB) Viewed 3146 times
Octogenarian's have an earned right to be a curmudgeon.
Chuck in Lancaster, CA
Chuck in Lancaster, CA

Another GREAT JOB there Chuck. Way to go and bet the D-I-L will be happy.
SS 500(09/1980), DC3300, jointer, bandsaw, belt sander, Strip Sander, drum sanders,molder, dado, biscuit joiner, universal lathe tool rest, Oneway talon chuck, router bits & chucks and a De Walt 735 planer,a #5,#6, block planes. ALL in a 100 square foot shop.
.
.
Bob
.
.
Bob

-
judaspre1982
- Platinum Member
- Posts: 1237
- Joined: Tue Jul 08, 2008 10:10 pm
=============================
DT aka Agent Orange is a POS
Liar Liar his wonky comb over is on fire
DT aka Agent Orange is a POS
Liar Liar his wonky comb over is on fire
Last edited by judaspre1982 on Fri Jun 02, 2017 5:13 pm, edited 2 times in total.

-
kd6vpe
- Platinum Member
- Posts: 585
- Joined: Mon Jun 11, 2007 8:53 pm
- Location: Owasso, Oklahoma
- Contact:
You are a master of the box joint. Great looking boxes.
SS 500 upgraded to 510; SS bandsaw; SS jointer
SS Oscillating Drum Sander; Universal Lathe Rest;
lathe duplicatior, shaper fence and shapers; SS Belt
Sander
Jim
www.youtube.com/kd6vpe
SS Oscillating Drum Sander; Universal Lathe Rest;
lathe duplicatior, shaper fence and shapers; SS Belt
Sander
Jim
www.youtube.com/kd6vpe

Thanks for the nice words, guys! Here's a little bit about how I choose to make box joints.
There's loads of material on making a box joint jig. Probably can find a couple on the Internet in woodworker sites, or/and woodworking magazine sites. There is a pretty fancy one in the June/July 2011 Woodcraft magazine. The trend seems make them "micro adjustable". You can use either a router or a table saw with a dado blade to make the joints. I use the Shopsmith with a wobble dado. (Not very high tech!)
Mine is a simple 3/4" board with a 1/4' finger. The board is "micro adjustable" with a tap of a light ball pein hammer. If the joint is too lose a tap away from the blade will tighten the next fingers. If the joint is too tight a tap away from the blade is needed. I cut the slots a little too deep and sand off the protrusions to smooth the sides.
Here's a front side and back side photo of my humble unit. The only part not shown is a piece of 1/4" hardboard that is hand held on the front side when sawing.
The purpose of the hardboard is to give a backup of the correct size - as the jig's 1/4" slot is now too wide and too high and unaided will allow shredding of the slot's top and edges. After making adjustments, the hardboard has been moved and looks like half of a long joint. All that's needed is a new slot and this slot is put over the finger. My hardboard piece is about 12 inches long and 4 inches high.
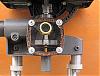
FRONT OF JIG - You can see where I once fixed the slot with wood filler. Now got smarter and use hardboard in front of the jig.
[ATTACH]13764[/ATTACH]
BACK OF JIG - Pencil lines marking out the approximate location on the Shopsmith miter gauge.
[ATTACH]13765[/ATTACH]
There's loads of material on making a box joint jig. Probably can find a couple on the Internet in woodworker sites, or/and woodworking magazine sites. There is a pretty fancy one in the June/July 2011 Woodcraft magazine. The trend seems make them "micro adjustable". You can use either a router or a table saw with a dado blade to make the joints. I use the Shopsmith with a wobble dado. (Not very high tech!)
Mine is a simple 3/4" board with a 1/4' finger. The board is "micro adjustable" with a tap of a light ball pein hammer. If the joint is too lose a tap away from the blade will tighten the next fingers. If the joint is too tight a tap away from the blade is needed. I cut the slots a little too deep and sand off the protrusions to smooth the sides.
Here's a front side and back side photo of my humble unit. The only part not shown is a piece of 1/4" hardboard that is hand held on the front side when sawing.
The purpose of the hardboard is to give a backup of the correct size - as the jig's 1/4" slot is now too wide and too high and unaided will allow shredding of the slot's top and edges. After making adjustments, the hardboard has been moved and looks like half of a long joint. All that's needed is a new slot and this slot is put over the finger. My hardboard piece is about 12 inches long and 4 inches high.
FRONT OF JIG - You can see where I once fixed the slot with wood filler. Now got smarter and use hardboard in front of the jig.
[ATTACH]13764[/ATTACH]
BACK OF JIG - Pencil lines marking out the approximate location on the Shopsmith miter gauge.
[ATTACH]13765[/ATTACH]
- Attachments
-
- Front of jig.jpg (117.93 KiB) Viewed 3026 times
-
- Back of Jig.jpg (123.78 KiB) Viewed 3027 times
Octogenarian's have an earned right to be a curmudgeon.
Chuck in Lancaster, CA
Chuck in Lancaster, CA