Drive Belt Issues
Moderator: admin
-
tvidnoviciii
- Gold Member
- Posts: 33
- Joined: Mon Jun 10, 2013 3:07 pm
- Location: Livermore, CA
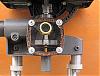
If you look at the pic you attached that shows the eccentric bushing, the thickest end of the bushing is pointing towards the motor. If you rotate the bushing so that is no longer the case, the idler shaft will be moved toward the motor, both tightening the poly-V belt (upper belt) and reducing the distance between the idler shaft and the motor drive shaft. This will give you a bit more room to work with while trying to reinstall the lower belt
-
JPG

- Platinum Member
- Posts: 35600
- Joined: Wed Dec 10, 2008 7:42 pm
- Location: Lexington, Ky (TAMECAT territory)
tvidnoviciii wrote:It also appears to me that the eccentric bushing that controls the tension on the upper belt needs to be adjusted. Check out: http://www.shopsmithacademy.com/SS_Archives/SS123/SS123_Shopsmith_Reborn_Pt3.htm
I agree, but for a different reason.
I speculate it was moved to get the idler shaft closer to the motor shaft by 'guess who;)'.
Good to call that out!!!!!!
All this sweat to replace the motor belt and no quill shaft rotation!:eek:
Gotta give credit where it is due though! Outside the box thinking!!

BTW do not take any of this as criticism nor poking fun at anyone but ourselves! Most of us have been there and done that or stuff much worse.
╔═══╗
╟JPG ╢
╚═══╝
Goldie(Bought New SN 377425)/4" jointer/6" beltsander/12" planer/stripsander/bandsaw/powerstation /Scroll saw/Jig saw /Craftsman 10" ras/Craftsman 6" thicknessplaner/ Dayton10"tablesaw(restoredfromneighborstrashpile)/ Mark VII restoration in 'progress'/ 10E[/size](SN E3779) restoration in progress, a 510 on the back burner and a growing pile of items to be eventually returned to useful life. - aka Red Grange
Also, here are the pictures of the headstock. I wonder after looking at tvid's link above if my pulley is different or if it splits apart. Please forgive my ignorance. Check out the difference between my pulley (non motor) and the one in the link picture attached. Is there anything else I am doing wrong?
- Attachments
-
- 1_Headstock_Cutaway.jpg (22.25 KiB) Viewed 1343 times
-
- photo 1.JPG (139.49 KiB) Viewed 1340 times
-
- photo 2.JPG (92.89 KiB) Viewed 1340 times
-
JPG
- Platinum Member
- Posts: 35600
- Joined: Wed Dec 10, 2008 7:42 pm
- Location: Lexington, Ky (TAMECAT territory)
csanders wrote:I watched sawdust sessions on shopsmith.com and they said to move the bushing to allow more belt slack. The motor is back on the pan. The pan and motor are now on the headstock. The Rectangular spring is disconnected from the middle pulley. Is that ok or will turning the control not effect the tension now. I know I need more terminology. Please bare with me.
The eccentric bushing is normally used to adjust poly-v belt tension. Moving is as described above will give you more slack to the motor belt, but that minimal movement should not be necessary to install the motor belt. And yes(I had not noticed earlier) it is positioned in your pix to maximize separation of the idler and motor shafts.
The wire loop attached to the button and bearing on the control sheave hub can be reattached later. Again the speed control need be set to fast.
By fast I mean all the way to the stop(enough about the stop 'later'). The control sheave should be as far towards the speed control end of the idler shaft as it will go without interfering with other parts of the speed control other than the control arm(porkchop/quadrant gear) which is what should be bearing against 'the stop'.
Re motor belt tension: The belt tension is provided by the floating sheave and spring. When the speed control sheave is moved to alter the speed, the floating sheave reacts to maintain motor belt tension. If the speed control is adjusted to a faster setting(the idler pulley opens up), the resultant belt slack is 'fixed' by closing the motor pulley. If the speed control is adjusted to a slower setting(the control sheave closes and tends to squeeze the belt). As the pulleys rotate, the control pulley pulls harder on the belt and causes the motor pulley to expand thus relieving the 'added' tension. This is why adjusting towards slow should be done sedately so the sheaves have time to react and never if the pulleys are not turning.
╔═══╗
╟JPG ╢
╚═══╝
Goldie(Bought New SN 377425)/4" jointer/6" beltsander/12" planer/stripsander/bandsaw/powerstation /Scroll saw/Jig saw /Craftsman 10" ras/Craftsman 6" thicknessplaner/ Dayton10"tablesaw(restoredfromneighborstrashpile)/ Mark VII restoration in 'progress'/ 10E[/size](SN E3779) restoration in progress, a 510 on the back burner and a growing pile of items to be eventually returned to useful life. - aka Red Grange
╟JPG ╢
╚═══╝
Goldie(Bought New SN 377425)/4" jointer/6" beltsander/12" planer/stripsander/bandsaw/powerstation /Scroll saw/Jig saw /Craftsman 10" ras/Craftsman 6" thicknessplaner/ Dayton10"tablesaw(restoredfromneighborstrashpile)/ Mark VII restoration in 'progress'/ 10E[/size](SN E3779) restoration in progress, a 510 on the back burner and a growing pile of items to be eventually returned to useful life. - aka Red Grange
-
JPG
- Platinum Member
- Posts: 35600
- Joined: Wed Dec 10, 2008 7:42 pm
- Location: Lexington, Ky (TAMECAT territory)
csanders wrote:Also, here are the pictures of the headstock. I wonder after looking at tvid's link above if my pulley is different or if it splits apart. Please forgive my ignorance. Check out the difference between my pulley (non motor) and the one in the link picture attached. Is there anything else I am doing wrong?
YES! Your second pix shows the control sheave positioned to slow(closed). The link pix shows the control sheave positioned to fast(opened).
Rest assured it is VERY difficult to get the belt on with the idler pulley at a maximum diameter(makes the other end of the belt VERY short).
Again, the speed control moves the control sheave to open and close the pulley thus changing the effective diameter for the belt. In your pix the control sheave is likely dropped onto the idler sheave by the force of gravity. You should be able to easily push it up(again, asumming the speed control is set to fast)
╔═══╗
╟JPG ╢
╚═══╝
Goldie(Bought New SN 377425)/4" jointer/6" beltsander/12" planer/stripsander/bandsaw/powerstation /Scroll saw/Jig saw /Craftsman 10" ras/Craftsman 6" thicknessplaner/ Dayton10"tablesaw(restoredfromneighborstrashpile)/ Mark VII restoration in 'progress'/ 10E[/size](SN E3779) restoration in progress, a 510 on the back burner and a growing pile of items to be eventually returned to useful life. - aka Red Grange
╟JPG ╢
╚═══╝
Goldie(Bought New SN 377425)/4" jointer/6" beltsander/12" planer/stripsander/bandsaw/powerstation /Scroll saw/Jig saw /Craftsman 10" ras/Craftsman 6" thicknessplaner/ Dayton10"tablesaw(restoredfromneighborstrashpile)/ Mark VII restoration in 'progress'/ 10E[/size](SN E3779) restoration in progress, a 510 on the back burner and a growing pile of items to be eventually returned to useful life. - aka Red Grange
-
JPG
- Platinum Member
- Posts: 35600
- Joined: Wed Dec 10, 2008 7:42 pm
- Location: Lexington, Ky (TAMECAT territory)
csanders wrote:I have been working on it and I can'even stretch the belt to the middle of the motor's shaft. I'm not sure what to do.
Upon closer look at the second pix, gravity should be causing the control sheave to drop until the button/bearing in the end of the control sheave(assuming the pix is right side up!) rests on the control arm of the porkchop. Regardless, the control sheave MUST be opened to its normal fast position. The speed control appears to be set to fast correctly.
If the control sheave is not moving very freely on the idler shaft it is in dire need of lubrication. If so, the floating sheave on the motor shaft is likely dry also, and may be the cause of the belt slipping off.
I realize the floating spring is quite stiff, but you should be able to manually move the floating sheave in/out on the motor shaft.
At this point I think lubrication of the sheaves(both control and floating) should be the first order of your effort.
I thought I had a copy of the belt changing instructions from SS, but alas I cannot find it. Sure someone else can post it.
╔═══╗
╟JPG ╢
╚═══╝
Goldie(Bought New SN 377425)/4" jointer/6" beltsander/12" planer/stripsander/bandsaw/powerstation /Scroll saw/Jig saw /Craftsman 10" ras/Craftsman 6" thicknessplaner/ Dayton10"tablesaw(restoredfromneighborstrashpile)/ Mark VII restoration in 'progress'/ 10E[/size](SN E3779) restoration in progress, a 510 on the back burner and a growing pile of items to be eventually returned to useful life. - aka Red Grange
╟JPG ╢
╚═══╝
Goldie(Bought New SN 377425)/4" jointer/6" beltsander/12" planer/stripsander/bandsaw/powerstation /Scroll saw/Jig saw /Craftsman 10" ras/Craftsman 6" thicknessplaner/ Dayton10"tablesaw(restoredfromneighborstrashpile)/ Mark VII restoration in 'progress'/ 10E[/size](SN E3779) restoration in progress, a 510 on the back burner and a growing pile of items to be eventually returned to useful life. - aka Red Grange
I think these are the instructions:
http://www.shopsmith.com/ownersite/prod ... cement.pdf
http://www.shopsmith.com/ownersite/prod ... cement.pdf
Peter
a 510,a Mini, dedicated SS drillpress, SS spt's, home made SS belt grinder, SS piston air system, Southbend 10k lathe, mill/drill, Taig
a 510,a Mini, dedicated SS drillpress, SS spt's, home made SS belt grinder, SS piston air system, Southbend 10k lathe, mill/drill, Taig
-
JPG
- Platinum Member
- Posts: 35600
- Joined: Wed Dec 10, 2008 7:42 pm
- Location: Lexington, Ky (TAMECAT territory)
Yep! That's it! Helped me find my copy. Duplicate file name when I went to save it!prmindartmouth wrote:I think these are the instructions:
http://www.shopsmith.com/ownersite/productmanuals/PolyV_GilmerBelt_Replacement.pdf
╔═══╗
╟JPG ╢
╚═══╝
Goldie(Bought New SN 377425)/4" jointer/6" beltsander/12" planer/stripsander/bandsaw/powerstation /Scroll saw/Jig saw /Craftsman 10" ras/Craftsman 6" thicknessplaner/ Dayton10"tablesaw(restoredfromneighborstrashpile)/ Mark VII restoration in 'progress'/ 10E[/size](SN E3779) restoration in progress, a 510 on the back burner and a growing pile of items to be eventually returned to useful life. - aka Red Grange
╟JPG ╢
╚═══╝
Goldie(Bought New SN 377425)/4" jointer/6" beltsander/12" planer/stripsander/bandsaw/powerstation /Scroll saw/Jig saw /Craftsman 10" ras/Craftsman 6" thicknessplaner/ Dayton10"tablesaw(restoredfromneighborstrashpile)/ Mark VII restoration in 'progress'/ 10E[/size](SN E3779) restoration in progress, a 510 on the back burner and a growing pile of items to be eventually returned to useful life. - aka Red Grange
Thanks guys, I didn't realize the motor pulley must be raised to get the belt in there. I had tried it before, but it hadn't been used in such a long time that it needed to be oiled. Just like you all said. Just a few more questions. I think. Should the bushing be flush with the headstock case? How deep should the belt be inside the motor sheeve. Is there a specific depth? Thanks again.