Page 2 of 2
Re: New owner 10ER restoration
Posted: Fri Aug 02, 2019 1:02 pm
by chapmanruss
As shown in the ebay ad from karenhenks, which is actually her husband that does the Shopsmith stuff, that is the parts needed for a complete Carriage Lock Assembly. He sells a lot of Shopsmith parts. If you can be patient a cheaper one may come along or try making him an offer to see if he will take less. The picture below shows a better view of all the Carriage Lock parts which are the same as the Headstock way tube lock.
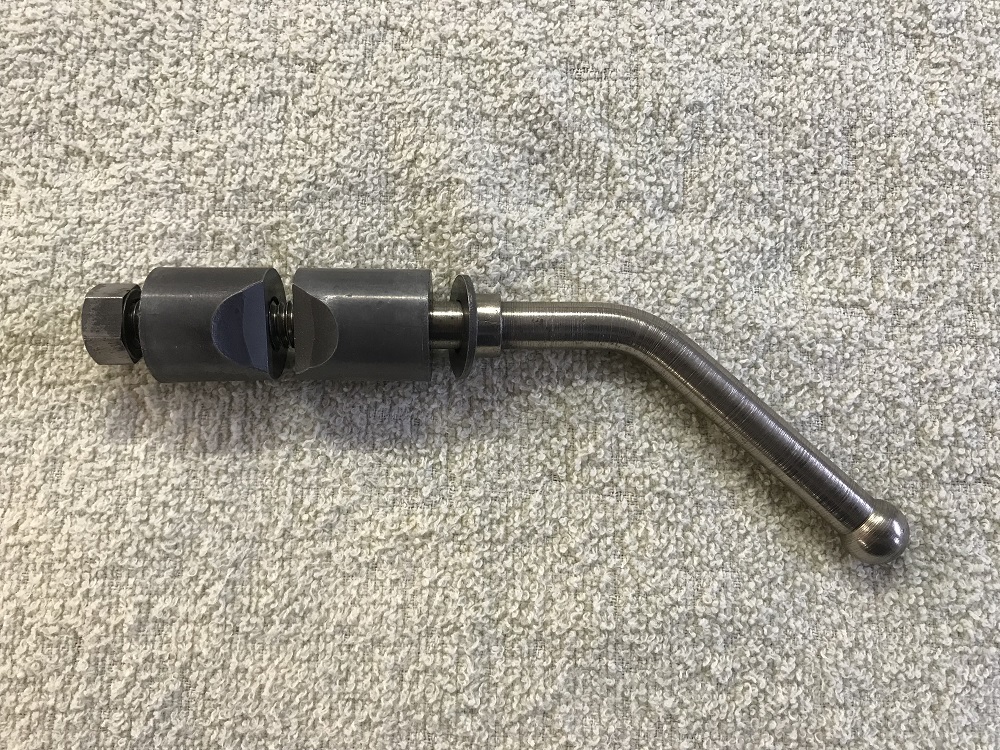
- 103-24X Carriage Lever Assembly r.jpg (481.17 KiB) Viewed 14860 times
As for getting the Floating Center for the Tailstock you may have to get an entire Tailstock assembly to get it from ebay. Again if you can be patient one may come along.
Skip Campbell of MKC Tools knows a lot about Shopsmiths and has been restoring them for years. He also machines some replacement parts but I believe he is closing his shop. The belts for the Speed Changer are 4L 250 (25 inch) and 4L 220 (22 inch.) The original belts were a 1/2 inch longer but are no longer available in 1/2 inch sizes. I do like the "Cogged" style belts over the plain belts. These belt sizes are for the Model 10's using the A. O. Smith 1/2 HP motor so other motors may need different length belts.
As for the Speed Changer it is not that it is rare but is a much sought after accessory. Over half of the 22 Model 10's I have purchased came with a Speed Changer.
...
Re: New owner 10ER restoration
Posted: Fri Aug 02, 2019 1:16 pm
by chapmanruss
The attached PDF is a helpful addendum to all the Model 10 Manuals.
...
Re: New owner 10ER restoration
Posted: Fri Aug 23, 2019 5:26 am
by Matt
Okay! Those prior commitments are done, I've obtained a couple of replacement parts, and this is Day 1 for restoring this machine. I've never tackled a project like this before, so it's going to be a real "learn by doing" kind of deal. My initial plan is to focus first on the base, then use that experience to clean up the table and attachments, and finally dig into the headstock. Hopefully this schedule will mean most of the serious mistakes get made on the sturdier and less crucial parts.
I'm thinking I'll use this thread to document the whole gradual process. Maybe the record will be useful for somebody else later on.
Day 1 was spent disassembling the base and simply washing off the dirt and grease with soap and water. I want everything basically clean before starting on de-rusting and stripping paint. Everything came apart much more easily than I had feared or expected; a little WD40 and a few taps with the rubber mallet were perfectly sufficient. I ran out of time before I could get the headrest loose. (My schedule lets me work on a project for an hour or two a day.)
What's the deal with the square nuts? Who ever thought those were a good idea? Maybe I'll anger some purists, but I ain't putting those things back on. I'm thinking all new stainless hardware when it comes time to reassemble the base. I suppose that disqualifies me from doing an actual "restoration"... Oh well.
Re: New owner 10ER restoration
Posted: Fri Aug 23, 2019 9:29 am
by JPG
"Square" nuts were far more common than "hex" nuts when thy project was born.
Open end wrenches were also more common than socket wrenches 'back then'.
One can apply more torque with an open end wrench(think crescent wrench) to the larger square nuts.
So they ain't
all bad!!!

Tis thy tool kit that creates thy frustration.

Re: New owner 10ER restoration
Posted: Fri Aug 23, 2019 6:43 pm
by rpd
Matt wrote:
What's the deal with the square nuts? Who ever thought those were a good idea? Maybe I'll anger some purists, but I ain't putting those things back on. I'm thinking all new stainless hardware when it comes time to reassemble the base. I suppose that disqualifies me from doing an actual "restoration"... Oh well.
Thanks for sharing, love to see these machines getting a new lease on life.
Square nuts were very common back then. I think they were simpler and cheaper to manufacture with the machinery available at the time.
Re: New owner 10ER restoration
Posted: Fri Aug 23, 2019 6:50 pm
by jsburger
Matt wrote:Okay! Those prior commitments are done, I've obtained a couple of replacement parts, and this is Day 1 for restoring this machine. I've never tackled a project like this before, so it's going to be a real "learn by doing" kind of deal. My initial plan is to focus first on the base, then use that experience to clean up the table and attachments, and finally dig into the headstock. Hopefully this schedule will mean most of the serious mistakes get made on the sturdier and less crucial parts.
I'm thinking I'll use this thread to document the whole gradual process. Maybe the record will be useful for somebody else later on.
Day 1 was spent disassembling the base and simply washing off the dirt and grease with soap and water. I want everything basically clean before starting on de-rusting and stripping paint. Everything came apart much more easily than I had feared or expected; a little WD40 and a few taps with the rubber mallet were perfectly sufficient. I ran out of time before I could get the headrest loose. (My schedule lets me work on a project for an hour or two a day.)
What's the deal with the square nuts? Who ever thought those were a good idea? Maybe I'll anger some purists, but I ain't putting those things back on. I'm thinking all new stainless hardware when it comes time to reassemble the base. I suppose that disqualifies me from doing an actual "restoration"... Oh well.
Why not? They probably have not been touched for 60+ years. If you use them I doubt you will ever touch them again.

