I have read that the reason you don't submerge any copper into the solution is because the copper reduces and deposits onto the "clean" iron piece causing it to now rust very quickly once removed from the solution.
I have previously been using a battery charger for my power supply, but have changed to using an old "bag" phone charger which supplies 13.6 volts and an untold amount of amps. It seems to be working fine.
Electrolysis Power Source
Moderator: admin
My electrolysis results
I am finally getting around to restoring the bandsaw that I got with my Mk 5. The Mk 5 was stored inside and was in decent shape, but the bandsaw was stored in a not so enclosed shed. The cast iron table took the brunt of the exposure, and electrolysis seemed like the best way to restore it.
First of all, thank you to everyone who posted their experience with the process. Here are a few pics of my setup.
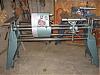
The electrodes are angle steel and are attached together with 12ga copper wire on the outside of the tub. I should have made them longer so they protruded over the top, as now I have to be careful not to over-fill. Instead of 'measure twice, cut once', I measured once and cut six times.
[ATTACH]8725[/ATTACH]
Somehow I forgot to take a good 'before' pic of the table, so this is the only one. The charger pictured ended up not working... more on that later.
[ATTACH]8724[/ATTACH]
This rig was built for the bandsaw table specifically, which is why there are more electrodes on one side.
[ATTACH]8726[/ATTACH]
The charger pictured did not work. I think it may have been broken before I started. Next I tried a 1.5A motorcycle maintainer type charger. It started working, but after a while it shut off with an error light. I tried hooking a battery inline as in PG-Zac's post, but I got the same result. In the charger's defense, I think the battery was too far gone to accept a charge. I went out and bought a new 2/4/6A charger that seemed to have less "intelligence" than the other one I tried. Success! I set it at 6A and let it run for about 4 hours.
I turned it off, disconnected the clamps, and pulled out the table. After a little scrubbing under water, a little sanding with 400 grit and a little more with emery cloth, it came out quite nice. A couple of coats of paste wax later, and here it is! Hmmm, the picture makes it look dirty still, but it is clean and smooth.
[ATTACH]8727[/ATTACH]
Overall I was happy with the process and the result. I bought baking soda, since I could not find washing soda. I did bake about a cup of it in an attempt to convert it to sodium carbonate. What I baked was not enough, so the solution ended up being a mix of the two.
Thanks again to everyone who shared their successes and failures. This is something I probably would not have tried if I only came across a document detailing the process.
--Loren
First of all, thank you to everyone who posted their experience with the process. Here are a few pics of my setup.
The electrodes are angle steel and are attached together with 12ga copper wire on the outside of the tub. I should have made them longer so they protruded over the top, as now I have to be careful not to over-fill. Instead of 'measure twice, cut once', I measured once and cut six times.
[ATTACH]8725[/ATTACH]
Somehow I forgot to take a good 'before' pic of the table, so this is the only one. The charger pictured ended up not working... more on that later.
[ATTACH]8724[/ATTACH]
This rig was built for the bandsaw table specifically, which is why there are more electrodes on one side.
[ATTACH]8726[/ATTACH]
The charger pictured did not work. I think it may have been broken before I started. Next I tried a 1.5A motorcycle maintainer type charger. It started working, but after a while it shut off with an error light. I tried hooking a battery inline as in PG-Zac's post, but I got the same result. In the charger's defense, I think the battery was too far gone to accept a charge. I went out and bought a new 2/4/6A charger that seemed to have less "intelligence" than the other one I tried. Success! I set it at 6A and let it run for about 4 hours.
I turned it off, disconnected the clamps, and pulled out the table. After a little scrubbing under water, a little sanding with 400 grit and a little more with emery cloth, it came out quite nice. A couple of coats of paste wax later, and here it is! Hmmm, the picture makes it look dirty still, but it is clean and smooth.
[ATTACH]8727[/ATTACH]
Overall I was happy with the process and the result. I bought baking soda, since I could not find washing soda. I did bake about a cup of it in an attempt to convert it to sodium carbonate. What I baked was not enough, so the solution ended up being a mix of the two.
Thanks again to everyone who shared their successes and failures. This is something I probably would not have tried if I only came across a document detailing the process.
--Loren
- Attachments
-
- parts laid out.JPG (327.95 KiB) Viewed 7328 times
-
- empty.JPG (198.34 KiB) Viewed 7329 times
-
- put together.JPG (321.71 KiB) Viewed 7333 times
-
- result.JPG (295.32 KiB) Viewed 7336 times
-
dusty

- Platinum Member
- Posts: 21530
- Joined: Wed Nov 22, 2006 6:52 am
- Location: Tucson (Wildcat Country), Arizona
Loren, you did a really neat job on your tank. By having the electrodes all the way around probably makes it much more efficient. I just used a steel plate so my process is very unidirectional.
Thanks for the feed back and for the photo images.
Thanks for the feed back and for the photo images.
"Making Sawdust Safely"
Dusty
Sent from my Dell XPS using Firefox.
Dusty
Sent from my Dell XPS using Firefox.
-
dusty
- Platinum Member
- Posts: 21530
- Joined: Wed Nov 22, 2006 6:52 am
- Location: Tucson (Wildcat Country), Arizona
Mickyd informed us that this electrolyte we are using and copper are not compatible. I read that but I did not heed. Today, I put another of my rusty swivel caster into the electrolysis process.
Everything was the same except that I changed leads. The ones I used this time had copper alligator clips and I attached one of them to the rusty item and submerged it.
The resulting foam was the rest indication that something was different. It was a different color. But, the real difference became apparent when I removed the item from the solution a couple hours later. The deposit was nasty and the rusted item is not near as clean. I'll redo the process to see if I ruined a caster but---
DO NOT SUBMERGE COPPER INTO THE ELECTROLYSIS SOLUTION!!!!!
"Making Sawdust Safely"
Dusty
Sent from my Dell XPS using Firefox.
Dusty
Sent from my Dell XPS using Firefox.
-
tom_k/mo

- Platinum Member
- Posts: 856
- Joined: Mon Jul 14, 2008 3:58 pm
- Location: St. Louis, MO
- Contact:
I had an idea (brain fart?) and thought I'd throw it out for comment. Knowing that the electrolysis process is a "straight line" process and works best when there are electrodes on all sides of the object being treated... What if you took a 5 gallon metal bucket and used that as the container/tank AND electrode? I know you'd have to sand or sandblast any protective coating off the inside of the bucket, and you would have to be careful that your part was hanging/suspended in the solution and didn't touch the bottom, but it seems as if you'd get good current flow and rust removal on ALL sides equally and it would make wiring that electrode extremely easy.
ShopSmith MarkV-520 with Belt Sander, Jointer, Band Saw, Strip Sander, Scroll Saw and Biscuit Jointer SPTs and a DC-3300...
Woodworking Hobbyist (Check out all my Woodworking Plans (http://vbwhiz.isa-geek.net/plans)
Aspiring Sandcarver: Breaking glass one grain at a time.
Black Powder Shooter (love the smell of burning sulfur).
Woodworking Hobbyist (Check out all my Woodworking Plans (http://vbwhiz.isa-geek.net/plans)
Aspiring Sandcarver: Breaking glass one grain at a time.
Black Powder Shooter (love the smell of burning sulfur).

Until the process eats a hole in the bucket and springs a leak...tom_k/mo wrote:I had an idea (brain fart?) and thought I'd throw it out for comment. Knowing that the electrolysis process is a "straight line" process and works best when there are electrodes on all sides of the object being treated... What if you took a 5 gallon metal bucket and used that as the container/tank AND electrode? I know you'd have to sand or sandblast any protective coating off the inside of the bucket, and you would have to be careful that your part was hanging/suspended in the solution and didn't touch the bottom, but it seems as if you'd get good current flow and rust removal on ALL sides equally and it would make wiring that electrode extremely easy.
Heath
Central Louisiana
-10ER - SN 13927, Born 1949, Acquired October 2008, Restored November, 2008
-10ER - SN 35630, Born 1950, Acquired April 2009, Restored May 2009, A34 Jigsaw
-Mark V - SN 212052, Born 1986, Acquired Sept 2009, Restored March 2010, Bandsaw
-10ER - SN 39722, Born 1950, Acquired March 2011, awaiting restoration
-
JPG

- Platinum Member
- Posts: 35598
- Joined: Wed Dec 10, 2008 7:42 pm
- Location: Lexington, Ky (TAMECAT territory)
Citrusstrip Dusty Citrusstrip Overnight Liberally applieddusty wrote:The carriage that was scheduled for electrolysis is an ebay special and it looks horrible. No corrosion. Just somehow stained and somewhat rusty (corroded).
It was to be an experimental restoration before I start on something more valuable.
[ATTACH]8699[/ATTACH] [ATTACH]8700[/ATTACH]
╔═══╗
╟JPG ╢
╚═══╝
Goldie(Bought New SN 377425)/4" jointer/6" beltsander/12" planer/stripsander/bandsaw/powerstation /Scroll saw/Jig saw /Craftsman 10" ras/Craftsman 6" thicknessplaner/ Dayton10"tablesaw(restoredfromneighborstrashpile)/ Mark VII restoration in 'progress'/ 10E[/size](SN E3779) restoration in progress, a 510 on the back burner and a growing pile of items to be eventually returned to useful life. - aka Red Grange
-
mickyd

- Platinum Member
- Posts: 2999
- Joined: Mon Feb 09, 2009 1:18 pm
- Location: San Diego, CA
- Contact:
Your exactly right heath. The process WILL eventually eat a hole in the bucket. The bucket (anode....+ charge) is sacrificial.heathicus wrote:Until the process eats a hole in the bucket and springs a leak...
When I do it like this, I put the bucket inside a larger container that is filled with water. The reason I fill it with water is WHEN the inside sacrificial one (anode + charge) springs a leak, the water level won't drop.
Mike
Sunny San Diego
Sunny San Diego
While on the subject of things to not do, here a couple of additional things I've come across that one should avoid.
Don't use Stainless Steel as the anode attached to the positive lead as it contains chromium. The electrolysis process slowly erodes the chromium and the result is that chromates end up in your electrolyte. These are highly toxic. Yellow electrolyte is a sign of chromates. You'll end up with hazardous waste.
Stainless Steel also contains nickel and washing soda (sodium carbonate) can dissolve nickel and the resulting nickel carbide is extremely poisonous / toxic. Moreover, one should also not clean parts that contain nickel or that are nickel plated. All nickel compounds are toxic and some acutely poisonous. More hazardous waste.
Also the electrolysis process produces hydrogen and oxygen and therefore de-rusting should be done outside.
Art in Western Pennsylvania