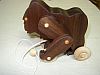
These are some Christmas pull toys I made as gifts for the young children in my family. The ducks are made from some local soft maple and the gorilla is walnut. Wheels were purchased. As the duck is pulled he waddles and the feet move up and down. The gorilla moves up and down and the arms move as well. I think the kids will enjoy them.
For the toys I used the SS jointer, planer, bandsaw, drill press. I drilled the cavity in the duck that houses the front wheels using the horizontal dirll press mode. As usual the Shopsmith functioned flawlessly.
The tray is made from a laminated blank with maple for the bottom and sapele for the top trim. I drilled the waste in drill press mode, routed the cavity with the OPR, cut the profile on the bandsaw, and sanded the inside walls with drum sanders in drill press mode (so I could set the height just off the bottom).
[ATTACH]11113[/ATTACH]
[ATTACH]11114[/ATTACH]
[ATTACH]11115[/ATTACH]
[ATTACH]11116[/ATTACH]
Gallery of completed woodworking projects
Moderator: admin
Christmas toys and snack tray
- Attachments
-
- toys1.jpg (89 KiB) Viewed 9312 times
-
- toys3.jpg (92.39 KiB) Viewed 9313 times
-
- toys4.jpg (88.07 KiB) Viewed 9312 times
-
- Tray1.jpg (85.86 KiB) Viewed 9311 times
-
JPG

- Platinum Member
- Posts: 35598
- Joined: Wed Dec 10, 2008 7:42 pm
- Location: Lexington, Ky (TAMECAT territory)
All very nicely done! Interesting keyed wheel on the quacker!
╔═══╗
╟JPG ╢
╚═══╝
Goldie(Bought New SN 377425)/4" jointer/6" beltsander/12" planer/stripsander/bandsaw/powerstation /Scroll saw/Jig saw /Craftsman 10" ras/Craftsman 6" thicknessplaner/ Dayton10"tablesaw(restoredfromneighborstrashpile)/ Mark VII restoration in 'progress'/ 10E[/size](SN E3779) restoration in progress, a 510 on the back burner and a growing pile of items to be eventually returned to useful life. - aka Red Grange

Very nice. What wood did you use on the Christmas tree? Did you glue the two pieces together, and then route it out?
Joe
520, Bandsaw, Beltsander, Delta Drill Press, Delta Lathe, Craftsman Planner/Jointer, Delta Planner, Mini "Greenie" Shorty 500
Being a VETERAN is an honor
Being a GRANDPA is priceless
520, Bandsaw, Beltsander, Delta Drill Press, Delta Lathe, Craftsman Planner/Jointer, Delta Planner, Mini "Greenie" Shorty 500
Being a VETERAN is an honor
Being a GRANDPA is priceless
The lighter wood is local maple obtained from a sawmill near here. The dark wood is Sapele obtained from a cabinet shop that closed down.joedw00 wrote:Very nice. What wood did you use on the Christmas tree? Did you glue the two pieces together, and then route it out?
To make the tray, I made a laminated blank with a thicker layer of maple and a thinner layer of Sapele. Each layer has pieces that were first edge glued to make a piece larger than my template. The layers were then faced glued together. I used Tightbond II.
I then attached the template to the blank and drill out most of the waste with a large forstner bit. You can see that process in thispost. Once that was done I removed the remaining waste with multiple passes with the OPR. Cut the outside profile on the bandsaw and then LOTS and LOTS of sanding. Apply a food safe finish, and you're done.
I am a newbie here and just wanna say Hi to everyone. I am Daniel from Pennsylvania, US.
__________________
free photoshop tutorials
__________________
free photoshop tutorials
lol Mickyd. thanks for the compliment. yes, cedar patio chairs. after the table I want to make a lounge chair next.
I kinda changed my mind and I'm making two more chairs now because there were some things I didn't like about the first two. I got everything cut today, tomorrow I'll sand, profile and assemble.
I use the table saw, bandaw (with a trammel table to cut the seat backs nice an evenly) belt sander, drum sander, and a 3 hp router with bearing bit to cut template shapes.
-
mickyd

- Platinum Member
- Posts: 2999
- Joined: Mon Feb 09, 2009 1:18 pm
- Location: San Diego, CA
- Contact:
Is there a preservative finish applied?dasgud wrote:lol Mickyd. thanks for the compliment. yes, cedar patio chairs. after the table I want to make a lounge chair next.
I kinda changed my mind and I'm making two more chairs now because there were some things I didn't like about the first two. I got everything cut today, tomorrow I'll sand, profile and assemble.
I use the table saw, bandaw (with a trammel table to cut the seat backs nice an evenly) belt sander, drum sander, and a 3 hp router with bearing bit to cut template shapes.
The lounge chair will really compliment this great patio set.
Mike
Sunny San Diego
Sunny San Diego