Page 18 of 19
Re: Yet another "Goldie" Restoration
Posted: Mon Sep 30, 2024 2:56 pm
by chapmanruss
The Restoration looks great. Nicely done.
I printed the Caution Label on clear label self-adhesive sheets. You can see the finished label below.
_

- Goldie Headstock.jpg (124.1 KiB) Viewed 4173 times
Re: Yet another "Goldie" Restoration
Posted: Mon Sep 30, 2024 3:41 pm
by AllenH
One more video after this one.
Re: Yet another "Goldie" Restoration
Posted: Wed Oct 02, 2024 12:40 pm
by chapmanruss
AllenH,
Thank you for sharing the videos of your progress. I have enjoyed seeing your progress and am happy for you in getting your Goldie restored.
For those who have watched the video for tips and help there are things to know about what was shown. This Goldie has been upgraded in this restoration process. Originally it had a 3/4 HP Motor and the Gilmer Drive. What is shown in the Headstock video is it being upgraded to a 1-1/8 HP Motor and the Poly V Drive with a double bearing Quill. It is a nice upgrade for this Goldie made just prior to the 1-18 HP Motor and the Poly V Drive changes.
Allen probably knows I cringed with every strike of the hammer he used while getting the Drive Sleeve Assembly back into the Headstock.

He acknowledged that the hammer was not the best choice. Metal to metal striking can "mushroom" the end being struck. The saving thing on the Drive Sleeve Assembly is the beveled end on the spindle. Enough about that.
When the Idler Shaft Assembly was put back into the Headstock, he didn't put the Eccentric in with it. This is fine for the version of the Eccentric he was putting in with the Poly V Drive upgrade. Some versions of the Eccentric have a set screw to hold it on the Idler Shaft Bearing. Those Eccentrics need to be attached to the Bearing prior to the Idler Shaft Assembly being re-inserted in the Headstock. Below is a picture of two of the Eccentric types. The new type is the one used in the upgrade shown in the video. Note the split in the thin wall side of the casting. The other is the type with the set screw. His caution about tightening the cap screw and nut which holds the Idler Shaft Assembly in the Headstock Casting should be followed. DO NOT OVERTIGHTEN. Doing so can break the Headstock casting.
_
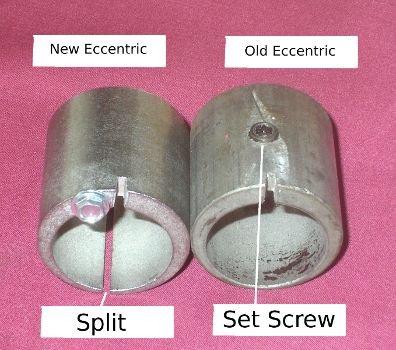
- eccentric old and new.jpg (35.2 KiB) Viewed 4085 times
.
Not shown in the video is when the "V" Belt was put back on the Idler Shaft Assembly. This is done prior to re-installing the Speed Control Assembly and the Loop on the end of the Idler Shaft Assembly is put over the Quadrant (porkchop) of the Speed Control.
Re: Yet another "Goldie" Restoration
Posted: Wed Oct 02, 2024 9:01 pm
by JPG
One 'comment'. The quill stop assembly on that vintage goldie did NOT have the flat washer between the serrated,keyed washer and the retaining ring.
So it is/was not 'missing'.

Re: Yet another "Goldie" Restoration
Posted: Thu Oct 03, 2024 10:37 am
by AllenH
JPG wrote: Wed Oct 02, 2024 9:01 pm
One 'comment'. The quill stop assembly on that vintage goldie did NOT have the flat washer between the serrated,keyed washer and the retaining ring.
So it is/was not 'missing'.
Good, I didn't like it when I have it in there. I will take it out.
Re: Yet another "Goldie" Restoration
Posted: Thu Oct 03, 2024 10:49 am
by JPG
WHAT did you not like about it? Dial spaced out?
Re: Yet another "Goldie" Restoration
Posted: Thu Oct 03, 2024 12:02 pm
by AllenH
Another question, what was the purpose of the second slot on the table?
Re: Yet another "Goldie" Restoration
Posted: Thu Oct 03, 2024 12:18 pm
by JPG
The main table/aux table has a gap that the rip fence does not adequately register across. The second slot allows ripping at those dimensions that the gap interferes with.
Re: Yet another "Goldie" Restoration
Posted: Thu Oct 03, 2024 12:53 pm
by chapmanruss
As JPG said,
The main table/aux table has a gap that the rip fence does not adequately register across. The second slot allows ripping at those dimensions that the gap interferes with.
The extra slot in the Main Table began with the Mark 2 to solve that problem. It was then added to the Mark 5 and continued until 1980. When using a Mark 5/V without the extra slot that gap can easily be overcome by using a face/spacer board on the Rip Fence.
Re: Yet another "Goldie" Restoration
Posted: Thu Oct 03, 2024 1:47 pm
by AllenH
Interesting.