Page 3 of 6
Re: Finalizing Main Table Alignment
Posted: Wed Dec 07, 2016 7:10 pm
by ecom1
jsburger wrote: absolutely agree. I really love these discussions and the ideas they produce. Sometimes we don't agree but that is OK.
I have said this before, KEEP IT UP DUSTY, and ignore the naysayers!!!!
I agree 100% - keep it up!!
Re: Finalizing Main Table Alignment
Posted: Wed Dec 07, 2016 8:49 pm
by JPG
Yes the world is populated by folks of habit(meself included) that have and continue to call them thar thingies bolts.
The thing with Mickyd( he is in the 'bolt' business) was that fairly recently a standards body(I fergit which one) was mulling over what was a screw and what was a bolt. After much circular thinking and always creating something that required multitudinous 'exceptions' finally realized the best distinction was as I mentioned earlier(tool surface and precision surface).
I doubt the world will ever come to use the words correctly(Waaaaay too much history of contrary use).
Besides the answer to 'what is the difference' will likely result in as many definitions as the number of persons asked.

I used to think screws were what you used with wood and bolts were the things you screwed a nut onto or screwed into a tapped hole. Then one day I asked my father to pick up some screws for me. I meant the wood kind, he got me the nutty kind. A rather heated 'discussion ' followed.

So correct understanding and common understanding is preferable to having those kinds of discussions.

Remember there are many kinds of screws and it is best to add another word(like wood or machine) when referring to them.
Ditto bolts(carriage...).
Oh by the way those blind hole thingies are toggle screws!
Re: Finalizing Main Table Alignment
Posted: Wed Dec 07, 2016 10:14 pm
by reible
I know a person who wanted to order cap screws for a project but ordered bolts. No not me. The factory was rather upset with the 10,000 extra nuts they had. That was enough for me to check when I specified a fastener as the standards are not always applied even at the places that make and sell the hardware.
As to the subject, I have found I like to have the table just able to move with some applied force, never loose enough to slide around. A small rubber mallet to tweak with even.
I have worked on machines that have a bracket that had a set screw and you would loosen the holding fasteners and use the set screws to align, loosen one fraction turn here then tighten on the other the other. With that method the table is locked in before you tighten the fasteners but is a pain as each location has a x-y location, 4 screws to deal with for each location.
Ed
Re: Finalizing Main Table Alignment
Posted: Thu Dec 08, 2016 1:57 am
by benush26
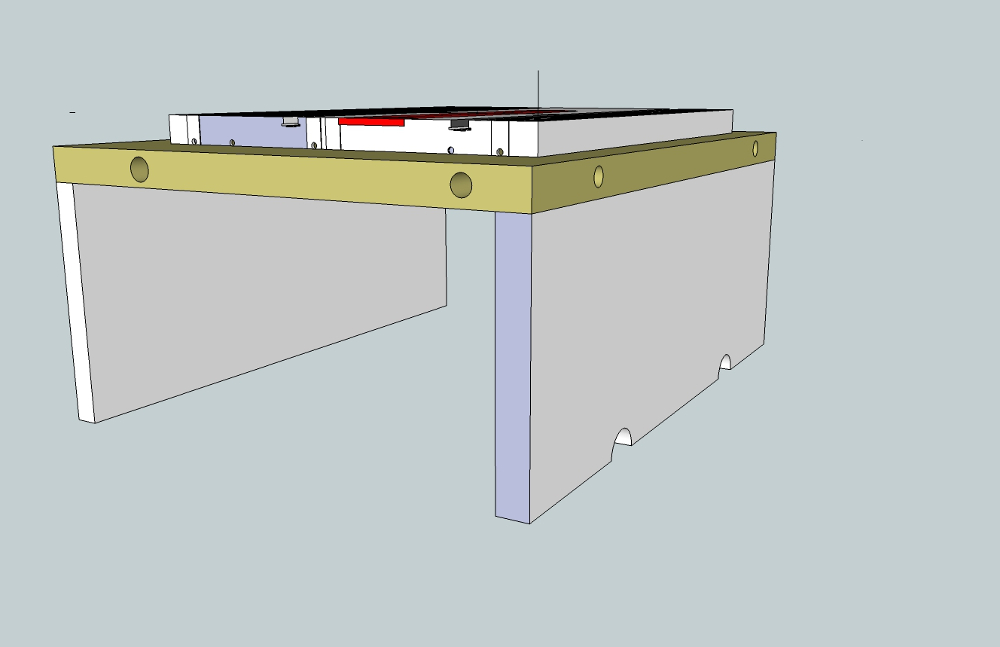
Dusty, what it you made a capture template
Forgive the crudeness of this but did it in a hurry. Also I made the capture template so the table is shown sticking through where in reality would be within the capture template
- dusty calibrate.jpg (78.84 KiB) Viewed 7750 times
A reasonably close opening for the table to fit through
I did NOT show attaching it to the way tubes, just a couple half circle cut outs.
By using threaded inserts you could then run "screws"
with a head that allowed adjustment

in the eight holes (only four shown)
Once you had the table where you wanted it, snug up the eight "screws", to hold the table in place
Then tighten the two accessible trunnion "screws" which are accessible. With them as tight as you wanted, would it them be possible to remove the capture template, tilt the table and proceed to tighten the other two trunion "screws".
Just a thought.
Be well,
Ben
Re: Finalizing Main Table Alignment
Posted: Thu Dec 08, 2016 2:32 am
by dusty
benush26 wrote:Dusty, what it you made a capture template
Forgive the crudeness of this but did it in a hurry. Also I made the capture template so the table is shown sticking through where in reality would be within the capture template
dusty calibrate.jpg
A reasonably close opening for the table to fit through
I did NOT show attaching it to the way tubes, just a couple half circle cut outs.
By using threaded inserts you could then run "screws"
with a head that allowed adjustment
in the eight holes (only four shown)
Once you had the table where you wanted it, snug up the eight "screws", to hold the table in place
Then tighten the two accessible trunnion "screws" which are accessible. With them as tight as you wanted, would it them be possible to remove the capture template, tilt the table and proceed to tighten the other two trunion "screws".
Just a thought.
Be well,
Ben
Yes, that would probably work. I have done somewhat the same concept by working against an extension table. Problem there was that the extension tables move some themselves.
The key to success here would be getting a template that is "immovable".
Hmmm... A short 5/16"allen wrench. OR
An adjustable wedge inserted between the inside front edge of the Main Table and the front trunnion. It is this relationship that must not change once properly adjusted.
Re: Finalizing Main Table Alignment
Posted: Thu Dec 08, 2016 9:25 am
by Ed in Tampa
Dusty
My thoughts.
First remove each trunnion and insure the surface of where the table touches it is perfectly flat no burrs or nicks etc. Then on the opposite side check that there are absolutely no burrs on trunions where the carriage bolts tighten down. Then check the bottom of the table itself. Is the mating surface of table where it in contact with trunnion perfectly flat without nick or burrs.
Then using NEW carriage bolts tighten them until the table can just be moved, make your adjustment and then tighten the two bolts sequentially until they hold the table. Then tilt the table and tighten the remaining bolts.
I think much of the problem tighten the carriage bolts comes from the fact the mating surfaces on trunnions, main table, carriage bolts are not perfectly flat.
That all said I still believe that once the table is perfectly aligned to the blade that the slightest pressure on the table will change the measurement. Let me say it this way, it certainly does on my machine. Also if you pull, push or other wise move the shopsmith using the main table to do so you will effect this measurement.
My opinion if you want a saw with .005 or less tolerance in table blade parallelism buy a tablesaw. Once set on a properly constructed tablesaw nothing changes this alignment.
Re: Finalizing Main Table Alignment
Posted: Thu Dec 08, 2016 10:08 am
by dusty
Ed in Tampa wrote:Dusty
My thoughts.
First remove each trunnion and insure the surface of where the table touches it is perfectly flat no burrs or nicks etc. Then on the opposite side check that there are absolutely no burrs on trunions where the carriage bolts tighten down. Then check the bottom of the table itself. Is the mating surface of table where it in contact with trunnion perfectly flat without nick or burrs.
Then using NEW carriage bolts tighten them until the table can just be moved, make your adjustment and then tighten the two bolts sequentially until they hold the table. Then tilt the table and tighten the remaining bolts.
I think much of the problem tighten the carriage bolts comes from the fact the mating surfaces on trunnions, main table, carriage bolts are not perfectly flat.
That all said I still believe that once the table is perfectly aligned to the blade that the slightest pressure on the table will change the measurement. Let me say it this way, it certainly does on my machine. Also if you pull, push or other wise move the shopsmith using the main table to do so you will effect this measurement.
My opinion if you want a saw with .005 or less tolerance in table blade parallelism buy a tablesaw. Once set on a properly constructed tablesaw nothing changes this alignment.
I agree with everything you have said here with one minor exception.
Yes, pressure on the table (or the carriage, or the tubes) will result in observable deflections ina dial indicato. The Mark is not heasvy and rigid. However, I have tested this phenomena quite rigorously and I am inclined to say that while the dial indicator deflects, it also returns.
You must have the locks all secured or the Mark is very unstable.
Re: Finalizing Main Table Alignment
Posted: Thu Dec 08, 2016 11:01 am
by Ed in Tampa
dusty wrote:Ed in Tampa wrote:Dusty
My thoughts.
First remove each trunnion and insure the surface of where the table touches it is perfectly flat no burrs or nicks etc. Then on the opposite side check that there are absolutely no burrs on trunions where the carriage bolts tighten down. Then check the bottom of the table itself. Is the mating surface of table where it in contact with trunnion perfectly flat without nick or burrs.
Then using NEW carriage bolts tighten them until the table can just be moved, make your adjustment and then tighten the two bolts sequentially until they hold the table. Then tilt the table and tighten the remaining bolts.
I think much of the problem tighten the carriage bolts comes from the fact the mating surfaces on trunnions, main table, carriage bolts are not perfectly flat.
That all said I still believe that once the table is perfectly aligned to the blade that the slightest pressure on the table will change the measurement. Let me say it this way, it certainly does on my machine. Also if you pull, push or other wise move the shopsmith using the main table to do so you will effect this measurement.
My opinion if you want a saw with .005 or less tolerance in table blade parallelism buy a tablesaw. Once set on a properly constructed tablesaw nothing changes this alignment.
I agree with everything you have said here with one minor exception.
Yes, pressure on the table (or the carriage, or the tubes) will result in observable deflections ina dial indicato. The Mark is not heasvy and rigid. However, I have tested this phenomena quite rigorously and I am inclined to say that while the dial indicator deflects, it also returns.
You must have the locks all secured or the Mark is very unstable.
Dusty with all due respect we differ on the RETURN aspect. It comes close but perfect return has alluded me so far. Haven,t documented it scientifically but I believe removing the main table and then putting it back on changes the alignment. Different teeth engaged in height gear, causing different pressures on the table tubes which change table blade alignment.
Re: Finalizing Main Table Alignment
Posted: Thu Dec 08, 2016 11:21 am
by dusty
This may be a matter of words but I contend that the system will remain properly aligned to within the .005" even after going through all of the abuses that we have been talking about. Pushing, pulling, removal, replacement, changing blades, tilting, raising, lowering, etc.
So we shall continue to disagree until that one day when we all get together in the same room and duke it out.
Re: Finalizing Main Table Alignment
Posted: Thu Dec 08, 2016 1:16 pm
by Ed in Tampa
Dusty
Wait a minute are you saying it will stay within .005" or are you saying it will only change less than .005" or are you saying it stay where it was set originally in this case .005"?
Three different conditions.
I set mine up to exactly .000" and then measured it after doing the above mentioned tortures as you called them and the setting had changed as much as .005". Had I set it up originally at .005" from what I measured it could have been .010" out.