Page 3 of 3
Re: Farmhouse Table
Posted: Mon Dec 12, 2016 9:21 pm
by jms
reible wrote:I'm not sure what the height turns out to be with larger 4 x 4 legs and the jig but make sure it fits your planner.
Ed
Well I'm scheduled to pick up a SS planer with power stand on Wed morning from a gentleman on Craigslist - as you point out that may not be a big enough planer. I will look at alternate methods like the one you've described. Sounds like hand planing will be necessary either way due to the size of the legs plus the jig. Suppose I could use the jointer as well?
Re: Farmhouse Table
Posted: Tue Dec 13, 2016 12:08 am
by JPG
A pesky 'detail' that has not been mentioned re using a planer or jointer, is the grain orientation. The conical disk sander may be a preferable approach. A modification to the rip fence would be required.
Re: Farmhouse Table
Posted: Tue Dec 13, 2016 8:56 am
by jms
JPG wrote:A pesky 'detail' that has not been mentioned re using a planer or jointer, is the grain orientation. The conical disk sander may be a preferable approach. A modification to the rip fence would be required.
Thanks JPG -- I've read up on the conical disk sander and I believe I understand it's benefits. But as a novice I'm not sure I fully grasp the entire process -- could you elaborate as to why the rip fence would need to be modified? Would it be to hold the leg at the tapered angle, similar to the jig previously mentioned?
Also, not quite sure I understand what to look for regarding grain orientation and then how that might affect which tool I use for finishing the taper.
Sorry for the rookie questions -- I suppose I should read a book or two, but with 4 kids that are 8 years old and younger (spaced by less than 24 months each) -- finding time to read an entire book just isn't in my near future !!
Thanks
-Jeremy
Re: Farmhouse Table
Posted: Tue Dec 13, 2016 10:01 am
by dusty
jeremysavoy wrote:JPG wrote:A pesky 'detail' that has not been mentioned re using a planer or jointer, is the grain orientation. The conical disk sander may be a preferable approach. A modification to the rip fence would be required.
Thanks JPG -- I've read up on the conical disk sander and I believe I understand it's benefits. But as a novice I'm not sure I fully grasp the entire process -- could you elaborate as to why the rip fence would need to be modified? Would it be to hold the leg at the tapered angle, similar to the jig previously mentioned?
Also, not quite sure I understand what to look for regarding grain orientation and then how that might affect which tool I use for finishing the taper.
Sorry for the rookie questions -- I suppose I should read a book or two, but with 4 kids that are 8 years old and younger (spaced by less than 24 months each) -- finding time to read an entire book just isn't in my near future !!
Thanks
-Jeremy
Don't be sorry. I do not consider myself a rookie but I am still looking forward to the answers for your questions.
You can freehand sand with the conical disk.
Re: Farmhouse Table
Posted: Tue Dec 13, 2016 1:52 pm
by charlese
For what it's worth, I'd go with the method Ed (reible) suggested. Sawing slowly on the bandsaw is a simple procedure. Just cut outside your marked lines and smooth with hand plane or sanding. I would probably use the belt sander, followed by sanding with a wood block with glued-on sandpaper.
Use a good 1/2" or 5/8" blade on the bandsaw. No need for a fence or a jig. Remember - after sawing off one side you'll have to tape the sawn off piece back into place to keep the leg square before sawing the opposite side.
Common masking tape will allow you to see your marked cut line through the tape. I don't think blue painter's tape will work well.
Re: Farmhouse Table
Posted: Tue Dec 13, 2016 2:14 pm
by JPG
With a taper on opposing sides, the fence needs to be at twice the taper angle. The modification is necessary so the square end will clear the fence. That means adding a spacer to the fence creating a 'pocket' for the square end.
Grain direction is a potential problem when planing or jointing. When cutting 'against' the grain, the wood fibres are pulled up leaving a rough surface. The annual rings reveal the direction. The darker/lighter parts as they exit the workpiece must point in the direction of feed.
Re: Farmhouse Table
Posted: Tue Dec 13, 2016 2:58 pm
by reible
From memory the upper limit is 4" on the conical sander, this is at the finished size of 4" legs, thus the raw size exceeds the limit. It could work but again not optimal.
One option is to go with a smaller leg size. Not sure how much smaller would work but that could be determined. The other issue is how will the smaller leg size look on the table. Massive table with skinny legs, well I'd have to think about that. But if you were able to just make things small enough to work then the options become the planer, the jointer, conical disk, and still the hand plane.
Keep in mind using a hand plane has the same grain issues as either the jointer of the planner. The good news is the choice of wood. Some woods are much more grain sensitive then others.
What ever way you go it will be a learning experience.
Ed
Re: Farmhouse Table
Posted: Tue Dec 13, 2016 6:19 pm
by BuckeyeDennis
It's a pretty simple taper jig, guys, and there are 16 tapered faces to cut for a single table. For just one leg, I might go with hand-feeding on the bandsaw, and then hand-plane ...
if I had a good hand-tool bench with the requisite workholding devices for the hand-planing ... which I don't (yet). For four legs, I'd make the jig anyway.
I'd saw to about 1/16" of final cut depth on the bandsaw using my miter-gauge fence and the taper jig. Then do a cleanup pass or two using the conical disc and the same taper jig. Fast, accurate, and just within the capacity of the tools, I think.
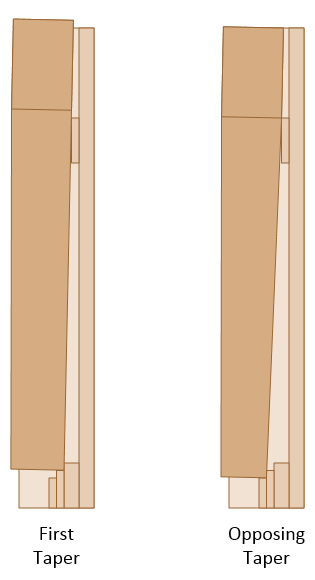
- Capture.PNG (11.32 KiB) Viewed 9220 times
Re: Farmhouse Table
Posted: Tue Dec 13, 2016 10:17 pm
by masonsailor2
You can make the legs using the SS table saw and a fairly simple taper jig that you can make. Here is a link to a version I use to make tapered legs.
https://youtu.be/l9Yplh3dPak . The rest of the project can easily be done using the SS and the router. You will need to make a taper jig and also a sled for the table saw for making the cross cuts and tenons. The sled will expand your capabilities. As far as the edge joining that can be done with the router. Your workbench can easily be turned into an edge jointer which for the price of a sheet of particle board and a router bit and can give you perfectly joined edges. Building your router into your workbench or building a router table will also allow you to add the detail to the legs also. You can also turn the SS into an edge jointer by building a floating router table for the SS. There are a lot of youtubes on edge jointing with a router. Making the jigs and tools to do the project is half the fun !
Paul