I started restoring my 1980s gray model last week. I, sadly, had to leave it in storage for many years beachside (salt air...) and it suffered badly. yet I'm amazed at how easily I was able restore it to proud looks. I just have to check all alignments and commence to cuttin!
I started restoring my 1980s gray model last week. I, sadly, had to leave it in storage for many years beachside (salt air...) and it suffered badly. yet I'm amazed at how easily I was able restore it to proud looks. I just have to check all alignments and commence to cuttin!
Stay safe everyone
Good Idea!
What did you do differently to yer smilie?(How did you select it?)
╔═══╗
╟JPG ╢
╚═══╝
Goldie(Bought New SN 377425)/4" jointer/6" beltsander/12" planer/stripsander/bandsaw/powerstation /Scroll saw/Jig saw /Craftsman 10" ras/Craftsman 6" thicknessplaner/ Dayton10"tablesaw(restoredfromneighborstrashpile)/ Mark VII restoration in 'progress'/ 10E[/size](SN E3779) restoration in progress, a 510 on the back burner and a growing pile of items to be eventually returned to useful life. - aka Red Grange
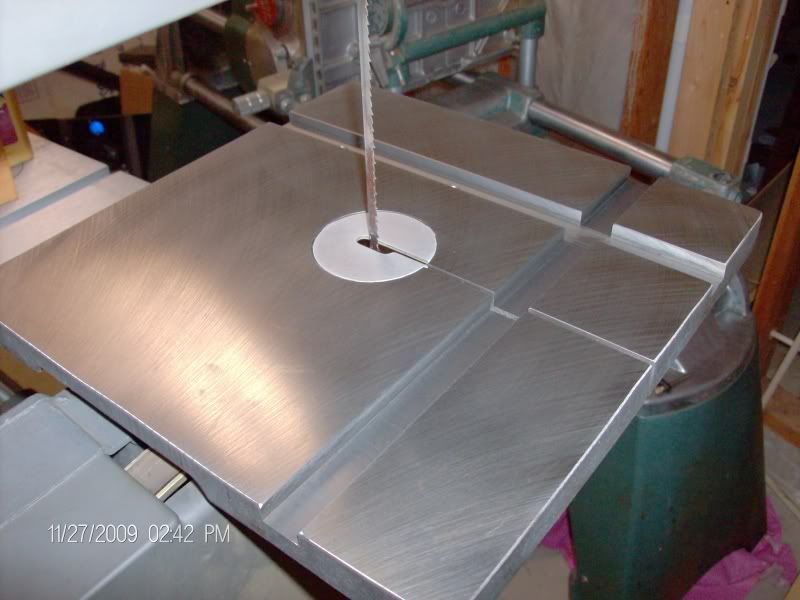
For the most part it was in pretty good shape. Certainly much better than the belt sander and the jointer. The jig saw probably had the best table.
Here is a close up of the worst section of the band saw table.
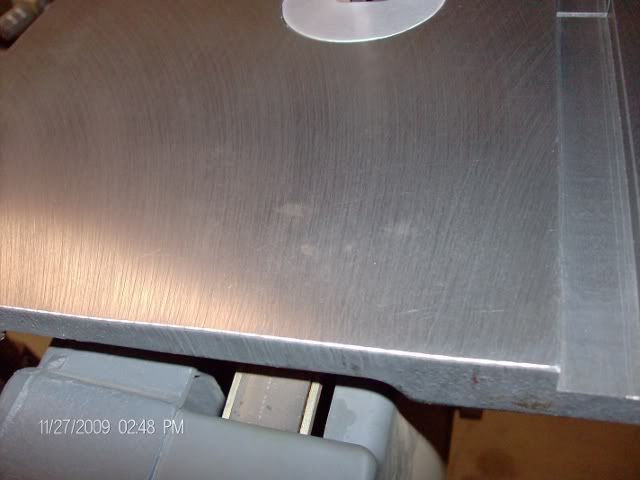
It was not bad enough to use power equipment, so I tried a rag and Brasso. I wasn't totally happy after about a half hour of polishing. I sprayed it with a heavy dose of WD-40 and let it sit over night.
I gave it a second Brasso polish this morning, and felt it was good enough for me.
Was not able to remove every blemish, but still looks pretty good. I could get them out in five minutes with the Weiler brush on my drill, but I think that changes the look of the table.
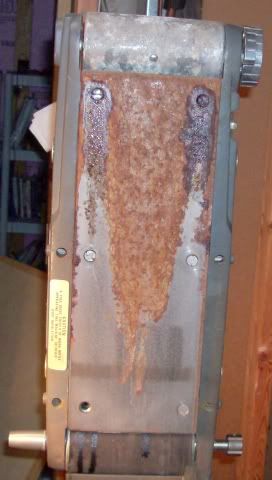
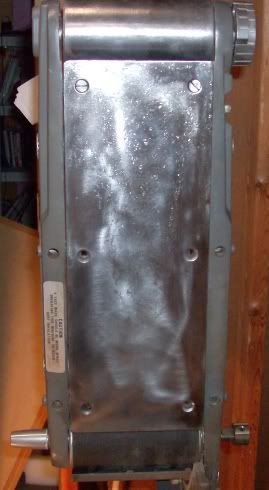
Someone suggested I should check the belt sander's platen. I wish I hadn't.
This is the worst rust removal I have worked on so far. The dark streaks are penetrating oil. I had planned to remove the platen and work on it off the sander. However, I could not get the top two screws unfastened. They are just sheet metal screws going into a clip. I wouldn't think there would be enough for the rust to hold.
I used the same procedure on this as with the tubes on my Greenie, a coarse Weiler cup brush attached to a drill with Brasso. After nearly an hour and a half, I felt this was about the best I could do.
Unfortunately, the rust was so bad that the pits were pretty deep. At least the pits are shiny now.
There also is a problem with the tracking. I'll have to probably tear it down to figure out why it does not seem to track properly. The drum at the top slants to the right, and the adjustment knob does not raise it up.
bluekayak wrote:Someone suggested I should check the belt sander's platen. I wish I hadn't.
This is the worst rust removal I have worked on so far. The dark streaks are penetrating oil. I had planned to remove the platen and work on it off the sander. However, I could not get the top two screws unfastened. They are just sheet metal screws going into a clip. I wouldn't think there would be enough for the rust to hold.
I used the same procedure on this as with the tubes on my Greenie, a coarse Weiler cup brush attached to a drill with Brasso. After nearly an hour and a half, I felt this was about the best I could do.
Unfortunately, the rust was so bad that the pits were pretty deep. At least the pits are shiny now.
There also is a problem with the tracking. I'll have to probably tear it down to figure out why it does not seem to track properly. The drum at the top slants to the right, and the adjustment knob does not raise it up.
Jerry Floren
St. Peter, MN
If the tension has not been 'set', the slant is normal. Rotate the knob a couple turns(CW until it 'clicks'). It should be square to the end and the drum should move in and out evenly(almost) on both sides. Pushing in the release 'unsets' it.
╔═══╗
╟JPG ╢
╚═══╝
Goldie(Bought New SN 377425)/4" jointer/6" beltsander/12" planer/stripsander/bandsaw/powerstation /Scroll saw/Jig saw /Craftsman 10" ras/Craftsman 6" thicknessplaner/ Dayton10"tablesaw(restoredfromneighborstrashpile)/ Mark VII restoration in 'progress'/ 10E[/size](SN E3779) restoration in progress, a 510 on the back burner and a growing pile of items to be eventually returned to useful life. - aka Red Grange
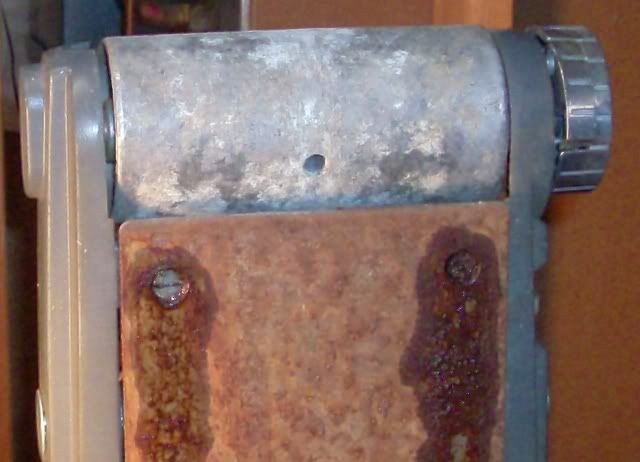
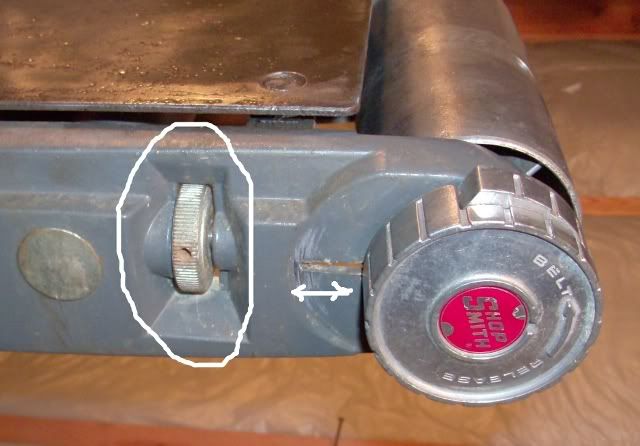
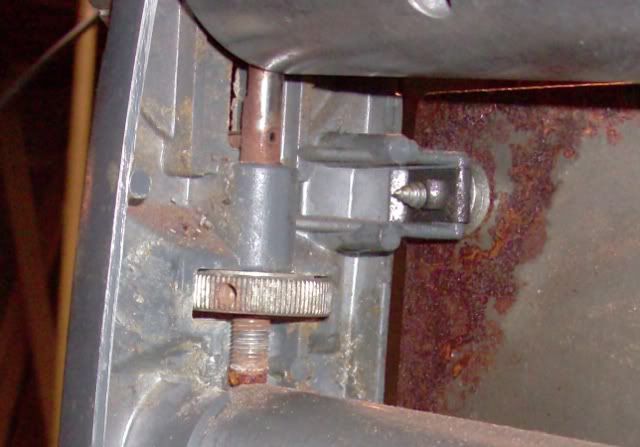
Thanks JPG for the suggestion to check the tension. I just tried that, but it still does not track properly. There is knob that is supposed to move the idler drum up and down, and that knob does not seem to move anything. I can see something moving along the path of the white arrows, but the idler drum does not move. Maybe a piece or two is missing, or rusted too badly to function.
Here is the knob from the back of the sander.
Here is a picture of this area from the manual. I wonder if that small piece by the arrow didn't get damaged by rust.
The knurled wheel that you reference in your photo is the knob that is used to tension one side of the drive wheel for the belt. Adjusting this knob moves one end of the drive wheel up and down changing tension and causing the belt to move left or right.
I think you need to tear that puppie down, clean it and put it back together. By the time you are done viewing this Sawdust Session, you'll be expert.
"Making Sawdust Safely" Dusty
Sent from my Dell XPS using Firefox.
Thanks for the link for the Sawdust Session on a belt sander overhaul. I just waxed the parts I shined and think I'll put this away for a later project.
The 'Tension Knob' I was referring to is the one in your pix that has arrows on it and the words belt release. Turning it in the direction OPPOSITE to the direction of the arrows SETS the tension.
The purpose of the rusted pin you were concerned about is to keep the threaded shaft from turning when the knurled 'nut' is turned. The purpose of the knurled 'nut' is to adjust the tracking of the belt. It moves only that one side of the drum in/out.
╔═══╗
╟JPG ╢
╚═══╝
Goldie(Bought New SN 377425)/4" jointer/6" beltsander/12" planer/stripsander/bandsaw/powerstation /Scroll saw/Jig saw /Craftsman 10" ras/Craftsman 6" thicknessplaner/ Dayton10"tablesaw(restoredfromneighborstrashpile)/ Mark VII restoration in 'progress'/ 10E[/size](SN E3779) restoration in progress, a 510 on the back burner and a growing pile of items to be eventually returned to useful life. - aka Red Grange


