Gallery of completed woodworking projects
Moderator: admin
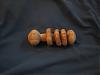
Thought I'd share these photos of a box I made this past week with my 500 and Dewealt 788. It's a rescue log from my fater-in-laws wood pile. Spalted birch and based on the Potpourri Box in the lattest Wood mag. This log prompted me to grab a whole pickup load last summer so I cant wait to work with the rest of it.
- Attachments
-
- Lid off Birch Box (Custom).JPG (52.65 KiB) Viewed 8263 times
-
- Lid on Birch Box (Custom).JPG (34.4 KiB) Viewed 8229 times
-
- Side View Birch Box (Custom).JPG (45.91 KiB) Viewed 8229 times
-
- Top Birch Box (Custom).JPG (57.3 KiB) Viewed 8220 times
Paul B

GREAT looking box ya made there. Just remember to protect yourself with that fungus wood.
SS 500(09/1980), DC3300, jointer, bandsaw, belt sander, Strip Sander, drum sanders,molder, dado, biscuit joiner, universal lathe tool rest, Oneway talon chuck, router bits & chucks and a De Walt 735 planer,a #5,#6, block planes. ALL in a 100 square foot shop.
.
.
Bob
.
.
Bob

Way cool sir and unique. Thats what I want to do next as I'm a newbie. Small jewelry / storage boxes with different joints ect on each one.
Found a new wood source here. Crazy small place, no one has ever heard of, no sign. The guy likes woodworking as a hobby so be bought a mill and takes down specialty types of trees and cuts them up! He has a SS in the corner with little or no use and big (to me) commmercial stuff. Wood everywhere and all kinds. Maple-Walnut-Cherry-Oak-Hickory-all kinds. Bets part is the price. They charge me by the foot or so, its flat rate cash only. For 6-10 $ I can come out with all kinds of goodies. I'm ready with those and a few scraps from a nice cabinet guy (hmm) to finally get started.
Found a new wood source here. Crazy small place, no one has ever heard of, no sign. The guy likes woodworking as a hobby so be bought a mill and takes down specialty types of trees and cuts them up! He has a SS in the corner with little or no use and big (to me) commmercial stuff. Wood everywhere and all kinds. Maple-Walnut-Cherry-Oak-Hickory-all kinds. Bets part is the price. They charge me by the foot or so, its flat rate cash only. For 6-10 $ I can come out with all kinds of goodies. I'm ready with those and a few scraps from a nice cabinet guy (hmm) to finally get started.
R Hart
-
terrydowning

- Platinum Member
- Posts: 1678
- Joined: Mon Jul 19, 2010 3:26 pm
- Location: Windsor, CO
Graduation Pens Complete
I volunteered to make pens as gifts to the graduating seniors in our Music Program.
School colors are blue and gold. Turned in PSI Oceana Colorgrain, Designer 24K with year bands and treble clef clips. Finish is 3-4 coats of medium CA sanded to 600 polished with maguires scratchX and maguires gold formula carnuba wax.
[ATTACH]13044[/ATTACH]
Not just 10 Graduates
[ATTACH]13043[/ATTACH]
But 27 so I decided to make 30 in case there were any bad ones.
[ATTACH]13045[/ATTACH]
- Attachments
-
- 10GradPens.png (693.99 KiB) Viewed 8473 times
-
- GradPenOnRock.png (260.77 KiB) Viewed 8472 times
-
- All30GradPens2.png (709.07 KiB) Viewed 8474 times
--
Terry
Copy and paste the URLs into your browser if you want to see the photos.
1955 Shopsmith Mark 5 S/N 296860 Workshop and Tools
https://1drv.ms/i/s!AmpX5k8IhN7ahFCo9VvTDsCpoV_g
Public Photos of Projects
http://sdrv.ms/MaXNLX
Terry
Copy and paste the URLs into your browser if you want to see the photos.
1955 Shopsmith Mark 5 S/N 296860 Workshop and Tools
https://1drv.ms/i/s!AmpX5k8IhN7ahFCo9VvTDsCpoV_g
Public Photos of Projects
http://sdrv.ms/MaXNLX
-
terrydowning
- Platinum Member
- Posts: 1678
- Joined: Mon Jul 19, 2010 3:26 pm
- Location: Windsor, CO
mbcabinetmaker (Mark) started a great thread called Pen Turning 101 It's a great primer for us SS users that decide to turn pens.mrhart wrote:Those are absolutely awesome sir!
I'm inspired:)
Pen turning Q
What do I need to start? wood and a kit aside. I need to look through my SS box and see what i have.
I tnink I just have the standard SS acc, nothing specific for pen turning
I use a Mandrel from Penn State Industries that is shopsmith specific and the Penn State Industries "Mandrel Saver" for the tail stock.
Penn State has has some decent lower end kits their "Funline" series which I recommend as a good place to start due to their low cost. DON'T spend a fortune on a high end kit to learn on. Instructions on assembly are decent and I recommend reading them through. Each style of pen uses a set of bushings that have the dimensions to turn the ends to so the tips, finials, and center bands are the correct size. The mandrel comes with 7 slimline bushings so starting with the slim line style is a natural.
Bushings are NOT required in fact for the most precise fit, you should measure each end fitting with calipers and turn the blank down to the correct size using calipers. I used bushings for the graduation pens because time was short and I had so many to do. Bushings are definitely a big help when learning.
I recommend having very sharp tools for sizing the blanks. I start with a roughing gouge to get the blank round and close to the final size. Then i switch to a skew for final sizing and contouring.
Finishing is one of the most difficult parts and I suggest a site like penturners.org for detailed information on different finishes.
material can be as simple as cutting your own blanks from available stock. typically 5/8 X 5/8 X a couple of inches per section.
Let me know if you have any questions.
Fair warning. Turning pens can become very addictive.
I hope you enjoy.
--
Terry
Copy and paste the URLs into your browser if you want to see the photos.
1955 Shopsmith Mark 5 S/N 296860 Workshop and Tools
https://1drv.ms/i/s!AmpX5k8IhN7ahFCo9VvTDsCpoV_g
Public Photos of Projects
http://sdrv.ms/MaXNLX
Terry
Copy and paste the URLs into your browser if you want to see the photos.
1955 Shopsmith Mark 5 S/N 296860 Workshop and Tools
https://1drv.ms/i/s!AmpX5k8IhN7ahFCo9VvTDsCpoV_g
Public Photos of Projects
http://sdrv.ms/MaXNLX
I just this morning saw your post showing off these pens on penturners.org
Do you do your pen turning on your ShopSmith? If so are there any good features or limitations concerning doing pens on the SS?
I just bought my first used SS back in early Feburary, but due to being busy with finishing up my thesis (just over a week until I defend!), working, and still trying to have time for my wife and kids (including a 1 month old), I have not touched it since buying it. To top it all off we are buying a home and hoping to close in a couple of weeks. So, once everything calms down a little I plan on finally starting to make some SS sawdust!
I have been lurking on penturners.org for the past couple of months, and can't wait to get my SS up and running and start trying out my hand at penturning.
Anyway, its fun to see SS owners work on multiple woodworking sites. Great looking pens by the way!
pessen
terrydowning wrote:I volunteered to make pens as gifts to the graduating seniors in our Music Program.
School colors are blue and gold. Turned in PSI Oceana Colorgrain, Designer 24K with year bands and treble clef clips. Finish is 3-4 coats of medium CA sanded to 600 polished with maguires scratchX and maguires gold formula carnuba wax.
[ATTACH]13044[/ATTACH]
Not just 10 Graduates
[ATTACH]13043[/ATTACH]
But 27 so I decided to make 30 in case there were any bad ones.
[ATTACH]13045[/ATTACH]
1981 Mark V, bought used in Feb. 2011
-
terrydowning
- Platinum Member
- Posts: 1678
- Joined: Mon Jul 19, 2010 3:26 pm
- Location: Windsor, CO
Yes, I do all of my turning on my SS using SS chisels.
I find the advancing of the quill to be very helpful at times.
One potential downside is that SS is not that common on the turning forums and some of the tools and techniques are for more standard lathes. Example: turning between centers with a 60 degree dead center in the head stock and a 60 degree live center in the tail stock. Since I don't have the ability to mount a MT2 dead center on the SS headstock and I've never seen one, I'll have to figure out how arrange a 60 degree dead center there.
Pretty much every thing can be worked around, it's just that the tutorials and articles assume a more standard lathe and you sometimes have to be creative. Example our tail stock does not advance, the quill does. This is exactly opposite to most wood lathes and you need to compensate for this fact in tutorials.
--
Terry
Copy and paste the URLs into your browser if you want to see the photos.
1955 Shopsmith Mark 5 S/N 296860 Workshop and Tools
https://1drv.ms/i/s!AmpX5k8IhN7ahFCo9VvTDsCpoV_g
Public Photos of Projects
http://sdrv.ms/MaXNLX
Terry
Copy and paste the URLs into your browser if you want to see the photos.
1955 Shopsmith Mark 5 S/N 296860 Workshop and Tools
https://1drv.ms/i/s!AmpX5k8IhN7ahFCo9VvTDsCpoV_g
Public Photos of Projects
http://sdrv.ms/MaXNLX
Those graduating seniors should feel real special. Quite an undertaking there and they all look great!! I would say that you spent a few hours or so on this project. I also do all my turning on my Shopsmith and have the mandrel from PSI as well and also use the shopsmith chisels. The only other lathes I have ever used was at Woodcraft when I took my how to turn classes. Their lathes were bench top models and one had to change the belts from one pulley to another for different speeds. I feel so much better doing my turnings on my machine.
Ron from Lewisburg, TN
Father and Son BBQ tables
Finished up two tables recently for my son and myself. My wife and son gave my large Egg for Christmas and after my son tasted some of the food coming off the egg he decided he had to have one too. So now we are a two Egg family and if I build something for mine I also have to make one for him too.
So here are the tables. They are made from cypress finished with 4 coats of Helmsman Spar Urethane. The working surface is solid granite with wood edging. Hanging hooks on the left and a handle/towel holder on the right. The drawer holds most of my eggsessories so far.
The wooden part of the top and the shelf are built solid with no gaps. I did this to keep water and dirt out of the drawer. I attached the top and shelf so they could move a little without splitting as the humidity and temperature changes.
[ATTACH]13157[/ATTACH]
[ATTACH]13158[/ATTACH]
[ATTACH]13159[/ATTACH]
[ATTACH]13160[/ATTACH]
- Attachments
-
- Table1.jpg (136.8 KiB) Viewed 8442 times
-
- Table2.jpg (118.11 KiB) Viewed 8415 times
-
- Table3.jpg (129.97 KiB) Viewed 8410 times
-
- Table4.jpg (106.71 KiB) Viewed 8401 times