Page 4 of 6
Posted: Fri Oct 31, 2008 8:13 pm
by dusty
Jim, I really enjoyed your video presentations (the entire series). It looks as though you have it down pat. I'm anxious to see your finished project (candle stick holder).
Posted: Sun Nov 23, 2008 1:47 pm
by davebodner
Resurrecting an old thread. Here's a jewelery box I made almost entirely with the Shopsmith. After carefully aligning the tablesaw, the long miter joints came out just about perfectly. I was real impressed with the precision. And the Shopsmith all-purpose blade left the miters smooth enough that I didn't have to sand.
Cherry and walnut "cabinet" with bocote (as I recall) drawer fronts. Top was bookmatched mahogany, split with the SS bandsaw. I turned the ebony drawer pulls. They're really too small, so I might replace them. Good thing they're only a friction fit. The SS jointer did a fine job of preparation for butt joints.
The photos stink, and my design isn't much better (just a big cube). But any imperfection isn't the machine's fault, it was my own.
Posted: Sun Nov 23, 2008 2:33 pm
by a1gutterman

Dave,
Thank you for sharing. That is a handsome jewelry box. I especially like those fancy corners.

Posted: Sun Nov 23, 2008 6:34 pm
by nuhobby
Way to go, Dave!
A nice project worthy of a fine forum thread.
Posted: Sun Nov 23, 2008 7:41 pm
by kd6vpe
Very nice work there Dave,
I can see you have learned the Shopsmith can do anything the others can do with just a little attention to detail and alignments. Thanks for sharing.
Posted: Sun Nov 23, 2008 9:41 pm
by charlese
Yep!
ATTA BOY DAVE! Thanks for your photos!
Love the fact that you turned the small pulls. Some of us have difficulty turning small things. I love showing it can be done!
Also really nice mitered corners. You made them with a Shopsmith combo blade and no jointing. Once again showing this can be done with a SS combo.

We've recently been having a discussion in another part of the forum about quality of saw blades vs. expense.
Posted: Tue Nov 25, 2008 3:08 pm
by heathicus
Here are photos of my first "real" project. Our fireplace was surrounded by very poorly applied tile so I built a new surround and mantel for it. Unfortunately, I only used the Shopsmith to sand some of the trim as the disk sander is still the only attachment I have (more parts are currently being shipped to me).
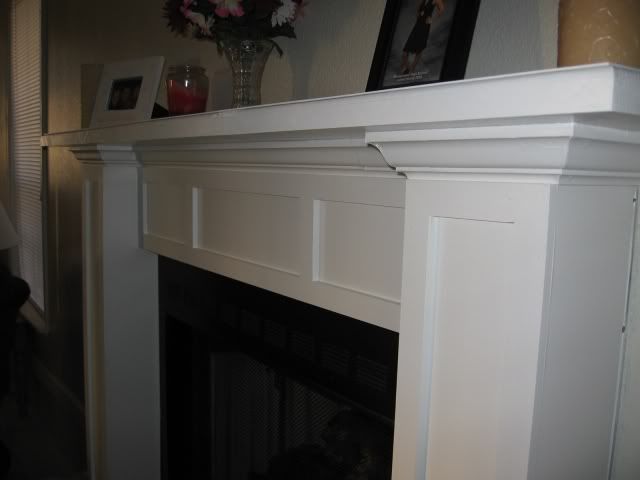
I detailed the full project including photos of the "before" and "during" at Lumberjocks.com.
http://lumberjocks.com/projects/11449
I'm still very much a "newbie" at this and anybody else here could have done a better job, but I'm proud of it.
Posted: Tue Nov 25, 2008 4:00 pm
by charlese
Beautiful mantle, Heath!!!:D Congratulations to both you and your Wife! That is a beautiful job of painting. Sorry about over use of the work Beautiful, but that is exactly what the unit is! Beautiful!
I loved your methods of straightforward construction! Looks like it will be there for a long while. Your trim really finishes off the mantle to give a more classic appearance. Nice job! Hope to be hearing more from you in the future.
An ATTA BOY to both of you!
attaboy
Posted: Tue Nov 25, 2008 4:30 pm
by jdramsey
Nice job from what I can see.
Posted: Tue Nov 25, 2008 4:52 pm
by dusty
attaboy, Heath
You and your wife must be very proud. Great team work.
The equity in your house has just jumped enough to buy yourself a new tool.