Page 4 of 5
Re: A Slow Clock (Build) To The Past -- Can I Do This?
Posted: Mon Jan 25, 2016 11:10 am
by JPG
?????
Re: A Slow Clock (Build) To The Past -- Can I Do This?
Posted: Mon Jan 25, 2016 11:15 am
by Jack Wilson
Al,
No doubt you can build the clock.
Guys,
Good stuff is coming from this thread. I will be watching and learning as usual.
Jack
Re: A Slow Clock (Build) To The Past -- Can I Do This?
Posted: Mon Jan 25, 2016 11:48 am
by algale
JPG, that's exactly the setup I imagined in my mind's eye after reading the description I posted. I don't see why it wouldn't work if the goose neck blank is a consistent width and fits snugly between the bearings. Since this is in vertical mode, the Horizontal location of the cut is controlled by the table height adjustment and the depth of cut is controlled by the quill advance.
I've also seen some examples of under table routers and a single point fence, above the bit, riding against a template screwed to the blank. I think that's kind of a similar idea to what Buckeye described. I'd think this set up would be better because the bearings take the guess work out of keeping a template tangent to the single point fence.
As usual, I am going to research and overthink the heck out of this and maybe try several method before I decide what works best for me.
Thanks, Jack and others for the encouragement and expressions of confidence.
Re: A Slow Clock (Build) To The Past -- Can I Do This?
Posted: Sat Jan 30, 2016 5:04 pm
by algale
Just a note to thank Buckeye for his book recommendation. I received my copy of Mr Sawdust's "How to Master the Radial Arm Saw" today. While much of the radial arm stuff is not going to be useful to me, I can probably adapt the swan neck molding technique he used to the Shopsmith on my clock project.
But even if I don't end up using that technique (and I now know of several others, the book is worth the price of admission just for its chapter on using the molding head. If you own the Shopsmith molding head, as I do, you quickly find out that there's very little written on using it beyond the very basics. This book has really opened my eyes about how to use and combine the knife profiles I have to their full advantage.
So, thanks again, Buckeye!
-Al
Re: A Slow Clock (Build) To The Past -- Can I Do This?
Posted: Sat Jan 30, 2016 11:29 pm
by BuckeyeDennis
algale wrote:Just a note to thank Buckeye for his book recommendation. I received my copy of Mr Sawdust's "How to Master the Radial Arm Saw" today. While much of the radial arm stuff is not going to be useful to me, I can probably adapt the swan neck molding technique he used to the Shopsmith on my clock project.
But even if I don't end up using that technique (and I now know of several others, the book is worth the price of admission just for its chapter on using the molding head. If you own the Shopsmith molding head, as I do, you quickly find out that there's very little written on using it beyond the very basics. This book has really opened my eyes about how to use and combine the knife profiles I have to their full advantage.
So, thanks again, Buckeye!
-Al
You're very welcome, Al. I learned a ton of stuff from that book, and it's a good read as well. Be sure to check out the section on kerfing. Mr. Sawdust gives the magic formula for how to kerf so that you get a rock-solid workpiece with exactly the radius you want. I went through the geometry, and his formula is dead-on. I haven't seen a precision kerfing technique like his anywhere else.
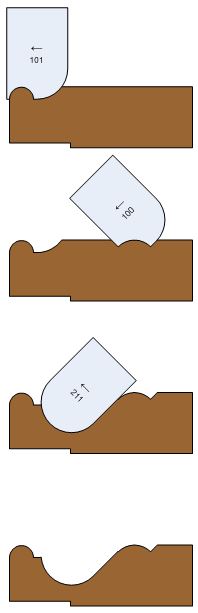
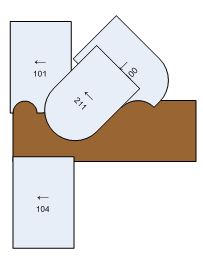
As for combining knife profiles for moldings, computers make it easier than ever. This topic came up over at the DeWalt radial saw forum a while back, and one of the guys there (from Europe) had a slick way of doing it with some basic 2D CAD software. Which motivated me to figure out how to do it with Microsoft Visio, 'cuz that's what I got. Here's an example, so the other guys here can see what we're talking about. First, I built a few "virtual" knife profiles. These are simple shapes, so they only take couple minutes each.
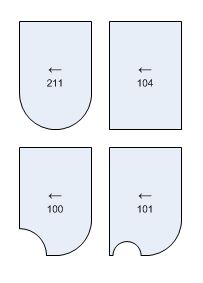
- Molding knives.JPG (13.05 KiB) Viewed 2736 times
Then I arranged them atop the workpiece blank, covering up the areas that I want to mill away to make the profile.
- Molding2.JPG (19.12 KiB) Viewed 2736 times
Finally, I had Visio subtract each knife profile in turn from the workpiece blank, to show the progression of cuts.
- Molding1.JPG (13.5 KiB) Viewed 2736 times
In this example, some of the cuts are with the RAS head tilted at 45 degrees. That may be too much for the SS table to tilt with a molder head. But I do know that you can tilt it a fair amount. Just last weekend, I needed to cut a 25 degree bevel on the edge of a long heavy Corian workpiece. Rather than try to stand it on edge and use a tall auxiliary fence, I installed a 45 degree V knife in my molder head, and tilted the table downward by 20 degrees. I had to do the operation without a table insert, but aside from that it worked just fine.
Re: A Slow Clock (Build) To The Past -- Can I Do This?
Posted: Sat Jan 30, 2016 11:41 pm
by algale
BuckeyeDennis wrote:algale wrote:
You're very welcome, Al. I learned a ton of stuff from that book, and it's a good read as well. Be sure to check out the section on kerfing. Mr. Sawdust gives the magic formula for how to kerf so that you get a rock-solid workpiece with exactly the radius you want. I went through the geometry, and his formula is dead-on. I haven't seen a precision kerfing technique like his anywhere else.
As for combining knife profiles for moldings, computers make it easier than ever. This topic came up over at the DeWalt radial saw forum a while back, and one of the guys there (from Europe) had a slick way of doing it with some basic 2D CAD software. Which motivated me to figure out how to do it with Microsoft Visio, 'cuz that's what I got. Here's an example, so the other guys here can see what we're talking about. First, I built a few "virtual" knife profiles. These are simple shapes, so they only take couple minutes each.
Molding knives.JPG
Then I arranged them atop the workpiece blank, covering up the areas that I want to mill away to make the profile.
Molding1.JPG
Finally, I had Visio subtract each knife profile in turn from the workpiece blank, to show the progression of cuts.
Molding2.JPG
In this example, some of the cuts are with the RAS head tilted at 45 degrees. That may be too much for the SS table to tilt with a molder head. But I do know that you can tilt it a fair amount. Just last weekend, I needed to cut a 25 degree bevel on the edge of a long heavy Corian workpiece. Rather than try to stand it on edge and use a tall auxiliary fence, I installed a 45 degree V knife in my molder head, and tilted the table downward by 20 degrees. I had to do the operation without a table insert, but aside from that it worked just fine.
Funny you mention the kerfing because I did read that section and found it fascinating!
Also funny you mention that 45 V molder because I was thinking about that profile today and how it would help cut the most common bevel without tilting the table.
Lastly, I wish I were more computer literate because I would love to be able to load my knife profiles into a program and be able to use it to design moldings like that!
Re: A Slow Clock (Build) To The Past -- Can I Do This?
Posted: Sun Jan 31, 2016 8:16 pm
by masonsailor2
Hi Al
The overhead routing method using the twin bearings is awkward and I doubt it will give you the results you are looking for. Somewhere I actually have the router chuck for the radial arm saw and I even have a router mounting attachment that attaches the router to the radial arm saw power head. They date back to the late 70,s. I was never able to achieve consistent results with either setup. The only way I have ever been able to achieve really good results is using a router with collets and building a pattern jig where the collet will allow the router to follow the pattern with the wood securely fastened to a subsurface of the jig. It sounds a lot more complicated than it is. I am flying home right now but in the next day or so I will post some drawings or photos. It will give you near perfect results using multiple bits and passes.
Paul
Re: A Slow Clock (Build) To The Past -- Can I Do This?
Posted: Mon Feb 01, 2016 4:23 pm
by everettdavis
As I was growing up, the professor who lived across the street from me would roll out his 10ER, and I gladly watched him and even helped him make a number of grandfather clocks and other things. He always insisted in having the clock movement before he started.
As I recall, they came with fairly detailed specifications for the various chambers as he called them.
He was he first who taught me how to make filler for nail holes from the sawdust of the actual wood in the project to make them disappear and how to countersink the nails properly to insure it would stay there forever.
We would mix up the filler with a bit of the stain and when we were done, the only way to find one of the nails was with a strong magnet.
That fascinated me as a boy, and started me on my Shopsmith journey when I was finally able to buy one. Still looking to score the 10ER that I will painstakingly restore in honor of my mentor, then I will tackle a grandfather clock perhaps someday using it for some of the project.
He loved working with pecan and oak, woods that he would travel great distances to acquire. He found a very old farmhouse with a buddy of his in east Texas that when the took the plaster off the walls, most of the lath, many of the studs, floor joists and ridge beam were from very old black walnut that we painstakingly worked to build pieces of furniture for his home. The ridge beam became the mantle in his living room.
He said someone had to purposefully order that material from back east and have it shipped in by rail, then by wagon to build that house in Texas.
Someone was about to burn it down when he and his friend agreed to salvage moldings and the base lumber they could from the house and the old barn.
I was blessed to grow up in that neighborhood and have access to that as a boy.
Great memories... but I ramble... I can't encourage you enough to build your grandfather clock, because I know we all want to see it and continue to learn in the process.
Everett
Re: A Slow Clock (Build) To The Past -- Can I Do This?
Posted: Tue Feb 02, 2016 2:22 am
by masonsailor2
I managed to get an hour in the shop tonight Al and managed to get an example done to show you the router technique. This technique has the advantage of allowing you to use router bits in any combination you choose to create your profile. You can also create a sled and use the SS in shaper mode but the draw back there is the cost of the shaper bits vs router bits. The router method also gives you a much higher cutter speed than the SS. Its also difficult to shape fine detail using the shaper as opposed to the router. The first step is to choose the size of the rosette you will be using and draw the pattern including the rosette. Its best to choose a rosette size that you have a matching forstner bit. Just about anything will work for the template. I used a piece of particle board. Draw your molding pattern and cut it out and then sand it to shape. I used the drum sander and belt sander to sand it to the final profile. Next I prepared the piece of wood for the molding. Use the pattern to trace the profile on the piece of wood and determine the location of the rosette. Drill out the rosette location with the forsner bit. This will ultimately cope the molding to the rosette. Now screw the block of wood that will become the molding to a piece of plywood. I fastened it directly to the bench because my bench top is just a sacrificial piece of particle board. Next screw the template to the wood with a backseat commensurate with the size of the bit and the collet or router base. I used the router base instead of a collet but either works. Usually the choice of whether to use a collet or the router base is determined by the size of the bit. Some bits are too big too use a collet. I used a straight bit first to trim the wood to size and then used a cove bit to create the molding. At this point you can make multiple passes with any number of bits to create as intricate a molding as you like. When done trace a line to determine the width of the molding, cut it out on the band saw and sand the back smooth for the finished product. Hope all this helped.
Paul
Re: A Slow Clock (Build) To The Past -- Can I Do This?
Posted: Tue Feb 02, 2016 6:33 am
by algale
Paul (masonssailor2), talk about going the extra mile! Thanks for the demo! I've read about 5 or 6 different methods for doing this and while yours has elements of several, it may be the easiest overall! I will have to give it a try!
I'm curious where you learned this technique and also what you have built with it.
The only potential issue I see in my case is that since I am hoping to copy a specific molding profile, it will be a bit of hit or miss whether the collets/base/router bits combinations will give me the correct spacing to create the profile.
Thanks again!
Al