Page 4 of 11
Re: 1957 Greenie Restoration
Posted: Wed Apr 20, 2016 7:06 pm
by ERLover
Looking good, and good choice on the castor color decision. IMHP
Re: 1957 Greenie Restoration
Posted: Wed Apr 20, 2016 7:24 pm
by jsburger
jjbuzard wrote:Got the bench tubes back from the Powder Coater today, they look awesome!
Put the bench together this afternoon, now we can progress!
Bench complete.jpg
WoW! Just beautiful.
Re: 1957 Greenie Restoration
Posted: Wed Apr 20, 2016 9:12 pm
by oldiron
JJ,
Just simply Excellent!!!!!
We're about as anxious as a blind dog in a meat house waiting to see the finished assembly.....
Mike
Re: 1957 Greenie Restoration
Posted: Thu Apr 21, 2016 12:24 am
by reubenjames
oldiron wrote:
We're about as anxious as a blind dog in a meat house waiting to see the finished assembly.....
Can a blind dog see the finished assembly?

Re: 1957 Greenie Restoration
Posted: Thu Apr 21, 2016 10:04 am
by rjent
Outstanding!
Love to see these machines being "saved" from the junk pile. You will have a Shopsmith that you can use for many years.
Looks good!

Re: 1957 Greenie Restoration
Posted: Thu Apr 21, 2016 11:37 am
by everettdavis
reubenjames wrote:I'm really anxious to see what a "new" Greenie would really have looked like with a more precise color match!
I am contemplating two Greenies that I have and doing one with the Verde Green Rustoleum, and one with the Shopsmith branded color matching paint.
I realize it is Shopsmith's interpretation of color matching paint based on Magna's paint selection in the early 1950's which certainly had different chemical compositions.
My decision has not been made whether to do the Vietnam era Camo tribute to the troops on the legs of either or both of them, which has me contemplating what to select for each.
I know that from the base up, I will keep the traditional green color scheme on the headrest, base, carriage, headstock, and tailstock etc. in each version of the green color mix. It will be interesting to see how they compare.
I am trying to decide if I want to do the legs solid, then add a green camo band accent stripe or do them totally in camo. I don't know yet, but I will post some pictures when I start restoring those machines.
I have some 10E / 10ER projects in front of them.
Everett
Re: 1957 Greenie Restoration
Posted: Thu Apr 21, 2016 6:14 pm
by jjbuzard
Re: 1957 Greenie Restoration
Posted: Thu Apr 21, 2016 6:45 pm
by dusty
Looking great. I said that when you get done it will look like NEW. You sure are not letting me down.
Does the table insert get a coat of red? Hmmm, Maybe they did not do that back then.
Re: 1957 Greenie Restoration
Posted: Thu Apr 21, 2016 6:55 pm
by ERLover
I dont think so Dusty, 2 greenies, and goldie, and 2 grawlings, and all the throat plates are brushed Aluminum, no matter what the application is for the throat plates.
Re: 1957 Greenie Restoration
Posted: Thu Apr 21, 2016 8:53 pm
by jjbuzard
Also Today I polished the way tubes, I decided this machine was going to be original, up to the Headstock upgrades, so rather than use the Bench and Way Tubes I bought on line, I used the original, the others will go on eBay.
So I built a jig to polish the way tubes. I used a freeze plug on the drive end.
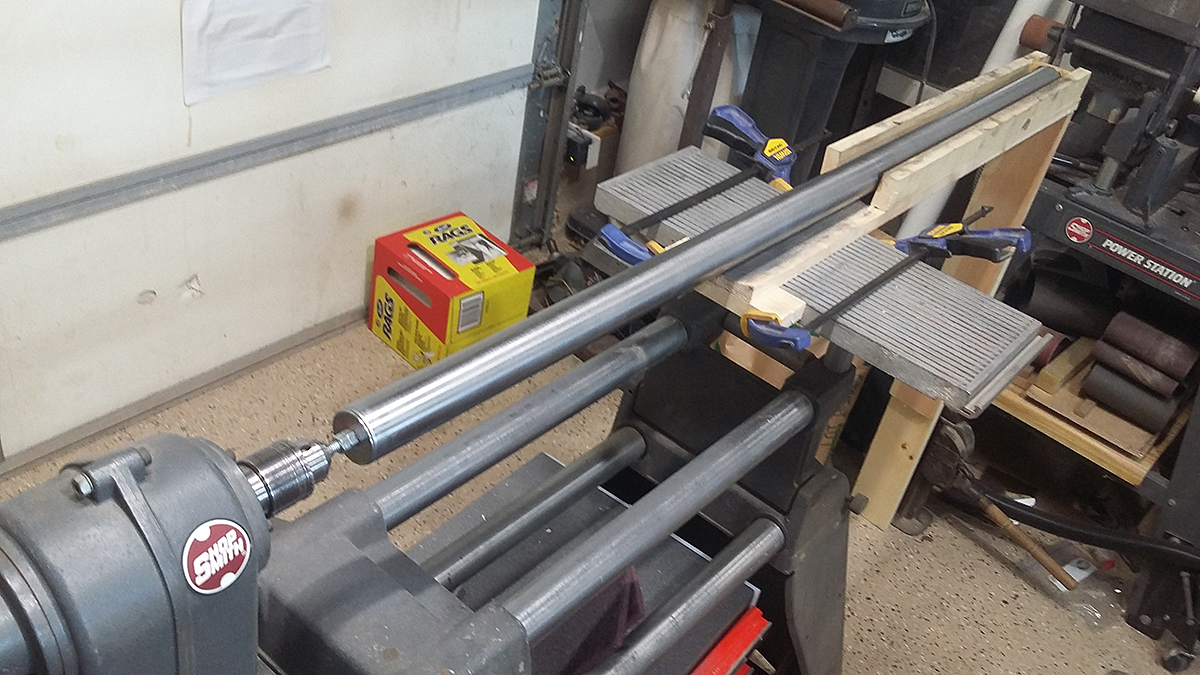
- Tube polishing.jpg (655.68 KiB) Viewed 2635 times
The tube rides about 3/4" above the bottom of the trough allowing room for Emory Cloth and Scotch Brite pads to be moved all the way to the end, after polishing the 1st half flip the tube end for end.
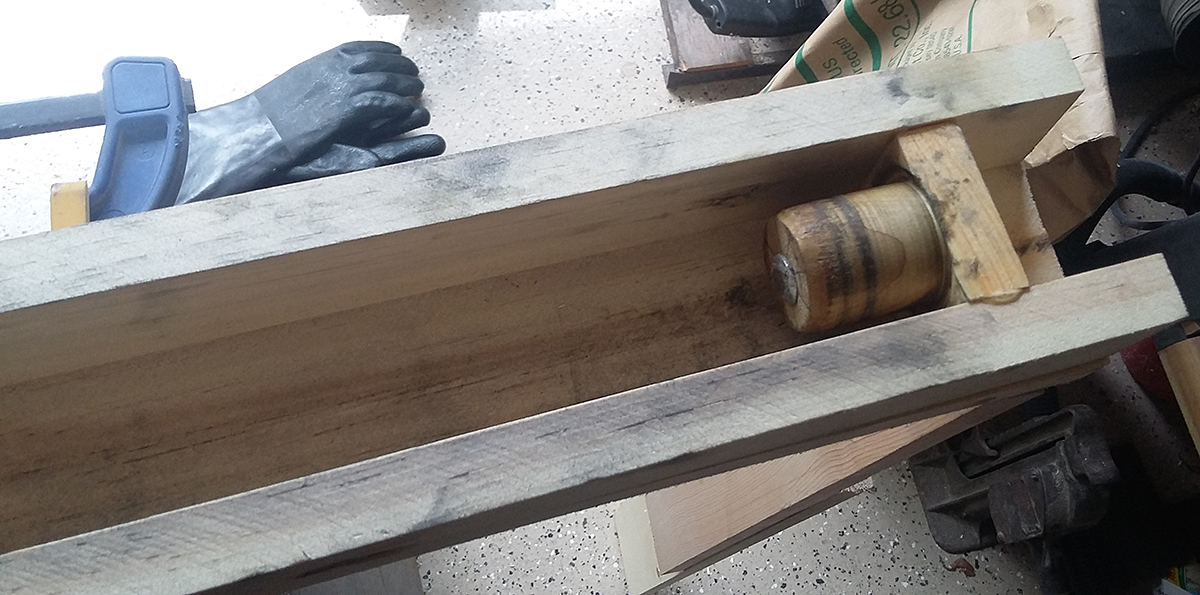
- pivot.jpg (516.64 KiB) Viewed 2635 times
I used a wood dowel on the far end, the end of the trough and the pivot keep the tube in place, I recommend smoothing the seam on the inside of the tube for smoother running.