Page 4 of 6
Re: New to the hobby; looking for tips
Posted: Sun May 31, 2020 11:57 am
by DLB
ehbowen wrote:Note: The quill extension is very, very stiff; at first I thought it was frozen even though I released all locks.
Since you are new to SS there are three easy mistakes, best to look at those first. You mentioned locks, plural, so probably not the first two: loosen the Quill Lock in the front and the Feed Stop in the rear. Next is make sure this setscrew, circled in red, is not fully seated:
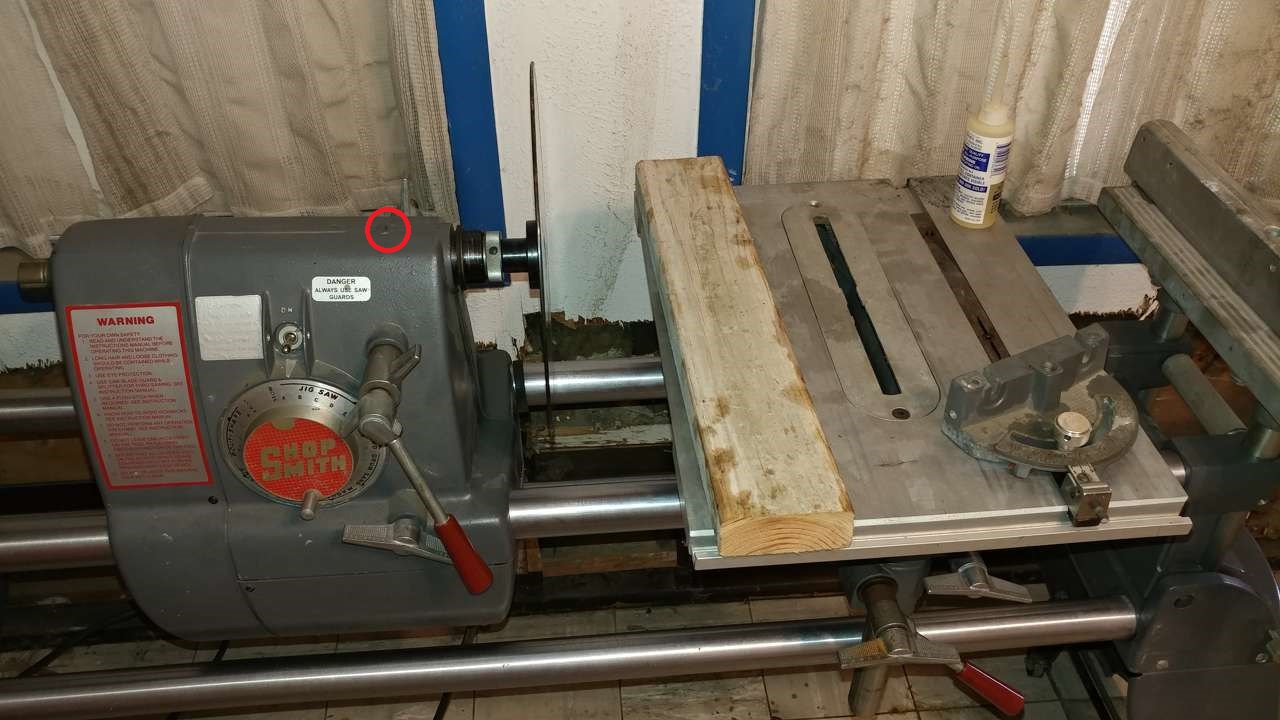
- Guide setscrew
- Headstock-Carriage.jpg (187.28 KiB) Viewed 11088 times
Loosen it slightly, 1/8 turn, and see if it frees up the Quill. If that is not it, it becomes slightly more complicated. I'd say start a new thread under Maintenance and Repair but first review this recent thread:
https://www.shopsmith.com/ss_forum/main ... 23456.html
Congratulations on your purchase.
- David
Re: New to the hobby; looking for tips
Posted: Sun May 31, 2020 6:00 pm
by ehbowen
Okay, that setscrew didn't help; I loosened it almost a full turn and the quill is still stiff. I didn't recognize it as a setscrew at first; it was covered by a plastic plug. Then I saw what seemed to be a similar setscrew on the back of the headstock above the assembly to set the quill feed limit and I tried loosening that. Mistake; it looks as if it was for a spring to counterbalance the weight of the quill in drill press mode...the stop indicator made close to a full turn when I loosened it. So now I have something else to fix.
Will try to review the other thread tonight; it's kind of long.
Re: New to the hobby; looking for tips
Posted: Sun May 31, 2020 6:13 pm
by jsburger
ehbowen wrote:Okay, that setscrew didn't help; I loosened it almost a full turn and the quill is still stiff. I didn't recognize it as a setscrew at first; it was covered by a plastic plug. Then I saw what seemed to be a similar setscrew on the back of the headstock above the assembly to set the quill feed limit and I tried loosening that. Mistake; it looks as if it was for a spring to counterbalance the weight of the quill in drill press mode...the stop indicator made close to a full turn when I loosened it. So now I have something else to fix.
Will try to review the other thread tonight; it's kind of long.
The set screw on top of the housing is covered with putty from the factory. If the putty is still there as you suggest it is unlikely the screw is out of adjustment.
The quill rack and pinion along with the quill body and the housing are likely gummed up and causing the problem. Remove the quill and thoroughly clean everything. Then wax the quill and the housing with Johnson's paste wax. Do not use oil or grease. It collects saw dust and creates the problem you are seeing.
Re: New to the hobby; looking for tips
Posted: Sun May 31, 2020 7:31 pm
by rpd
ehbowen wrote:Okay, that setscrew didn't help; I loosened it almost a full turn and the quill is still stiff. I didn't recognize it as a setscrew at first; it was covered by a plastic plug. Then I saw what seemed to be a similar setscrew on the back of the headstock above the assembly to set the quill feed limit and I tried loosening that. Mistake; it looks as if it was for a spring to counterbalance the weight of the quill in drill press mode...the stop indicator made close to a full turn when I loosened it. So now I have something else to fix.
Will try to review the other thread tonight; it's kind of long.
This video may also be of help.

[youtube]
https://www.youtube.com/watch?v=YbHVTwSp9DI[/youtube]
Still No Woody Yet, But I'm Close...
Posted: Sun Jul 12, 2020 7:51 pm
by ehbowen
It's been a while since I've been able to work on the Shopsmith; Real Life has intervened...in this case, spelled "car trouble". But today I went into the machine and I think I've finally got the headstock ready.
For the sticking quill, I ended up taking out both the quill and the pinion assembly. Turned out that the rack was choked with sawdust and also some of the teeth in the far back were, to put it kindly, munged. Also, it looks as if someone in the past has thought that setscrew which rides in the quill groove was a lock screw; lots of "dimples" where it had been tightened down. Edit To Add: Good news, though, is that it looks as if this machine has been upgraded to the two-bearing quill by the previous owner.
I'm not sure if this was exactly the recommended fix, but I chucked the quill in a vise (gently) and took a sheet of 180 grit sandpaper to it to take down the high spots. And I cleaned it thoroughly of sawdust and applied paste wax before reinstalling it in the headstock. It moves in and out much more smoothly now. One question I still have: Just how much preload is there supposed to be on the quill? I'm not sure exactly how much of a twist to put on that spring.
In order to get the quill pinion out I had to take out the speed control assembly and that was a bit of an adventure. I think I finally managed to get everything set back up correctly and a high speed adjustment done (thanks to the links in the Maintenance & Repair section), but I'd feel more comfortable if I had a tachometer to check it.
I did get all of the recommended lubrication (re)done while I had the headstock open, and As Far As I Can Tell everything in there seems to be undamaged (although a couple of the quadrant teeth look a little bent...not badly, though). There was one loose item which I couldn't identify, a white plastic strap a little over an inch long which looks like a restraint for electrical wires. Where is that supposed to go?
I think, though, that the headstock is essentially done! Now to move on to getting everything properly aligned and ready for my first real cuts!
Re: New to the hobby; looking for tips
Posted: Tue Jul 14, 2020 11:27 am
by br549
To re-tension the quill, it should be tightened 3 turns. Here is a link to a Sawdust Session that describes how to remove and replace the quill, and how to re-tension if necessary.
http://www.shopsmithacademy.com/SS_Arch ... enance.htm
The little white strap that you mentioned I seem to recall, but when I went out to take a picture of mine, I don't see it. Perhaps mine broke and I just removed it. I do think its only purpose was to hold the wires out of harms way. I do that with a twisted pipe cleaner and a little electrical tape, tying the individual conductors to each other and back to the main cord.
Re: New to the hobby; looking for tips
Posted: Tue Jul 14, 2020 1:37 pm
by ehbowen
It's beginning to look as if I have a warped main table.
Started really working on the alignment this morning. Saw blade I was using checked out good and flat, but when I put the table at 90 degrees to check its flatness I had to use three shims in the back right corner to get it flush against the blade. Zero degree and 45 degree tilt checked out OK after adjusting the stops, but when I checked the miter slots for parallel they were 1/8" out of line. I followed the procedure for loosening the trunnion bolts and tapping the table with a rubber mallet to realign, but I couldn't get them any closer than about 1/32". I suppose that's OK for what I'm doing right now (carpentry around the house), but I'd like to fix that eventually. Oh, and when I check the miter gauge at 45 degrees with an Oriental Square I get a different result depending on which side of the arbor I check it on. Again, not excessive but noticeable. I'm using a standard Shopsmith 10" combination saw blade.
I know of the old definition of a boat: A hole in the water, surrounded by wood, into which money is poured. That never said anything about the boatbuilding shop...
Re: New to the hobby; looking for tips
Posted: Tue Jul 14, 2020 3:24 pm
by JPG
Whoooieeee. Where to start?
One must be careful so as to adjust the 'correct' thing to achieve a given result.
I would NOT adjust for table co-planer with the 'blade' (table perpendicular to the shaft) until after all other adjustments are correct.
One must also be careful what is being used as a reference for each adjustment.
IIUC you adjusted the table EDGE to the saw blade. Not a desirable reference.
The important thing is miter slots parallel to the blade plane. ALSO the first thing that should be adjusted(table to trunion). This is done with the table top horizontal.
The only other table adjustment is the front to rear 'height'. NOW the table can be adjusted/checked (I would use a sanding disk rather than a saw blade).
This adjustment is accomplished by shimming between the table and the trunion. Care must be taken to insure not creating a left/right deviation from the front.(i.e. 4 locations to shim).
The reference here is the trunion pivots.
I do not recommend shimming the table unless one fully understands what is required and how to accomplish success AND how other adjustments may be affected.
The table vertical(drill press mode) is done by adjusting the stop bolts. That must be done after the front to rear is aligned.
ALL other adjustments do not include adjusting the table, but ALL depend upon the table as a reference.
Rip fence and miter gauge adjustments do not require table adjustments, but DO depend upon the table being correct.
I am unclear how you checked the miter gauge on opposite sides of the arbor. Also WHAT was the oriental square referencing? If the miter gauge slots are NOT perpendicular to the arbor, an unequal indication would be expected IF the miter gauge is moved(rotated 180°) from front side of the arbor shaft to the rear side.
I consider any miter gauge checking that does NOT involve actual cutting to be a rough check.
Re: New to the hobby; looking for tips
Posted: Tue Jul 14, 2020 6:24 pm
by reible
The modern versions of the tables have both miter slots done at the same time so it is very unlikely that they are off in respect to each other. It would something to check but the amount off if any would be pretty small, in the thousands of an inch.
I just recently shimmed my table on one of my units because I was working on a a set up that this became important. The best way to do this is described in the alignment procedure. I think you might be off on a tangent so get a copy of the procedure to follow and go step by step. I always try to get the "blade" to miter slot no more then .005" off. The rip fence then either needs to be parallel to the miter slots or slightly off in the away from the blade direction. Since I rip with the rip fence to the right then the fence is slightly off to the right, more important is is not off so that the wood is pinched between the blade and the fence by being tilted off the other way.
Ed
Re: New to the hobby; looking for tips
Posted: Wed Jul 15, 2020 5:34 am
by ehbowen
JPG wrote:
I would NOT adjust for table co-planer with the 'blade' (table perpendicular to the shaft) until after all other adjustments are correct.
I was following the procedure as given in the "Shopsmith Journals" DVD sold by Shopsmith.
One must also be careful what is being used as a reference for each adjustment.
IIUC you adjusted the table EDGE to the saw blade. Not a desirable reference.
No, I tilted the table to 90 degrees, ran it over to the saw blade, and locked everything down. The DVD said to check the contact points where the saw blade was at/over the miter slots (four corners). Three of the points were right up against the blade, but for the back right (top back when tilted) there was a gap of almost 1/16". This is what I shimmed out; now I have even contact all the way around the blade.
The important thing is miter slots parallel to the blade plane. ALSO the first thing that should be adjusted(table to trunion). This is done with the table top horizontal.
Again, I was following the procedure on the DVD which said to check the table first, then the miter slots. After that check I put the table back horizontal and verified that it was perpendicular to the blade with a combination square (and, yes, I did check the combination square for accuracy. I got it used, but it's a Brown & Sharpe...good quality). Just had to adjust the zero degree stop screw on the table tilt a couple of turns.
After that I checked the miter slots/table rake to see if they were parallel to the blade. They were WAY off...I had about a 1/8" difference between the near side of the blade and the far side. By loosening the trunnion bolts and adjusting the table I got most of that to go away, but I still ended up about 1/32" off of perfectly parallel after adjusting the table as far as it would go.
I am unclear how you checked the miter gauge on opposite sides of the arbor. Also WHAT was the oriental square referencing? If the miter gauge slots are NOT perpendicular to the arbor, an unequal indication would be expected IF the miter gauge is moved(rotated 180°) from front side of the arbor shaft to the rear side.
I consider any miter gauge checking that does NOT involve actual cutting to be a rough check.
I placed the table in sawing position with the blade projecting up about 2-1/2" through the slot, then checked the miter gauge against the saw blade with the combination square at 90 degrees and with the Oriental square at 45 degrees. I noticed a slight but real difference depending on whether the miter gauge and square were on the near side or the far side of the arbor. Of course, this could very well be due to the remaining rake of the table which I was unable to correct.