Ok, I usually do the finish last. I have two rockers that I did that way and had no issues. It is not difficult on these pieces because there are no really tight areas. Thanks again for the help. It is amazing how much there is to learn and how many people there are to help.
I have been keeping notes on this project and it seems to be a really good idea. I will make another of these beds, and I'll bet it is easier the second time with the notes.
For example, I will do all of the posts and spreaders first, dry fit them and then measure the slats to fit. I spent a lot of unneeded time setting up to get the spreaders to fit the slats when it would have been quicker to do the other way.
I had to adjust the slats a bit anyway.
dlbristol wrote:Ok, I usually do the finish last. I have two rockers that I did that way and had no issues. It is not difficult on these pieces because there are no really tight areas. Thanks again for the help. It is amazing how much there is to learn and how many people there are to help.
I have been keeping notes on this project and it seems to be a really good idea. I will make another of these beds, and I'll bet it is easier the second time with the notes.
For example, I will do all of the posts and spreaders first, dry fit them and then measure the slats to fit. I spent a lot of unneeded time setting up to get the spreaders to fit the slats when it would have been quicker to do the other way.
I had to adjust the slats a bit anyway.
I'm sure you realize the slats must be in the grooves of the spreaders before you glue the spreaders to the legs. - but I thought it safer to say this, rather than to leave it unsaid!
Octogenarian's have an earned right to be a curmudgeon.
Chuck in Lancaster, CA
You may want to give those slats just a bit of slack to allow for wood movement. And be careful to knot get glue on the slats (for the same reason), just the spacers.
Tim
Buying US made products will help keep YOUR job or retirement funds safer.
You know, I actually tried a dry fit to see if I could put the slats into the spreaders after They were in the legs!:o I seemed very reasonable until I tried it, then it seemed pretty silly to have thought it would work! I appreciate the help, and at this point I would never be offended by any thing like that. I don't think of those things all the time. I am at the most important point of knowledge in any new endeavor. I now have a pretty good idea just how little I really know about it!:) I have a plan to keep a bit of space on the slats as well. I did a dry fit and used a strip of plastic as a shim between the slat and spacer that i can pull out after the glue sets a bit. THANKS AGAIN.
Oh!- - I'm sure we were all newbies at least once! Like your plans said - 'you will become a more knowledgeable woodworker when you figure out this assembly'
When reading about your plastic spacer, I thought maybe your mind is set on the idea to glue in the slats by themselves then place the spacers. I hope not! Too much work, and will cause you to hurry too fast.
Glue on the ends of the slats is not necessary. Just allow them to "float" until you put in the spreaders. When you put glue into the slot to hold a spacer, that same glue ,along with the spacer itself, will hold the slat in place.
Remember to clamp the spacers to make sure the slots are closed on them.
Octogenarian's have an earned right to be a curmudgeon.
Chuck in Lancaster, CA
I was going to glue the spacers ,not the slats. I just thought it would be a quick and accurate way to be sure I had some space between the slat and spacer. If I didn't have something, I might forget and push them to tight.
This is the bed I started on last January! Progress has been slow, but I have learned a lot. I really had to feel my way through a lot of this, so I ended up doing lots of things two or three times,or taking things in small bites that could have been done in bigger ones. I'm sure the head board will go quicker now that I have the slat assembly issues figured out. Figuring out how to assemble it may take a while as it has three spreaders, not two. The rails require a 3/4 in dowel in the ends for the hardware screws to grab. Lots of clamping and a longer bit are going to be needed.
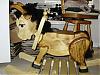
The chair is a project I did earlier this year for my wife. The chair was in pieces and had been for 35 years. It is at least 80 years old. ( man is the wood in it hard!) I had to rebuild some parts and then figure out how it all went together. I also did a trial run on the finishing for the bed. My grand daughter likes it . #2 daughter is looking for "just the right color" for the bed. Hope you enjoy this, I can say for sure I would not have gotten this far with out your help. Thanks
I neglected to explain the 3rd photo. I used a slot in the spreaders rather than mortising the slats in. This is a shot of the filled slot.
oh boy,
What a nice job there. So many beautiful things that can be built with wood and a shopsmith. Thank you for sharing your work. I is very inspiring. I am also working on a project that is taking along time. What the heck it is a hobby and I'm not doing it for a living so who cares how long it takes as long as it turns out as nice as your work I will be happy. Very nice work.
SS 500 upgraded to 510; SS bandsaw; SS jointer
SS Oscillating Drum Sander; Universal Lathe Rest;
lathe duplicatior, shaper fence and shapers; SS Belt
Sander
Jim www.youtube.com/kd6vpe