
Down to the last few posts and you finally get to see the what makes this so powerful a jig.
The first thing I did to day was to cut out a circle from the same thickness stock as I have been using. I didn't measure but I'd say it was about 6" in diameter. I then cut it in about half (again just by eye ball. We will pick up with the tips and pictures at this point.
My guess at the center was off by maybe a 1/32" but like I said no measurements. I picked the smaller of the halves and then eyed the center and put a tape mark making sure I was not going cut more then half of it.
[ATTACH]4803[/ATTACH]
When the cut was finished I had established what the size of each of the quarters were going to be, that being established by the tape mark. Now here is how this works, I marked the edge that had been cut so I wouldn't get confused. See below:
[ATTACH]4804[/ATTACH]
Now I rotated then flipped the part:
[ATTACH]4805[/ATTACH][ATTACH]4806[/ATTACH]
Using the tape I did all four quarters and they came out the same size... A better method would have been to set up a physical stop but the tape was good enough for me.
BTW yes we are on the same project this thread has been going on with.
Ed
Mystery project and tips along the way
Moderator: admin
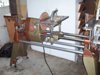
The next stage of the process is to do some routing. Since part of the post is for exposing readers to as much as possible I pulled out my Joint-Matic, an older shopsmith tool that just happens to work really well for jobs like this.
I almost scrapped using the Joint-Matic as I've misplaced the plastic guard... so don't do as I have done... or should I say the guard has been removed so you can see better???
[ATTACH]4807[/ATTACH]
The set up was done again without measuring. Using the t-track I was able to set the router depth and the slide location. The parts are a little small so a little help is in order. Anyway here they are:
[ATTACH]4808[/ATTACH]
Got any idea of what these are and why I made them the way I did? Soon all will be clear.
Ed
- Attachments
-
- 69 a little routing.jpg (63.99 KiB) Viewed 3004 times
-
- 70 all done.jpg (68.51 KiB) Viewed 3002 times
{Knight of the Shopsmith} [Hero's don't wear capes, they wear dog tags]
-
JPG

- Platinum Member
- Posts: 35598
- Joined: Wed Dec 10, 2008 7:42 pm
- Location: Lexington, Ky (TAMECAT territory)
Corner brace/squaring comes to mind, but then why the detail of making them identical????reible wrote:The next stage of the process is to do some routing. Since part of the post is for exposing readers to as much as possible I pulled out my Joint-Matic, an older shopsmith tool that just happens to work really well for jobs like this.
I almost scrapped using the Joint-Matic as I've misplaced the plastic guard... so don't do as I have done... or should I say the guard has been removed so you can see better???
[ATTACH]4807[/ATTACH]
The set up was done again without measuring. Using the t-track I was able to set the router depth and the slide location. The parts are a little small so a little help is in order. Anyway here they are:
[ATTACH]4808[/ATTACH]
Got any idea of what these are and why I made them the way I did? Soon all will be clear.
Ed
╔═══╗
╟JPG ╢
╚═══╝
Goldie(Bought New SN 377425)/4" jointer/6" beltsander/12" planer/stripsander/bandsaw/powerstation /Scroll saw/Jig saw /Craftsman 10" ras/Craftsman 6" thicknessplaner/ Dayton10"tablesaw(restoredfromneighborstrashpile)/ Mark VII restoration in 'progress'/ 10E[/size](SN E3779) restoration in progress, a 510 on the back burner and a growing pile of items to be eventually returned to useful life. - aka Red Grange
This is it, the final grand plan is happening right here and right now. Let's start with pictures:
[ATTACH]4809[/ATTACH]
Now picture a cabinet door and say a flute bit or maybe a core box bit in your router. Can you picture it?
[ATTACH]4810[/ATTACH]
How about some sort of design for a border on sign?
That style not to your liking? What if you made a set that looked like this:
[ATTACH]4811[/ATTACH]
Any shape you want for the corners... or what you wish make a shape to add to just the top...
Well I could go on for a long while with the options but if you can imagine it you should have lots of ideas popping up about now.
[ATTACH]4812[/ATTACH]
I'm not going to try and add anything more to this post but questions are welcome.
Ed
- Attachments
-
- 71 guess where they go.jpg (71.46 KiB) Viewed 2987 times
-
- 72 picture this.jpg (67.68 KiB) Viewed 2987 times
-
- 73 or do something like this.jpg (41.83 KiB) Viewed 2984 times
-
- 74 last of the lot.jpg (57.1 KiB) Viewed 2984 times
{Knight of the Shopsmith} [Hero's don't wear capes, they wear dog tags]

-
johnmccrossen
- Gold Member
- Posts: 173
- Joined: Wed Feb 21, 2007 8:09 pm
- Location: Washington
Thanks Ed for a great instructional thread. I really appreciate your efforts to educate others and demonstrate various techniques. This has been both thought provoking and fun to follow. John McCrossen
John McCrossen
Everett, Wa.
1954 Mk 5 SN 269454, 1955 Mk 5 SN 316013, 1960 Mk 5 SN 360792, 1962 Mk 5 SN 380102, Magna band saw, (2) jointers, (1) belt sander, (1) air compressor, (1) jig saw, (1) strip sander, (1) 20" scroll saw, DC 3300 dust collector, Sawsmith RAS, Craftsman table saw, 13" DeWalt planer, Triton 3 1/4 HP plunge router & table
-
JPG
- Platinum Member
- Posts: 35598
- Joined: Wed Dec 10, 2008 7:42 pm
- Location: Lexington, Ky (TAMECAT territory)
Ah So! Very good. Thank You! Real thought jump starter!
╔═══╗
╟JPG ╢
╚═══╝
Goldie(Bought New SN 377425)/4" jointer/6" beltsander/12" planer/stripsander/bandsaw/powerstation /Scroll saw/Jig saw /Craftsman 10" ras/Craftsman 6" thicknessplaner/ Dayton10"tablesaw(restoredfromneighborstrashpile)/ Mark VII restoration in 'progress'/ 10E[/size](SN E3779) restoration in progress, a 510 on the back burner and a growing pile of items to be eventually returned to useful life. - aka Red Grange
╟JPG ╢
╚═══╝
Goldie(Bought New SN 377425)/4" jointer/6" beltsander/12" planer/stripsander/bandsaw/powerstation /Scroll saw/Jig saw /Craftsman 10" ras/Craftsman 6" thicknessplaner/ Dayton10"tablesaw(restoredfromneighborstrashpile)/ Mark VII restoration in 'progress'/ 10E[/size](SN E3779) restoration in progress, a 510 on the back burner and a growing pile of items to be eventually returned to useful life. - aka Red Grange
Hi,
Sorry I though I was done but I had mentioned posting a quick reference table and I have not done that yet. So here that is and I hope I didn't mess up anything (had to regenerate the spreadsheets, found the drawings on one of my old computers)
[ATTACH]4814[/ATTACH]
[ATTACH]4815[/ATTACH][ATTACH]4816[/ATTACH]
[ATTACH]4817[/ATTACH][ATTACH]4818[/ATTACH]
Hope this makes since without me writing anymore on it. If it doesn't please ask.
Ed
- Attachments
-
- template guide 1.jpg (16.42 KiB) Viewed 2973 times
-
- template guide table C.jpg (87.74 KiB) Viewed 2972 times
-
- template guide table D.jpg (87.72 KiB) Viewed 2978 times
-
- template guide ex1.jpg (16.41 KiB) Viewed 2969 times
-
- template guide ex2.jpg (16.28 KiB) Viewed 2978 times
{Knight of the Shopsmith} [Hero's don't wear capes, they wear dog tags]
-
a1gutterman

- Platinum Member
- Posts: 3653
- Joined: Tue Jan 09, 2007 12:45 am
- Location: "close to" Seattle
Thank you, Ed! I found this tutorial very interesting. I have a project that I have been putting offand now I know exactly how to proceed. That jig and the additional corner pieces are perfect for it: I have to match some existing doors that include a pattern routed into them just the way that your jig will do.
Tim
Buying US made products will help keep YOUR job or retirement funds safer.
Buying US made products will help keep YOUR job or retirement funds safer.
-
robinson46176

- Platinum Member
- Posts: 4182
- Joined: Mon Mar 09, 2009 9:00 pm
- Location: Central Indiana (Shelbyville)
I love it...
I also loved the no measuring approach.
This is one of those things that could just keep growing in usefulness with minor additions over time.
Great pictures as well.
I also loved the no measuring approach.
This is one of those things that could just keep growing in usefulness with minor additions over time.
Great pictures as well.
--
farmer
Francis Robinson
I did not equip with Shopsmiths in spite of the setups but because of them.
1 1988 - Mark V 510 (bought new), 4 Poly vee 1 1/8th HP Mark V's, Mark VII, 1 Mark V Mini, 1 Frankensmith, 1 10-ER, 1 Mark V Push-me-Pull-me Drillpress, SS bandsaw, belt sander, jointer, jigsaw, shaper attach, mortising attach, TS-3650 Rigid tablesaw, RAS, 6" long bed jointer, Foley/Belsaw Planer/molder/ripsaw, 1" sander, oscillating spindle/belt sander, Scroll saw, Woodmizer sawmill