ldh wrote:Paul,
the nylon bolt takes up the side play in the Guide Column Post. Just enough tension to remove the side play yet allow the post to move smoothly up and down. Did you buy your saw new in 82? I am not sure just when SS started putting the nylon bolt in. I am not sure just when I started adding the nylon bolt on the saws that I work on, but I know it is just one of the mods that help make the SS Bandsaw a great little tool.
ldh
I purchased it new sometime after 1982. I got my 500 in 1982 and it came with a jointer (which I have never used though is has gotten lots of use) and regretted not getting the bandsaw. So I don't know exactly when I purchased it maybe 1983. I have since upgraded the table, fence, bearings and door but never saw this nylon bolt until yesterday.
How is it adjusted, or does it not need adjusting?
Paul Cohen
Beaverton, OR
A 1982 500 Shopsmith brand upgraded to a Mark 7 PowerPro, Jointer, Bandsaw (with Kreg fence), Strip Sander, Ring Master and lots of accessories all purchased new
12" Sliding Compound Mitre Saw, 1200 CFM DC
FYI, I rechecked my serial number against the chart and it indicates mine is from 1985 and did not have the nylon bolt. Of course when you get something used who knows what has been done to it....
I can see an improvement with it installed, still not perfect but closer. Once the guide blocks are in and adjusted most of that is left is a wash anyway.
The hardware store had 1-1/2" long ones and that is a good fit. They are slotted but I found I can just use my fingers to tighten it to a mix of less slop but not too much resistance to moving the guard up and down.
So far so good.
Ed
{Knight of the Shopsmith} [Hero's don't wear capes, they wear dog tags]
The blade stayed on.
The tires stayed on.
NO strange noises.
NO strange vibrations.
So you see it wasn't much of a day (just the way I like them).
I now have a working shopsmith bandsaw!
I still have the dust port to install, and the cover is going to get a shot of fresh paint in the form of Krylon fusion for plastic, 2531 black metallic hammered. Oh yea, maybe I'll add the brush inside.
Thanks to all who participated in this thread. Now are there anymore updates/upgrades that I should know about? And by this I mean ones that have not already been discussed.
Ed
{Knight of the Shopsmith} [Hero's don't wear capes, they wear dog tags]
I have also discovered another small issue. As the blade guard goes up it hits one of the ribs, maybe about an inch before reaching the top. This deflects the top of the arm to the right just a smidgen... have to evaluate what if any problem this might cause.
Has anyone else seen this?
Ed
{Knight of the Shopsmith} [Hero's don't wear capes, they wear dog tags]
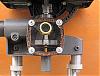
Back a couple of posts I mentioned that I was seeing some interference with the blade guard post and the webbing of the housing. It seems to happen with the guard up at 6". I know the capacity of the saw however you need a bit more then 6" to clear a 6" workpiece so.....
Here is a picture of what I see:
[ATTACH]13801[/ATTACH]
It would appear this has been this way for a while as I can see a wear spot on the casting. In fact it starts down farther then were I now see contact, perhaps indicating that adjustments have something to do with the point were contact is made.
Next time you have your cover off have a look.
Ed
Attachments
DSCF1625sc.jpg (73.77 KiB) Viewed 9520 times
{Knight of the Shopsmith} [Hero's don't wear capes, they wear dog tags]
Was planning on painting it today as well but when I read the can it said: "Product may not produce a hammered finish in very high humidity." And the temperature range is 40-85 degrees, and we are higher then that.
So it is time for a few more pictures.
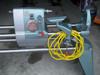
[ATTACH]13802[/ATTACH]
This shows the shopsmith with speed reducer and the 2-1/2 hole saw. The recommended speed for this operation is 200 rpm (G). Remember the speed reducer lets you go down to 100 rpm on the non-powerpro machines.
[ATTACH]13803[/ATTACH]
I used these Keps nuts to make sure the parts don't shake loose. (BTW the nut is held and the screw is turned.)
[ATTACH]13804[/ATTACH]
This shot is of the inside with the port installed.
[ATTACH]13805[/ATTACH]
This is what it looks like from the front side.
Now another question, the cover has a label on the lower left side. Mine is so faded that you can't read it. Anything I should know about on that label?
Ed
Attachments
DSCF1630sc.jpg (70.68 KiB) Viewed 9518 times
DSCF1631sc.jpg (56.51 KiB) Viewed 9518 times
DSCF1632sc.jpg (54.57 KiB) Viewed 9518 times
DSCF1628sc.jpg (67.42 KiB) Viewed 9524 times
{Knight of the Shopsmith} [Hero's don't wear capes, they wear dog tags]
reible wrote:
Now another question, the cover has a label on the lower left side. Mine is so faded that you can't read it. Anything I should know about on that label?
Ed
It is a standard warning label - but the "unique" item (and most important) is not to run over 1000 RPM, or "D" on the speed dial.
Michael
Mark V Model 500 (1985) upgraded to 520 (2009) and PowerPro (2011); Bandsaw, Jointer, Jigsaw, Planer.