Page 6 of 7
Progress to date
Posted: Thu Dec 24, 2009 6:51 am
by cat_couple
Merry Christmas!!!!!
Well I wanted to post again to share where we are at in the rebuild of the 510 to date.
This is what we started with:

Here is where we are at as of this morning:
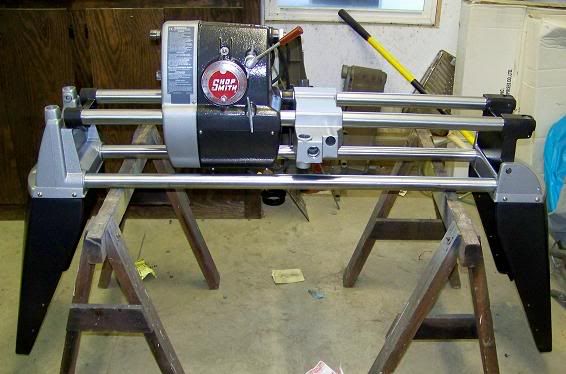
I am in process of doing the casters. I received the new wheels yesterday from Grizzly, and have primed and am currently painting the caster parts. Should reassemble Casters by Saturday. Also the mechanicals are back in the carriage, and the table is disassembled.
Merry Christmas!!!
Eric and Janie
Posted: Thu Dec 24, 2009 7:37 am
by tdubnik
Very nice progress and a great looking machine.
You'll be making sawdust in no time!!!
Posted: Thu Dec 24, 2009 8:02 am
by cat_couple
Yeah, I am starting to get a little antsy, but i am also going to do the 520 upgrade while I am at it, so now the fine stuff begins.
Posted: Thu Dec 24, 2009 9:27 am
by dlbristol
nice work, I like the color.
Posted: Thu Dec 24, 2009 9:39 am
by mickyd
cat_couple wrote:Merry Christmas!!!!!
Well I wanted to post again ........
I am in process of doing the casters. I received the new wheels yesterday from Grizzly, and have primed and am currently painting the caster parts. Should reassemble Casters by Saturday. Also the mechanicals are back in the carriage, and the table is disassembled.
Merry Christmas!!!
Eric and Janie
Great progress Eric. It really looks nice!!
Since you said your doing your casters, I wanted to share this tip in the event that you aren't aware. If your a pro already, bear with my instruction. It will help others. If your not, plan on a struggle getting orientation of stuff figured out unless you have photos to go by or if you marked everything prior to disassembly. It disassembles
much easier than reassembles.
The caster reassembly can be (is) a mind game in order to get the cams, lift posts, foot lever, and rods back on in the correct orientation. I just went through it on my ER10 and I am going to post a detailed how to instruction but in case I don't have it posted by the time you do it, here's the most important trick.
DRY assemble the entire caster assembly with
slip fit machine screws
first. The machine screw must be long enough to pass completely (or darn close) though the entire cummulative hole. The screws will ensure that you have everything in the correct place, in the correct orientation, AND also serve as pilot guides as you actually tap the spring pins (or roll pins) in place. This will ensure that you don't break your aluminum castings (as jpg experienced first hand) and is THE MOST important step.
.
.
[ATTACH]7073[/ATTACH]
.
.
Here's a pic of a roll pin (aka spi
rol pin) vs. a spring pin. Both serve the same purpose.
.
.
[ATTACH]7074[/ATTACH]
.
.
Leave the machine screw in place as you start tapping your spring pin in. Keep a finger
pressing against the machine screw as the spring pin goes it. Let the spring pin push the machine screw out. This ensures exact alignment.
Good luck. Hopefully, I get my complete caster reassembly thread done by the time you start. It could save you much frustration.
p.s. You having trouble uploading and posting photos so that they show up within the post?? I noticed your last post used photos from an upload site vs. ShopSmith yet previous posts you made they showed up as links.
Posted: Thu Dec 24, 2009 12:00 pm
by JPG
mickyd wrote:Great progress Eric. It really looks nice!!
Since you said your doing your casters, I wanted to share this tip in the event that you aren't aware. If your a pro already, bear with my instruction. It will help others. If your not, plan on a struggle getting orientation of stuff figured out unless you have photos to go by or if you marked everything prior to disassembly. It disassembles much easier than reassembles.
The caster reassembly can be (is) a mind game in order to get the cams, lift posts, foot lever, and rods back on in the correct orientation. I just went through it on my ER10 and I am going to post a detailed how to instruction but in case I don't have it posted by the time you do it, here's the most important trick. DRY assemble the entire caster assembly with slip fit machine screws first. The machine screw must be long enough to pass completely (or darn close) though the entire cummulative hole. The screws will ensure that you have everything in the correct place, in the correct orientation, AND also serve as pilot guides as you actually tap the spring pins (or roll pins) in place. This will ensure that you don't break your aluminum castings (as jpg experienced first hand) and is THE MOST important step.
.
.
[ATTACH]7073[/ATTACH]
.
.
Here's a pic of a roll pin (aka spirol pin) vs. a spring pin. Both serve the same purpose.
.
.
[ATTACH]7074[/ATTACH]
.
.
Leave the machine screw in place as you start tapping your spring pin in. Keep a finger pressing against the machine screw as the spring pin goes it. Let the spring pin push the machine screw out. This ensures exact alignment.
Good luck. Hopefully, I get my complete caster reassembly thread done by the time you start. It could save you much frustration.
p.s. You having trouble uploading and posting photos so that they show up within the post?? I noticed your last post used photos from an upload site vs. ShopSmith yet previous posts you made they showed up as links.
So WHAT no off center drilling warning?
Mike PM'd me with his discovery that IHHO the rods are intentionally drilled off center.
This is why his 'dry' assemble with screws is critical! Had I done that on one assembly, I would not have a cracked casting(Yeah I Forced it).
If you have any the correct size, long rivits are a better guide.
Posted: Thu Dec 24, 2009 12:08 pm
by cat_couple
Thanks for the compliments and support information. As for the pictures, i was not happy with just having links in the posts, so i decided over coffee and my two Schnauzers(which live in my lap when at thew computer) that I was going to actually try and do the pics right. so I went to community at the bottom of the furum, played with it and got a combination of the two, now that I have figured it out, there will be no more double posting(I hope)
Eric
Posted: Thu Dec 24, 2009 1:32 pm
by mickyd
JPG40504 wrote:So WHAT no off center drilling warning?
Mike PM'd me with his discovery that IHHO the rods are intentionally drilled off center.
This is why his 'dry' assemble with screws is critical! Had I done that on one assembly, I would not have a cracked casting(Yeah I Forced it).
If you have any the correct size, long rivits are a better guide.
The off center drilling you mention is self detecting / correcting with the 'dry' assembly. There are actually MANY critical steps that I will document in another thread. I just don't have the time to create it right now. I'm getting my reindeer and sled fueled up and ready for my ride tonight. Your suggestion on using the rivet really needs to say "may be a better guide". The cumulative manufacturing tolerances of the spring pin (namely OD, end chamfer), the tolerances of the spring pin through hole OD, and the OD tolerance of the rivet can be such that it will not assure accurate alignment.
The nice thing about using the #8 machine screw is that it either fits real close (closer than a rivet will just by design specs) or there will be a very slight interference fit. If the interference it's too much where gentle hammer taps won't work, a quick, delicate spin of it's OD on a bench grinder will get it just right.
It all comes down to this. As your tapping the spring pin in, you SHOULD NOT CONTINUE if you meet a change in resistance as it passes through the mating parts. If you do, something isn't lining up. You can tell by the sound if your working on a solid surface.
Your suggestion on using the rivet really needs to say "may be a better guide". The cumulative manufacturing tolerances of the spring pin (namely OD, end chamfer), the tolerances of the spring pin through hole OD, and the OD tolerance of the rivet can be such that it will not assure accurate alignment.
The nice thing about using the #8 machine screw is that it either fits real close (closer than a rivet will just by design specs) or there will be a very slight interference fit. If the interference it's too much where gentle hammer taps won't work, a quick, delicate spin of it's OD on a bench grinder will get it just right.
It all comes down to this. As your tapping the spring pin in, you SHOULD NOT CONTINUE if you meet a change in resistance as it passes through the mating parts. If you do, something isn't lining up. You can tell by the sound if your working on a solid surface.
Posted: Thu Dec 24, 2009 1:39 pm
by mickyd
cat_couple wrote:Thanks for the compliments and support information. As for the pictures, i was not happy with just having links in the posts, so i decided over coffee and my two Schnauzers(which live in my lap when at thew computer) that I was going to actually try and do the pics right. so I went to community at the bottom of the furum, played with it and got a combination of the two, now that I have figured it out, there will be no more double posting(I hope)
Eric
If you upload straight to the ShopSmith site vs. photobucket as you did in you last picture post, the thing you were missing was once you've uploaded and created your post, you put the cursor where you want the photo to appear, then hit the down arrow near the paper clip and select the photo file you want. It will show up in your post like this:
[ATTACH]
some number[/ATTACH]
Give it a try. If you still have troubles, let me know and I can show more details.
Posted: Thu Dec 24, 2009 3:28 pm
by cat_couple
you mean like this
[ATTACH]7084[/ATTACH]
The Shadow Box I built for myself with my 510 when I retired from Active Duty. Thanks for the advice.