Page 9 of 24
Re: Buying a Used Shopsmith Revisited
Posted: Mon Jan 23, 2017 4:54 pm
by LR1231
Wow!
Just what I needed! Photos of someone doing it! Any recommendations on how to best determine and measure how far off things are using the allen wrench method?
Lewis
Re: Buying a Used Shopsmith Revisited
Posted: Mon Jan 23, 2017 5:04 pm
by everettdavis
Sure. Just set the long Allen wrench a few thousandths off the sanding disc and rotate it to insure it is not bent and touching like the dial indicator would show.
Then set it say .010 off the disc using a flat automotive feeler gauge and check the other side. You know the gauge used to set points on non electronic ignition cars.
Everett
Re: Buying a Used Shopsmith Revisited
Posted: Mon Jan 23, 2017 5:06 pm
by LR1231
I can do that.
Thanks again for all the ideas.
Lewis
Re: Buying a Used Shopsmith Revisited
Posted: Mon Jan 23, 2017 5:31 pm
by reible
I make a slight adjustment to this method. I use the allen wrench and a set of feeler gauges. I find the tooth I want to use then take say a .007" feeler gauge(actual size in not important) and adjust the wrench to be .007" away from the blade using the feeler gauge. Now I check the other side by rotating the blade and seeing how close to the .007" it is. If the feeler gauge is not touching then attempt to adjust to get it to fit. When you get it to fit go back and check the other side again. It it is either too tight or too loose I used another feeler gauge to find what the amount is. Then go to the other side and check with the new feeler gauge..... keep doing this until you are as close as you would like to be.
Often we use .005" because we know that works. Maybe .007" works???? Anyway I personally keep adjusting until the difference measured on each side is less then .005".
I use to use the wrench against the tooth but found when moving the table about it would often bind on the tooth and deflect(flexing the blade if you will, not bending the blade) the blade so I had to keep playing with the allen wrench mounting which is a lot more work then trying different feeler gauges.
Typically one sets the rip fence to the right, if you work differently then adjust for that. The error if you will should be that the far end of the fence is farther from the blade so there is no chance it will pinch. Given that then an example would be a feeler gauge reading of .003 on the front the back would be from the same .003 to .008.
There is at least 50 ways to do this and I use several methods myself. I never use the disk sander, too much variability and I hate trying to use the dial indicator set up that shopsmith has, the miter slop exceeds the numbers I'm trying to reach unless I shim it at each location, more work then it is worth.
Rather then investing in the dial gauge you would be better off getting a master plate.
I'm an owner since 1976 and now have 6 machines, I have no problem getting with in .003" on any of them. I do sometime use the dial indicator to check my work or do a quick verification, the rest of the time it sets in the tool box.
Ed
Re: Buying a Used Shopsmith Revisited
Posted: Mon Jan 23, 2017 8:54 pm
by everettdavis
Ed is right. There are many methods and one can only use what they have. I am certain Ed' s methods are exceptionally precise!
I framed my answer more to the last question you asked on how to do it without the dial indicator.
The bottom line we all come to is whatever method you use, Align it!
One Cut Squareness Test
Posted: Mon Jan 23, 2017 9:18 pm
by JPG
An added comment re the one cut 'test'.
Select a 'board' with at least one straight EDGE and one flat FACE.*
Mark that edge and the flat face.
Make that cut with the marked EDGE against the miter gauge and the marked FACE against the table top surface.
Stand the (now)two pieces on the END just cut with the marked EDGES facing each other. If the miter gauge is accurate to 90°, there will be no gap along the edges.
Again set the two pieces on the END just cut, but with the marked FACES facing each other. If the table tilt is accurate to 90°, there will be no gap between the faces.(flat is critical)*
The longer the board initially, the more accurate the 'test'.
Re: Buying a Used Shopsmith Revisited
Posted: Tue Jan 24, 2017 9:58 am
by LR1231
I think the -What can a single crosscut tell you?- instructions say that already.
He used an illustration for both the face view and edge view, and then he stated "Let's start with a short length of board that is KNOWN flat, and square on the corners meaning 90 degrees" He used the degree symbol but I can't find that on my keyboard. He put KNOWN in all caps.
If it is known flat, and all the corners both face and edge are 90 degrees, what am I missing? I agree with what you said, but didn't he say that?
Lewis
Re: Buying a Used Shopsmith Revisited
Posted: Tue Jan 24, 2017 12:18 pm
by everettdavis
Lewis,
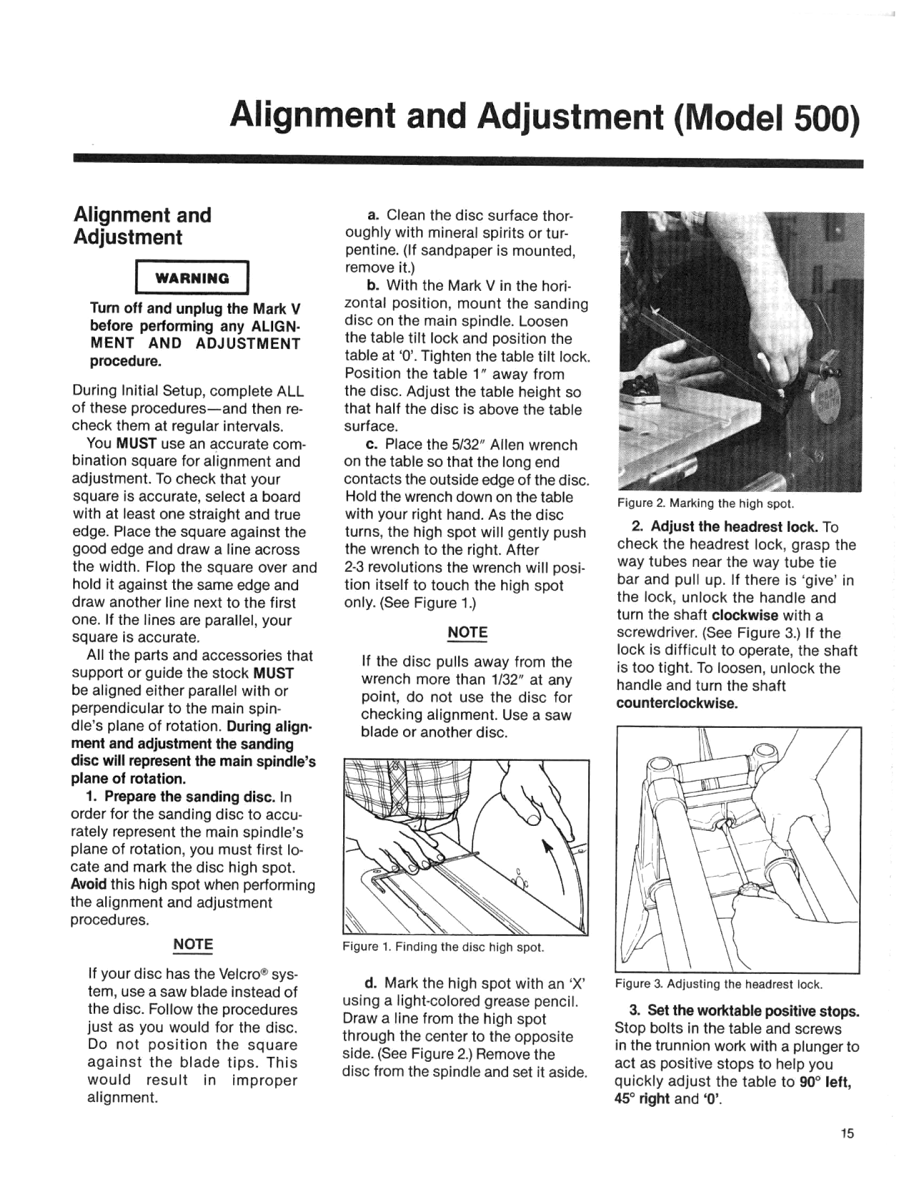
If you and your buddy do not have one already, download the Free 500 Summary Manual from Shopsmith directly. It is at
http://www.shopsmith.com/getting_starte ... Manual.pdf
They too show using the long allen wrench with a sanding disc in a bit of a different manner than I mentioned. I have attached the page illustrating that from the manual for your review.
In it they say don't use the disk if it is 1/32" off. I don't use it if it is far less than that. More like .001" Keep a good flat one handy for alignment tasks.
As JPG elaborated, the test board needs to be flat and dimensionally true.
In all reality, it doesn't make a bit of difference either way if the board is 90° or even beveled at either of the ends, since neither end is used in the measurements in the single cut. The actual cut within it is used.
It does make a difference if the board is NOT flat on the face, back and edges and of a uniform thickness before you make your cut. That’s what JPG was referring to.
Everett
As an FYI - you can make the degree symbol from your keyboard by pressing down and holding the Alt key, and while doing so entering 248 on the Numeric Key Pad (only) and then releasing the Alt key.
That's the ASCII degree symbol. So is Alt + 0176 but I prefer the shorter method. Since we work with angles frequently, that may help you more than you realize as you write documents.
- Shopsmith Model 500 Alignment and Adjustment.png (543.11 KiB) Viewed 23562 times
Re: Buying a Used Shopsmith Revisited
Posted: Tue Jan 24, 2017 9:13 pm
by JPG
LR1231 wrote:I think the -What can a single crosscut tell you?- instructions say that already.
He used an illustration for both the face view and edge view, and then he stated "Let's start with a short length of board that is KNOWN flat, and square on the corners meaning 90 degrees" He used the degree symbol but I can't find that on my keyboard. He put KNOWN in all caps.
If it is known flat, and all the corners both face and edge are 90 degrees, what am I missing? I agree with what you said, but didn't he say that?
Lewis
We said much of the same things.(after all the goal is the same)
However I posted a method that did not require any measuring nor calculating.
One cut - two comparisons - no other 'tools'.
I also emphasized(repeated) the requirement of a straight edge and a flat face.
The method does not require an accurate 90° edge/face angle though it helps with the comparing.
Food fer thought - ° ± ≈ ÷ ∞ ≡ µ Ω ≥ ≤ ½ ¼ ¢ π √ ²

Re: Buying a Used Shopsmith Revisited
Posted: Tue Jan 24, 2017 9:51 pm
by jsburger
JPG wrote:LR1231 wrote:I think the -What can a single crosscut tell you?- instructions say that already.
He used an illustration for both the face view and edge view, and then he stated "Let's start with a short length of board that is KNOWN flat, and square on the corners meaning 90 degrees" He used the degree symbol but I can't find that on my keyboard. He put KNOWN in all caps.
If it is known flat, and all the corners both face and edge are 90 degrees, what am I missing? I agree with what you said, but didn't he say that?
Lewis
We said much of the same things.(after all the goal is the same)
However I posted a method that did not require any measuring nor calculating.
One cut - two comparisons - no other 'tools'.
I also emphasized(repeated) the requirement of a straight edge and a flat face.
The method does not require an accurate 90° edge/face angle though it helps with the comparing.
Food fer thought - ° ± ≈ ÷ ∞ ≡ µ Ω ≥ ≤ ½ ¼ ¢ π √ ²
Do you have an ASCII table without me searching for one?