Update – Starlog 10/23/20 3:10 pm eastern
While anxiously waiting for the new quill to show up today, I thought I’d provide a summary of yesterday’s phone call with SS tech support person, Sue. She’s been with Shopsmith since 1977 and said she does all the repair work. I explained the problem and told her after replacing the motor pulley and belt, and balancing and tensioning, I was leaning towards the quill as the problem. She said I could have, and still can, send the quill to her to inspect and repair if appropriate. I didn’t ask what the charge for a no repair inspection would be.
Second – Here first question when I told her I replaced the motor pulley – “Did you make sure to place it right up against the snap ring?” Fortunately, although by accident, my answer was yes and told her I LocTited the set screw in place. Her response – “Good.”
Next – she asked if I checked the fan on the opposite end of the motor. Apparently, the setscrew coming loose on that is also a very common problem. Again I was able to answer yes. But the screw was already so tight I couldn’t get it out to apply Loctite. So I left it alone. She said that was fine.
After hearing about my motor pulley replacement, she said the quill was the next area to examine. So when I get the new one, I may send this to her for repair to have on hand.
Next, we talked about alignment, balancing and tensioning of the belts. I asked about clarification of exactly what the straight edge across the motor pulley should line up with. To my great surprise, she said that is not necessary. She never uses that technique. Instead…
(Important I think to know that she does all her headstock work with the headstock off the way tubes, on a jig of some sort.) She said everything will align automatically when the belts are positioned properly. Looking at the pulleys, belts from the side, the top belt should be positioned on the top pulley so that two groves show on the right side of the top pulley. (Mine are.)
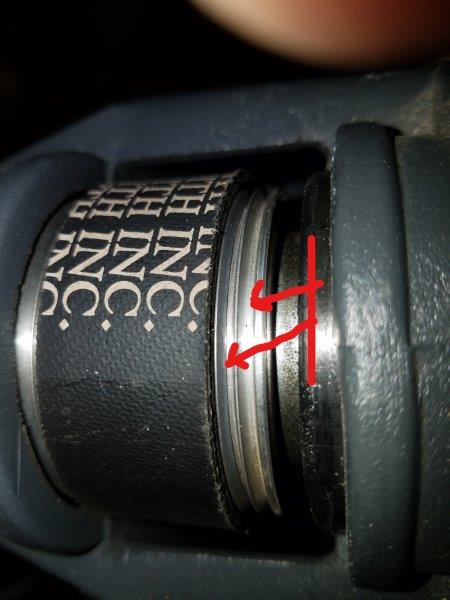
- Top pulley and belt positioned with two grooves showing
- Inked20201022_161015_LI.jpg (39.33 KiB) Viewed 1667 times
The last V on the bottom part of the top belt should fit in the farthest right groove of the left pulley on the idler shaft. In other words, there should be no grooves showing. The bottom belt should cover all ridges on both the idler and motor pulleys. I took it that she lets gravity initially set the tension. (Remember she’s got this positioned horizontally and not in Drill Press configuration.)
Regarding the idler and eccentric: Sue said the eccentric needs to be flush the casting, right at the Philipps head screw and washer. The bearings should be up against the washer held by a hex head screw in the eccentric. When I told her that with the eccentric bolt loose I couldn’t adjust the eccentric until I drastically loosened the tension on the motor pulley belt. Surprisingly she said that I could loosen the eccentric screw a little to help with this. HOWEVER, it is IMPORTANT to tighten that again. When I explained that currently the belt was apparently too loose as my turning (supported with tailstock) was slipping from time to time. She said when all is said and done, the correct tension would allow about 1/8” deflection when squeezing the lower belt.
Another surprise came when she said to adjust the eccentric first, and then the belt tension.
Looking forward and wondering what to do if I couldn’t get this working properly after replacing the quill, and attempting to balance and adjust the belts, I asked if I could make an appointment to drop off my headstock and then pick up the next day. (I’m only 2 ½ hours away from the factory.) Sue said they couldn’t do that. She’s got about a two week backlog. Hopefully I won’t need to resort to this resolution.
As I wait for the quill, I’m watching parts of Jim’s video again, and toying with returning to the belt adjustments again but doing them in the horizontal position.
later.
hal