Page 10 of 10
Posted: Mon Oct 29, 2012 6:06 am
by michaeltoc
The Auto-Track uses the same bearings, but a slightly different configuration:
Posted: Mon Oct 29, 2012 8:01 am
by wrdavis
Thanks, can't get much better than drawings with part numbers and the logo download.
Parts on order.
Posted: Sat Nov 09, 2013 8:56 pm
by reible
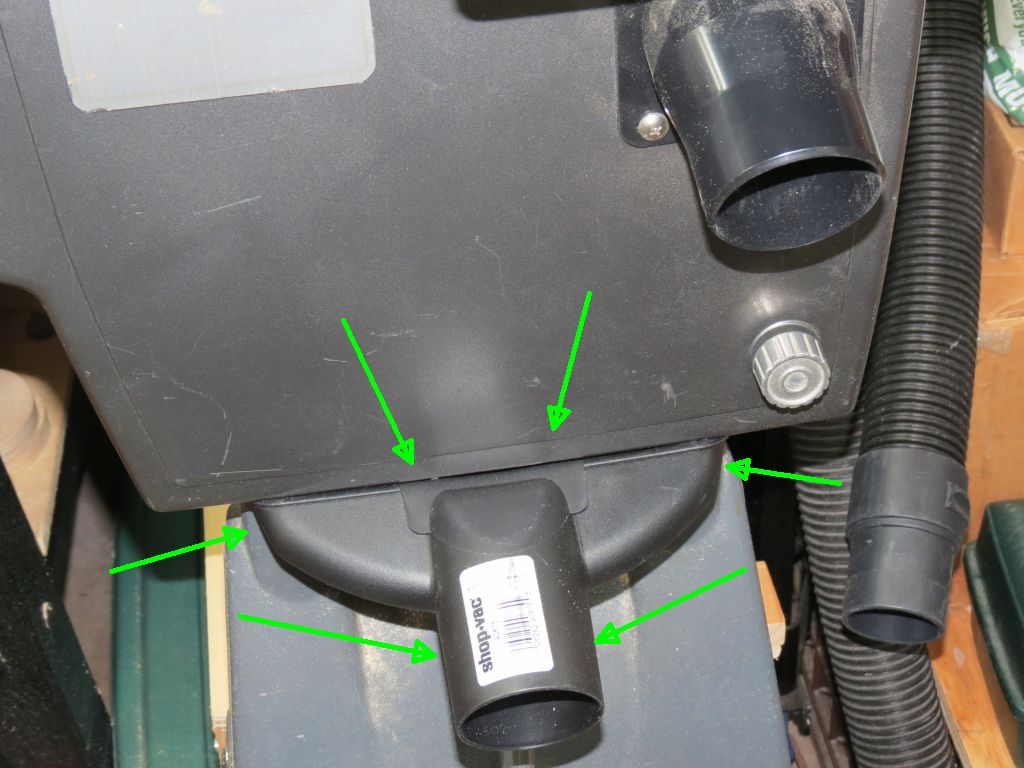
Dust collection....
The port I added seems to get a lot of the fine dust that use to float about while using the bandsaw so that was a good thing. But the saw still seems to like to drop the heavier saw dust out the bottom making a mess to clean up.
I started working on a solution some months ago and while the project is not finished it as so unlikely that it will get done this winter in my unheated garage so I though I'd show you were I'm at and if someone whats to do some exploring on their own all the better so long as you share results with the forum.
Of course I have some pictures but little else in the way of dimensions etc. As a work in progress it isn't so nice to look at because getting it work is more important then what it looks like. I'm really saying that because this is a lot more hack then I normally do even on a prototype.
The first photo shows the attachment. Yes the white PVC pipe. As it is at this stage it is attached by wire and stays with the body of the saw. The cover works as normal for blade changes/etc.
[ATTACH]23189[/ATTACH]
With the cover off you can see the wires that attach it and how it fits the bottom of the saw. This is NOT a sealed system, and I'm not planning to make it one. This simply catches the saw dust that normally falls out the bottom.
[ATTACH]23190[/ATTACH]
The next two pictures show more of how it fits the saw.
[ATTACH]23191[/ATTACH]
[ATTACH]23192[/ATTACH]
This last picture of this post shows how I did the wire attachment, using two small holes.
[ATTACH]23193[/ATTACH]
Just a bit more in the next post.
Ed
Posted: Sat Nov 09, 2013 9:07 pm
by reible
The next photo show how the cut outs look on the PVC.
[ATTACH]23194[/ATTACH]
That should give you a good start if you wish to use the idea.
So far the testing has been slow. I've got it put together but have had only a few small projects to try it out on. It pretty much works as I expected but I wish it had been done earlier when I did a bigger re-saw project, that would have been a much better test.
Ed
Posted: Mon Nov 11, 2013 10:38 am
by rmojo
I like the PVC idea. If you capped one end and hooked up a shopvac or a DC to both ports(on the bandsaw and the PVC) i bet it would get almost all the dust. Looking forward to an update.
Re: Modification Bandsaw (Cast Iron table version)
Posted: Wed Jan 27, 2016 7:43 pm
by reible
I've been back at work on my bandsaw. In the last segment I had added a pvc dust collection system. It worked but was a pain because of the mounting and un-mounting. I never worked out a good way to do that so that idea was abandoned.
Enter my new idea. This is a way of taking a dust port on and off the bottom without much effort, and I hope it will work well enough to make a little less dust in the shop.
This was a part I purchased at menards and I'm sure other stores sell them as well. I made a couple of modifications to it and this is what I ended up with.
- IMG_0499scm.jpg (120.76 KiB) Viewed 7828 times
On the rear it looks like this.
- IMG_0500sc.jpg (95.53 KiB) Viewed 7828 times
To remove it you turn the part so it can be with drawn.

- IMG_0502sc.jpg (89.58 KiB) Viewed 7828 times
The part looks like this.
- IMG_0503sc.jpg (83.76 KiB) Viewed 7828 times
Preliminary testing looks promising. One issue is that the bandsaw has a pretty much open bottom and that extends to both sides past the legs and the range of my dust collector. I may attempt to block those places but I have a nice resaw job coming up and I want to test it the way it is hoping it will not need any thing more.
Ed