Shop building questions
Moderator: admin
-
mbcabinetmaker
- Platinum Member
- Posts: 1627
- Joined: Thu Jul 20, 2006 6:18 am
- Location: Greer SC

First order of business is to build a shelf/counter/work area against the back wall. This will extend 2' from the wall and extend across the entire back wall. I'll probably add some shelves under it on either end, leaving the middle open so I can sit there with a stool or chair. I'll add some shelves above it on either end as well with maybe a pegboard above it between the shelves for hanging tools.
No time to do alignments on my machines - I've got to get to work on shelves so I can get organized! And this isn't really "woodworking" but "carpentry" so woodworking level of accuracy isn't required.
I was having too much fun making sawdust to stop and take pictures. My shelf/counter/work area will be 2"x4" supports and 1"x6" planks for the surface. I cut lengths of rough cut 1"x6" lumber to roughly 25" long (just using a circular saw), then used light passes on the planer to get them flat and consistent in thickness. This brought them down to about 15/16". Then I jointed one edge on the jointer, and ripped the other side parallel on my Craftsman table saw. I decided to use tongue and groove joinery between boards. I've never cut tongue and groove before, but this was a stunning success!
I wanted to use my Craftsman wobble dado (which I use when there is no benefit to using my stacked dado set over the wobble) on my Mark 5 to cut the tongues. But before I could do that, I had to make a dado insert. This was also my first attempt at making table inserts. It took me a few minutes of thinking and planning and a couple false starts to figure out the best way to go about making them.
My bandsaw is out of commission (just before I had to pack everything up for the move, I accidentally started the Mark 5 on a high speed with it attached to the bandsaw and the old tires were slung off the wheels in several pieces - scary learning experience!), so used the planer to plane a couple pieces of oak (?) to the right thickness. Then used my Craftsman table saw to rip them to the right width. I didn't measure anything - just set them on a flat surface with the existing insert to judge thickness, then used the existing insert to set the fence width on the table saw. I used the disc sander on a 10ER to round the ends.
Then I used the Mark 5 as an overhead router (along with the shaper/drum sander fence) to route the lip around the edge of the underside. Again, I just used an existing insert to set the depth and width of cut. Finally I used the Mark 5 in drill press mode to drill and countersink the screw holes. I made two inserts as I was going in case I messed one of them up. I figured if both survived, it wouldn't hurt to have that extra one anyway.
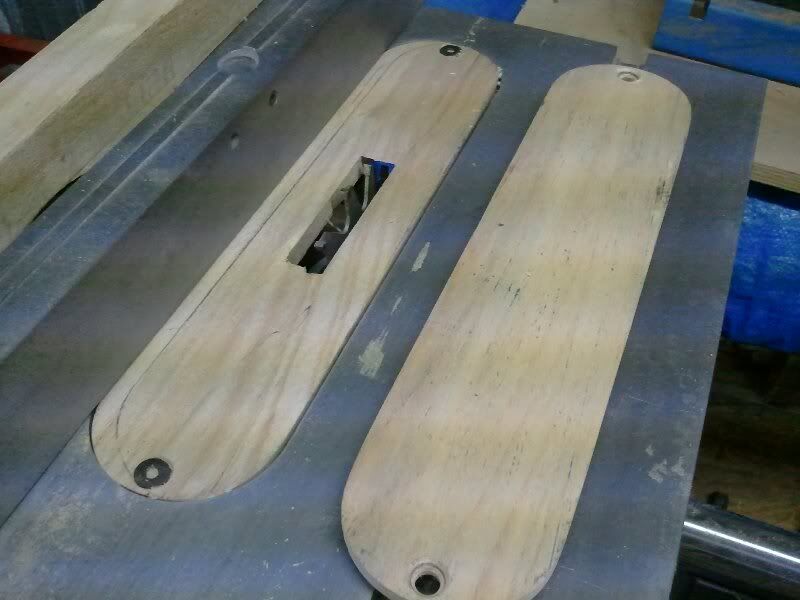
I then installed an insert, mounted the dado blade to the Mark 5, clamped a board over the insert, and slowly lowered the table onto the blade until I had the depth I wanted. Raised the table, added the sacrificial fence and adjusted it to the width I wanted then lowered the table back down to make the cut into the sacrificial fence. Width and depth of cut was just eyeballed. I don't know what the best practice is, but I wanted the tongue to be about 1/3 the thickness of the board. So I eyeballed a couple marks on the edge of a board and used that to set the blade height.
To cut the grooves, I used my Craftsman table saw. Again, no measurement. I used one of my boards to set the fence so the outer edge of the blade was even with the outer edge of the tongue and made some test cuts. Run a board through, flip it around and run it again, clean out any strip in the middle with my pocket knife, and see how the tongue fit the groove. A couple of tiny adjustments and I had a nice snug fit.
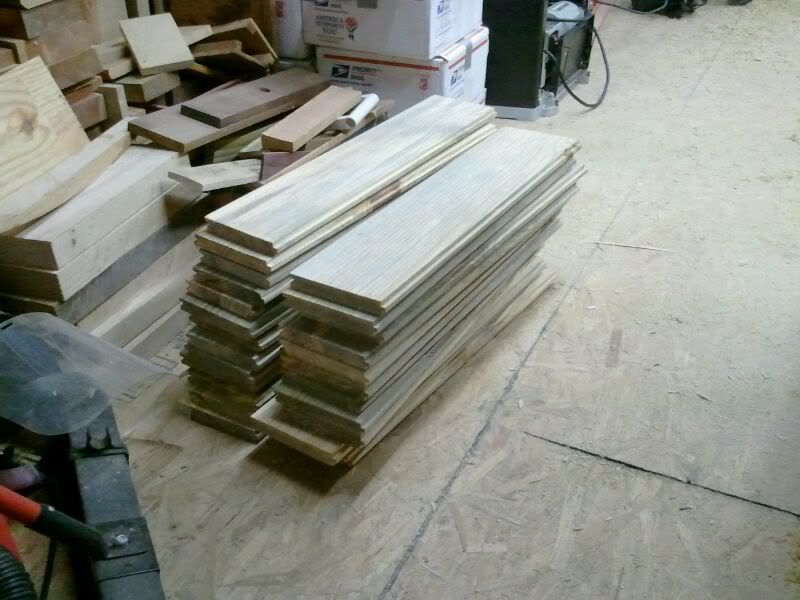
With the planks done (except cut to final length) I started framing out the platform they would sit on. I didn't get far with that until it was time for supper and my workday was done. All said, I think that was great progress but I would have loved if I could have gotten that shelf/work area finished.
Not a bad day! I got to use my planer, jointer, table saw, Mark 5 (dado, router, drill press) 10ER (disc sander). I did some things I've never done before (tongue and groove, custom zero clearance inserts). I made a lot of sawdust and made great progress on my first shelf/counter thingy!
No time to do alignments on my machines - I've got to get to work on shelves so I can get organized! And this isn't really "woodworking" but "carpentry" so woodworking level of accuracy isn't required.
I was having too much fun making sawdust to stop and take pictures. My shelf/counter/work area will be 2"x4" supports and 1"x6" planks for the surface. I cut lengths of rough cut 1"x6" lumber to roughly 25" long (just using a circular saw), then used light passes on the planer to get them flat and consistent in thickness. This brought them down to about 15/16". Then I jointed one edge on the jointer, and ripped the other side parallel on my Craftsman table saw. I decided to use tongue and groove joinery between boards. I've never cut tongue and groove before, but this was a stunning success!
I wanted to use my Craftsman wobble dado (which I use when there is no benefit to using my stacked dado set over the wobble) on my Mark 5 to cut the tongues. But before I could do that, I had to make a dado insert. This was also my first attempt at making table inserts. It took me a few minutes of thinking and planning and a couple false starts to figure out the best way to go about making them.
My bandsaw is out of commission (just before I had to pack everything up for the move, I accidentally started the Mark 5 on a high speed with it attached to the bandsaw and the old tires were slung off the wheels in several pieces - scary learning experience!), so used the planer to plane a couple pieces of oak (?) to the right thickness. Then used my Craftsman table saw to rip them to the right width. I didn't measure anything - just set them on a flat surface with the existing insert to judge thickness, then used the existing insert to set the fence width on the table saw. I used the disc sander on a 10ER to round the ends.
Then I used the Mark 5 as an overhead router (along with the shaper/drum sander fence) to route the lip around the edge of the underside. Again, I just used an existing insert to set the depth and width of cut. Finally I used the Mark 5 in drill press mode to drill and countersink the screw holes. I made two inserts as I was going in case I messed one of them up. I figured if both survived, it wouldn't hurt to have that extra one anyway.
I then installed an insert, mounted the dado blade to the Mark 5, clamped a board over the insert, and slowly lowered the table onto the blade until I had the depth I wanted. Raised the table, added the sacrificial fence and adjusted it to the width I wanted then lowered the table back down to make the cut into the sacrificial fence. Width and depth of cut was just eyeballed. I don't know what the best practice is, but I wanted the tongue to be about 1/3 the thickness of the board. So I eyeballed a couple marks on the edge of a board and used that to set the blade height.
To cut the grooves, I used my Craftsman table saw. Again, no measurement. I used one of my boards to set the fence so the outer edge of the blade was even with the outer edge of the tongue and made some test cuts. Run a board through, flip it around and run it again, clean out any strip in the middle with my pocket knife, and see how the tongue fit the groove. A couple of tiny adjustments and I had a nice snug fit.
With the planks done (except cut to final length) I started framing out the platform they would sit on. I didn't get far with that until it was time for supper and my workday was done. All said, I think that was great progress but I would have loved if I could have gotten that shelf/work area finished.
Not a bad day! I got to use my planer, jointer, table saw, Mark 5 (dado, router, drill press) 10ER (disc sander). I did some things I've never done before (tongue and groove, custom zero clearance inserts). I made a lot of sawdust and made great progress on my first shelf/counter thingy!
Heath
Central Louisiana
-10ER - SN 13927, Born 1949, Acquired October 2008, Restored November, 2008
-10ER - SN 35630, Born 1950, Acquired April 2009, Restored May 2009, A34 Jigsaw
-Mark V - SN 212052, Born 1986, Acquired Sept 2009, Restored March 2010, Bandsaw
-10ER - SN 39722, Born 1950, Acquired March 2011, awaiting restoration
Central Louisiana
-10ER - SN 13927, Born 1949, Acquired October 2008, Restored November, 2008
-10ER - SN 35630, Born 1950, Acquired April 2009, Restored May 2009, A34 Jigsaw
-Mark V - SN 212052, Born 1986, Acquired Sept 2009, Restored March 2010, Bandsaw
-10ER - SN 39722, Born 1950, Acquired March 2011, awaiting restoration
I meant to add that I was concerned with rust on the machines after being in that storage shed for over a year. Before I packed everything up, I put a good thick coat of Johnson's Past Wax on everything cast iron and on the Shopsmith tubes and then just left it there. No buffing it off. I had hoped that would protect the surfaces against rust and it looks like it did the job. The worst cases of new rust I could find were on the quill feed handles and the table tilt lock handle on the 10ER. Easily cleaned. Some of the arbors have some slight surface rust spots, but I'm not too concerned about that.
Heath
Central Louisiana
-10ER - SN 13927, Born 1949, Acquired October 2008, Restored November, 2008
-10ER - SN 35630, Born 1950, Acquired April 2009, Restored May 2009, A34 Jigsaw
-Mark V - SN 212052, Born 1986, Acquired Sept 2009, Restored March 2010, Bandsaw
-10ER - SN 39722, Born 1950, Acquired March 2011, awaiting restoration
Central Louisiana
-10ER - SN 13927, Born 1949, Acquired October 2008, Restored November, 2008
-10ER - SN 35630, Born 1950, Acquired April 2009, Restored May 2009, A34 Jigsaw
-Mark V - SN 212052, Born 1986, Acquired Sept 2009, Restored March 2010, Bandsaw
-10ER - SN 39722, Born 1950, Acquired March 2011, awaiting restoration
-
JPG

- Platinum Member
- Posts: 35600
- Joined: Wed Dec 10, 2008 7:42 pm
- Location: Lexington, Ky (TAMECAT territory)
I bet yer dad would like that New O'leans version better! 
╔═══╗
╟JPG ╢
╚═══╝
Goldie(Bought New SN 377425)/4" jointer/6" beltsander/12" planer/stripsander/bandsaw/powerstation /Scroll saw/Jig saw /Craftsman 10" ras/Craftsman 6" thicknessplaner/ Dayton10"tablesaw(restoredfromneighborstrashpile)/ Mark VII restoration in 'progress'/ 10E[/size](SN E3779) restoration in progress, a 510 on the back burner and a growing pile of items to be eventually returned to useful life. - aka Red Grange
╟JPG ╢
╚═══╝
Goldie(Bought New SN 377425)/4" jointer/6" beltsander/12" planer/stripsander/bandsaw/powerstation /Scroll saw/Jig saw /Craftsman 10" ras/Craftsman 6" thicknessplaner/ Dayton10"tablesaw(restoredfromneighborstrashpile)/ Mark VII restoration in 'progress'/ 10E[/size](SN E3779) restoration in progress, a 510 on the back burner and a growing pile of items to be eventually returned to useful life. - aka Red Grange
He might... but he ain't getting it!JPG40504 wrote:I bet yer dad would like that New O'leans version better!
Actually, I think he'd like a 10ER better. Old, heavy, and solid as a rock just like him.
Heath
Central Louisiana
-10ER - SN 13927, Born 1949, Acquired October 2008, Restored November, 2008
-10ER - SN 35630, Born 1950, Acquired April 2009, Restored May 2009, A34 Jigsaw
-Mark V - SN 212052, Born 1986, Acquired Sept 2009, Restored March 2010, Bandsaw
-10ER - SN 39722, Born 1950, Acquired March 2011, awaiting restoration
Central Louisiana
-10ER - SN 13927, Born 1949, Acquired October 2008, Restored November, 2008
-10ER - SN 35630, Born 1950, Acquired April 2009, Restored May 2009, A34 Jigsaw
-Mark V - SN 212052, Born 1986, Acquired Sept 2009, Restored March 2010, Bandsaw
-10ER - SN 39722, Born 1950, Acquired March 2011, awaiting restoration

-
JPG
- Platinum Member
- Posts: 35600
- Joined: Wed Dec 10, 2008 7:42 pm
- Location: Lexington, Ky (TAMECAT territory)
And that is just the first half!:Dnuhobby wrote:Heath, I say you're now the Answer Man on shop-building!

╔═══╗
╟JPG ╢
╚═══╝
Goldie(Bought New SN 377425)/4" jointer/6" beltsander/12" planer/stripsander/bandsaw/powerstation /Scroll saw/Jig saw /Craftsman 10" ras/Craftsman 6" thicknessplaner/ Dayton10"tablesaw(restoredfromneighborstrashpile)/ Mark VII restoration in 'progress'/ 10E[/size](SN E3779) restoration in progress, a 510 on the back burner and a growing pile of items to be eventually returned to useful life. - aka Red Grange
╟JPG ╢
╚═══╝
Goldie(Bought New SN 377425)/4" jointer/6" beltsander/12" planer/stripsander/bandsaw/powerstation /Scroll saw/Jig saw /Craftsman 10" ras/Craftsman 6" thicknessplaner/ Dayton10"tablesaw(restoredfromneighborstrashpile)/ Mark VII restoration in 'progress'/ 10E[/size](SN E3779) restoration in progress, a 510 on the back burner and a growing pile of items to be eventually returned to useful life. - aka Red Grange
After the kids were in bed tonight, and we watched Storage Wars and my wife was getting ready for bed, I sought her permission to go work in my shop some. I think she understands I'm like a kid with a new toy right now, so she gave her permission with the stipulation I not stay up too late.
I hope 1:00am doesn't count as "too late. "
But I did get the big shelf completed.
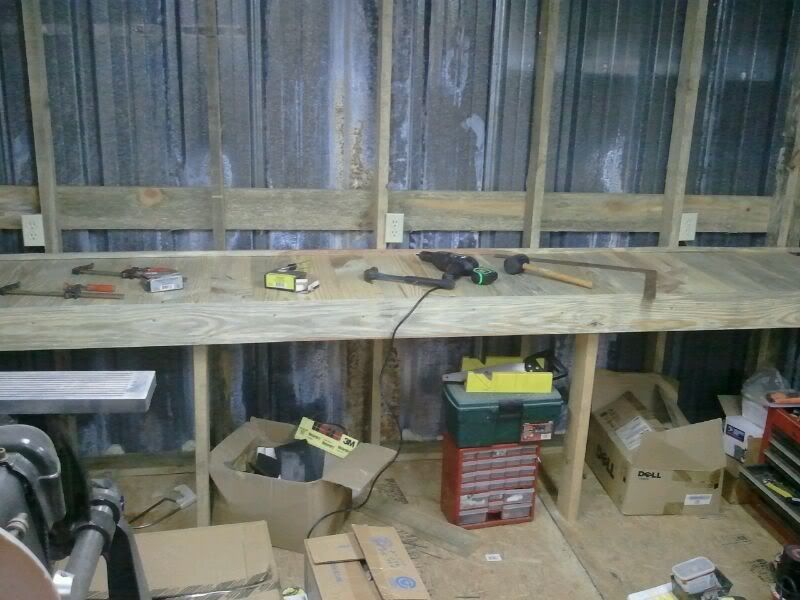
I screwed a 1x6 to the studs across the back wall, then screwed a 2x4 to opposite studs on he right and left walls and added some 2x4 legs. Then I squared and cut to length the studs I prepared earlier. I used a rubber mallet to knock them tight together alternating the end grain direction. I only put one nail in each board to allow for movement. Then I screwed a 1x6 to the front 2x4 placing it so the the top edge of the 1x6 was even with the top surface of the planks. I also added a small strip that was ripped off of the 1x6 to the back of the shelf to keep small parts from falling behind it.

It's not dead flat or perfectly smooth, but that isn't necessary here. It looks like it is not level, but my 4' level says otherwise. I think it is an optical illusion caused by the slat board that the tin is screwed to not being parallel to the floor. But it is very solid. I hopped up and sat on it and it didn't move. And at least I have a place to start getting stuff off the floor and start sorting stuff.
I hope 1:00am doesn't count as "too late. "
But I did get the big shelf completed.
I screwed a 1x6 to the studs across the back wall, then screwed a 2x4 to opposite studs on he right and left walls and added some 2x4 legs. Then I squared and cut to length the studs I prepared earlier. I used a rubber mallet to knock them tight together alternating the end grain direction. I only put one nail in each board to allow for movement. Then I screwed a 1x6 to the front 2x4 placing it so the the top edge of the 1x6 was even with the top surface of the planks. I also added a small strip that was ripped off of the 1x6 to the back of the shelf to keep small parts from falling behind it.
It's not dead flat or perfectly smooth, but that isn't necessary here. It looks like it is not level, but my 4' level says otherwise. I think it is an optical illusion caused by the slat board that the tin is screwed to not being parallel to the floor. But it is very solid. I hopped up and sat on it and it didn't move. And at least I have a place to start getting stuff off the floor and start sorting stuff.
Heath
Central Louisiana
-10ER - SN 13927, Born 1949, Acquired October 2008, Restored November, 2008
-10ER - SN 35630, Born 1950, Acquired April 2009, Restored May 2009, A34 Jigsaw
-Mark V - SN 212052, Born 1986, Acquired Sept 2009, Restored March 2010, Bandsaw
-10ER - SN 39722, Born 1950, Acquired March 2011, awaiting restoration
Central Louisiana
-10ER - SN 13927, Born 1949, Acquired October 2008, Restored November, 2008
-10ER - SN 35630, Born 1950, Acquired April 2009, Restored May 2009, A34 Jigsaw
-Mark V - SN 212052, Born 1986, Acquired Sept 2009, Restored March 2010, Bandsaw
-10ER - SN 39722, Born 1950, Acquired March 2011, awaiting restoration
Now I'm thinking it's the first third!JPG40504 wrote:And that is just the first half!:D
Heath
Central Louisiana
-10ER - SN 13927, Born 1949, Acquired October 2008, Restored November, 2008
-10ER - SN 35630, Born 1950, Acquired April 2009, Restored May 2009, A34 Jigsaw
-Mark V - SN 212052, Born 1986, Acquired Sept 2009, Restored March 2010, Bandsaw
-10ER - SN 39722, Born 1950, Acquired March 2011, awaiting restoration
Central Louisiana
-10ER - SN 13927, Born 1949, Acquired October 2008, Restored November, 2008
-10ER - SN 35630, Born 1950, Acquired April 2009, Restored May 2009, A34 Jigsaw
-Mark V - SN 212052, Born 1986, Acquired Sept 2009, Restored March 2010, Bandsaw
-10ER - SN 39722, Born 1950, Acquired March 2011, awaiting restoration
-
papahammer8
- Gold Member
- Posts: 161
- Joined: Fri Apr 06, 2007 9:03 pm
- Location: lafayette alabama
fun watching your progress . try and find some pegboard to cover wall . behing ur work table . strip wall out with 1x4's . i built my work bench pretty much same way . only regert is were u sitand work make it a smooth surface . i build alot of small toys. so a flat surface comes in handy. the fun is just starting and thats the oraganization of your equipment . i haven't stopped . one thing that key is to keep the center a free as possible . clutter can get u hurt. anotherthing i need to do. and this might sound a bit over board but i only ran 1 sheet 3/4 ply on my floor. but with the tools running wish i had more stiffness in the floor . i have framed houses last 30 years . have fun jim
- Attachments
-
- new house construction 001.JPG (156.63 KiB) Viewed 1752 times
jim bandy lafayette alabama 79 model 500 /80 model 500/94model 510 mini/ planer/dc3300/bandsaw/jointer/ lathe duplicator/ router table with a porter cablerouter.