
Hi all
Need your opinion. I bought a used ss jointer and it hasn't worked well since I got it. I expected the knives were set too high because it was cutting way too much in one pass even when not set to do so...
The fence was also stuck in one position...this will become important in a moment.
So, I removed the guard and eventually the fence, cleaned up the tables and made my way to looking at the knives. When I bought it, I was told one may have a nick in it. As it turns out, all three knives have a groove worn into them in the same place...presumably because the PO never moved the fence side to side.
So the knives are generally dull feeling with this worn out spot on them...
Do you think I should just replace them for $50? Or better to send them out for sharpening/regrinding? With the amount of wear on the edge, I do not have the confidence that I could hone them effectively.
What do you guys think?
Thanks
Geo
sharpening jointer knives
Moderators: HopefulSSer, admin

First off what is the width of the knives? Both the full width and the narrowest width. Ya may want to buy an extra set anyway, that way ya can just install one set and keep working. Sharpen the removed set later.
SS 500(09/1980), DC3300, jointer, bandsaw, belt sander, Strip Sander, drum sanders,molder, dado, biscuit joiner, universal lathe tool rest, Oneway talon chuck, router bits & chucks and a De Walt 735 planer,a #5,#6, block planes. ALL in a 100 square foot shop.
.
.
Bob
.
.
Bob
-
pieceseeker
- Gold Member
- Posts: 370
- Joined: Mon Jan 07, 2013 12:13 pm
- Location: Lawrenceville, Georgia
Hey, thanks for the thumbs up on my recent purchase. Since I have both the jointer and planer, I'm planning on getting the sharpening jig for both type blades.
Only downside is the conical sanding disc is required which also requires its own grit papers.
About a $150 dollar investment + shipping, but if planning to use the jointer a lot, it may pay for itself.
Only downside is the conical sanding disc is required which also requires its own grit papers.
About a $150 dollar investment + shipping, but if planning to use the jointer a lot, it may pay for itself.
" I cut it twice and it's still too short"
2006 Mark 520, 1983 Mark V model 500(soon to be a shorty)/Power Stand mounted Planer/Jointer/Belt Sander/Band Saw/Jigsaw on pwr stand/Scroll saw/Strip Sander/Power Station/Speed Reducer/Increaser/2 Nova chucks.... 12" DeWalt sliding compound mitre saw, 10" Delta tabletop saw, Bosch router and jig saw, Makita circular saw, Graco V-COMP HVLP, Festool CT-26 E Hepa
2006 Mark 520, 1983 Mark V model 500(soon to be a shorty)/Power Stand mounted Planer/Jointer/Belt Sander/Band Saw/Jigsaw on pwr stand/Scroll saw/Strip Sander/Power Station/Speed Reducer/Increaser/2 Nova chucks.... 12" DeWalt sliding compound mitre saw, 10" Delta tabletop saw, Bosch router and jig saw, Makita circular saw, Graco V-COMP HVLP, Festool CT-26 E Hepa
-
JPG

- Platinum Member
- Posts: 34643
- Joined: Wed Dec 10, 2008 7:42 pm
- Location: Lexington, Ky (TAMECAT territory)
A blade holding jig can be made from a hunk of firewood(white oak preferably or maple).
A conical disk works better, but the flat one will work as well. The procedure varies slightly. Instead of feeding the jig/blade past the disk, the quill is used to feed the disk against the jig mounted blade.
A conical disk works better, but the flat one will work as well. The procedure varies slightly. Instead of feeding the jig/blade past the disk, the quill is used to feed the disk against the jig mounted blade.
╔═══╗
╟JPG ╢
╚═══╝
Goldie(Bought New SN 377425)/4" jointer/6" beltsander/12" planer/stripsander/bandsaw/powerstation /Scroll saw/Jig saw /Craftsman 10" ras/Craftsman 6" thicknessplaner/ Dayton10"tablesaw(restoredfromneighborstrashpile)/ Mark VII restoration in 'progress'/ 10E[/size](SN E3779) restoration in progress, a 510 on the back burner and a growing pile of items to be eventually returned to useful life. - aka Red Grange
-
trainguytom

- Gold Member
- Posts: 324
- Joined: Sat Feb 10, 2007 7:22 pm
- Location: Central WI
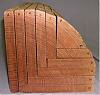
I've always sharpened my jointer blades with the sanding disk. (regular one) One of the old Shopsmiths I once bought came with a block of wood approximately 6" long x1 1/2" x 2" with a saw kerf cut along the 1 1'2" face at the blade bevel angle leaving about 1/2 to 1/3 of the blade exposed[ATTACH]20643[/ATTACH]
[ATTACH]20644[/ATTACH].
I just slip a blade in, put the jig against the rip fence with the edge of the jig just a hair over the edge of the table, and move the sanding disk up the sharpen the blade. I think it takes one of two minutes to do the set.
[ATTACH]20644[/ATTACH].
I just slip a blade in, put the jig against the rip fence with the edge of the jig just a hair over the edge of the table, and move the sanding disk up the sharpen the blade. I think it takes one of two minutes to do the set.
- Attachments
-
- ss jig2.JPG (123.71 KiB) Viewed 1637 times
-
- ss jig1.JPG (142.82 KiB) Viewed 1631 times
My dad's 1951 10er, 2 more 10er's, same vintage, a Goldie MK5, a 510 shortie with 34inch tubes, bandsaw, jointer, jigsaw, belt sander, a ton of small SS goodies and still looking...you just can't have enough Shopsmith stuff
-
dusty

- Platinum Member
- Posts: 21371
- Joined: Wed Nov 22, 2006 6:52 am
- Location: Tucson (Wildcat Country), Arizona
That is basically what the Shopsmith jig does except it is long enough to hold all three blades simultaneously and it must be used with the conical disk. It must be used with the conical disk because the blades would contact a flat disk on the up stroke as well as the down stroke with the flat disk.
The only advantage is that the sharpened blades are more likely to be the same size when done.
The only advantage is that the sharpened blades are more likely to be the same size when done.
"Making Sawdust Safely"
Dusty
Sent from my Dell XPS using Firefox.
Dusty
Sent from my Dell XPS using Firefox.
-
trainguytom
- Gold Member
- Posts: 324
- Joined: Sat Feb 10, 2007 7:22 pm
- Location: Central WI
Size matters???
I know I'm not the most detail oriented guy around, so my way of dealing with that is to count & keep my "touches" consistent. I do check with a caliper from time to time to make sure they stay close. I seem to be pretty consistent as they're almost always on the money.dusty wrote:The only advantage is that the sharpened blades are more likely to be the same size when done.
I'm guessing that before the conical disk, most guys used a similar jig.
My dad's 1951 10er, 2 more 10er's, same vintage, a Goldie MK5, a 510 shortie with 34inch tubes, bandsaw, jointer, jigsaw, belt sander, a ton of small SS goodies and still looking...you just can't have enough Shopsmith stuff
-
dusty
- Platinum Member
- Posts: 21371
- Joined: Wed Nov 22, 2006 6:52 am
- Location: Tucson (Wildcat Country), Arizona
I think you are spot on. I believe I have seen drawings of the same. I think in PTWFE. Success is the ultimate test.trainguytom wrote:I know I'm not the most detail oriented guy around, so my way of dealing with that is to count & keep my "touches" consistent. I do check with a caliper from time to time to make sure they stay close. I seem to be pretty consistent as they're almost always on the money.
I'm guessing that before the conical disk, most guys used a similar jig.
"Making Sawdust Safely"
Dusty
Sent from my Dell XPS using Firefox.
Dusty
Sent from my Dell XPS using Firefox.
Tom, does it matter whether you sand "into" the point of you edge or the other way?trainguytom wrote:I've always sharpened my jointer blades with the sanding disk. (regular one) One of the old Shopsmiths I once bought came with a block of wood approximately 6" long x1 1/2" x 2" with a saw kerf cut along the 1 1'2" face at the blade bevel angle leaving about 1/2 to 1/3 of the blade exposed[ATTACH]20643[/ATTACH]
[ATTACH]20644[/ATTACH].
I just slip a blade in, put the jig against the rip fence with the edge of the jig just a hair over the edge of the table, and move the sanding disk up the sharpen the blade. I think it takes one of two minutes to do the set.
I was thinking of using this approach, but with the block clamped down at back of table. If it is not leaving an excessive bur, maybe it does not matter. If it does not matter, I'd not futz with the clamp. I got my jointer several months ago, but am just now rereading upgrade instructions and getting ready to it set up.
Edit changed Terry to Tom.
Sam in Northfield, MN
A day without beer......could have been better

Mark V 500 - S/N 100990, Mark V 510 - S/N missing, SS Band Saw, SS 6" Belt Sander, SS 4" Jointer, SS Scroll Saw, SS DC3300
A day without beer......could have been better
Mark V 500 - S/N 100990, Mark V 510 - S/N missing, SS Band Saw, SS 6" Belt Sander, SS 4" Jointer, SS Scroll Saw, SS DC3300
So... I've contacted woodworker's source in Tempe...and according to them, they can sharpen them for a whopping $.75 per inch...so $9 total.
I think what I'll do is get them sharpened the first time and then keep them touched up in the jointer. If I do need to remove them to sharpen I will make the jig that is pictured earlier in the thread. I don't have the conical disk though..I hope the regular disk with a Velcro kit will work OK.
So since the knives were out and I have some time to burn before I get them back I decided to tear into the rest of the jointer and clean it up and perform all the maintenance that I can.
I ran into something a little bothersome when I puller the wedge locks out to clean the cutter head... I found some dried red stains... I fear the jointer might have jointed someones fingers at some point in its life.
  . It looks like a thorough cleaning job was done, but the area under the wedge locks and between the knives and the wedge locks was missed. The knives were a little difficult to remove and had some staining...and now I realize why. It really makes me feel bad, but at the same time reminds me that care always needs to be taken...and it has refreshed my resolve to work safely.
On to the story... I have taken the infeed/out feeds apart and cleaned & lubed the mating surfaces... cleaned and waxed the entire thing...cutter head, fence, tables and squared everything.
As soon as my knives come back and I get them put in and adjusted, my jointer should be good as new!
I'm looking forward to it!
Thanks
Geo
I think what I'll do is get them sharpened the first time and then keep them touched up in the jointer. If I do need to remove them to sharpen I will make the jig that is pictured earlier in the thread. I don't have the conical disk though..I hope the regular disk with a Velcro kit will work OK.
So since the knives were out and I have some time to burn before I get them back I decided to tear into the rest of the jointer and clean it up and perform all the maintenance that I can.
I ran into something a little bothersome when I puller the wedge locks out to clean the cutter head... I found some dried red stains...
On to the story... I have taken the infeed/out feeds apart and cleaned & lubed the mating surfaces... cleaned and waxed the entire thing...cutter head, fence, tables and squared everything.
As soon as my knives come back and I get them put in and adjusted, my jointer should be good as new!
I'm looking forward to it!
Thanks
Geo