Just started turning pens -- and it's fun! Started with Slimlines and got a 7mm pen mill for trimming blanks, which worked fine. But, on kits with larger tubes, the mill was a sloppy fit inside the tube. I see mill kits with multiple shafts available, but they are a bit pricey, and aren't sized for every tube diameter. I tried sanding them, but the blanks aren't always (OK, almost never) square and true with the center hole.
It occurred to me that I already own a very large collection of shafts with precisely graduated diameters: my drill bit index! I could find one to slip snugly inside any tube I'm likely to encounter and chuck it in my M2 tailstock chuck. All I had to do is reverse the direction of the pen mill cutter and mount it in my headstock chuck. I just slide the blank into the spinning cutter until I see the shiny brass ring. Cheap, simple, accurate and easy.
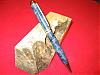
Here is my 7mm pen mill ready to trim a Push Click blank sliding on a 21/64 bit.
kenbu wrote:Just started turning pens -- and it's fun! Started with Slimlines and got a 7mm pen mill for trimming blanks, which worked fine. But, on kits with larger tubes, the mill was a sloppy fit inside the tube. I see mill kits with multiple shafts available, but they are a bit pricey, and aren't sized for every tube diameter. I tried sanding them, but the blanks aren't always (OK, almost never) square and true with the center hole.
It occurred to me that I already own a very large collection of shafts with precisely graduated diameters: my drill bit index! I could find one to slip snugly inside any tube I'm likely to encounter and chuck it in my M2 tailstock chuck. All I had to do is reverse the direction of the pen mill cutter and mount it in my headstock chuck. I just slide the blank into the spinning cutter until I see the shiny brass ring. Cheap, simple, accurate and easy.
Here is my 7mm pen mill ready to trim a Push Click blank sliding on a 21/64 bit.
. . .
Ken
There be transfer punches that would work better(think drill bit with no flutes - i.e. different sized straight 'rods').
Goldie(Bought New SN 377425)/4" jointer/6" beltsander/12" planer/stripsander/bandsaw/powerstation /Scroll saw/Jig saw /Craftsman 10" ras/Craftsman 6" thicknessplaner/ Dayton10"tablesaw(restoredfromneighborstrashpile)/ Mark VII restoration in 'progress'/ 10E[/size](SN E3779) restoration in progress, a 510 on the back burner and a growing pile of items to be eventually returned to useful life. - aka Red Grange
if you turn your drill bit around you will have good results. myself I just "turn" different sized wood blanks to fit inside the larger tubes as I use the disk sander to square up the ends. as your pen mill gets dull you will destroy a few blanks and ask yourself/others if there is a better way.
Bob
1954 greenie, 1963 anniversary edition now a mini,
1984 500, 1985 510, 1987 510, pro-planer, bandsaw, dust collector
kenbu wrote:Hmmm. Would these also be useful in pen disassembly?
Not having ever 'disassembled' one, I ain't gotta clue!:o
╔═══╗
╟JPG ╢
╚═══╝
Goldie(Bought New SN 377425)/4" jointer/6" beltsander/12" planer/stripsander/bandsaw/powerstation /Scroll saw/Jig saw /Craftsman 10" ras/Craftsman 6" thicknessplaner/ Dayton10"tablesaw(restoredfromneighborstrashpile)/ Mark VII restoration in 'progress'/ 10E[/size](SN E3779) restoration in progress, a 510 on the back burner and a growing pile of items to be eventually returned to useful life. - aka Red Grange
+1 on the punches.
+1 on Bob's approach with the disc sander. I find raising the tailstock slightly provides additional surface area for on the sanding and keeps the paper from wearing out i one spot.
--
Terry
Copy and paste the URLs into your browser if you want to see the photos.
1955 Shopsmith Mark 5 S/N 296860 Workshop and Tools
https://1drv.ms/i/s!AmpX5k8IhN7ahFCo9VvTDsCpoV_g