Page 1 of 1
Camping Table
Posted: Sat Dec 10, 2016 2:43 pm
by newportcycle
- Table Resize 3.jpg (367.86 KiB) Viewed 8797 times
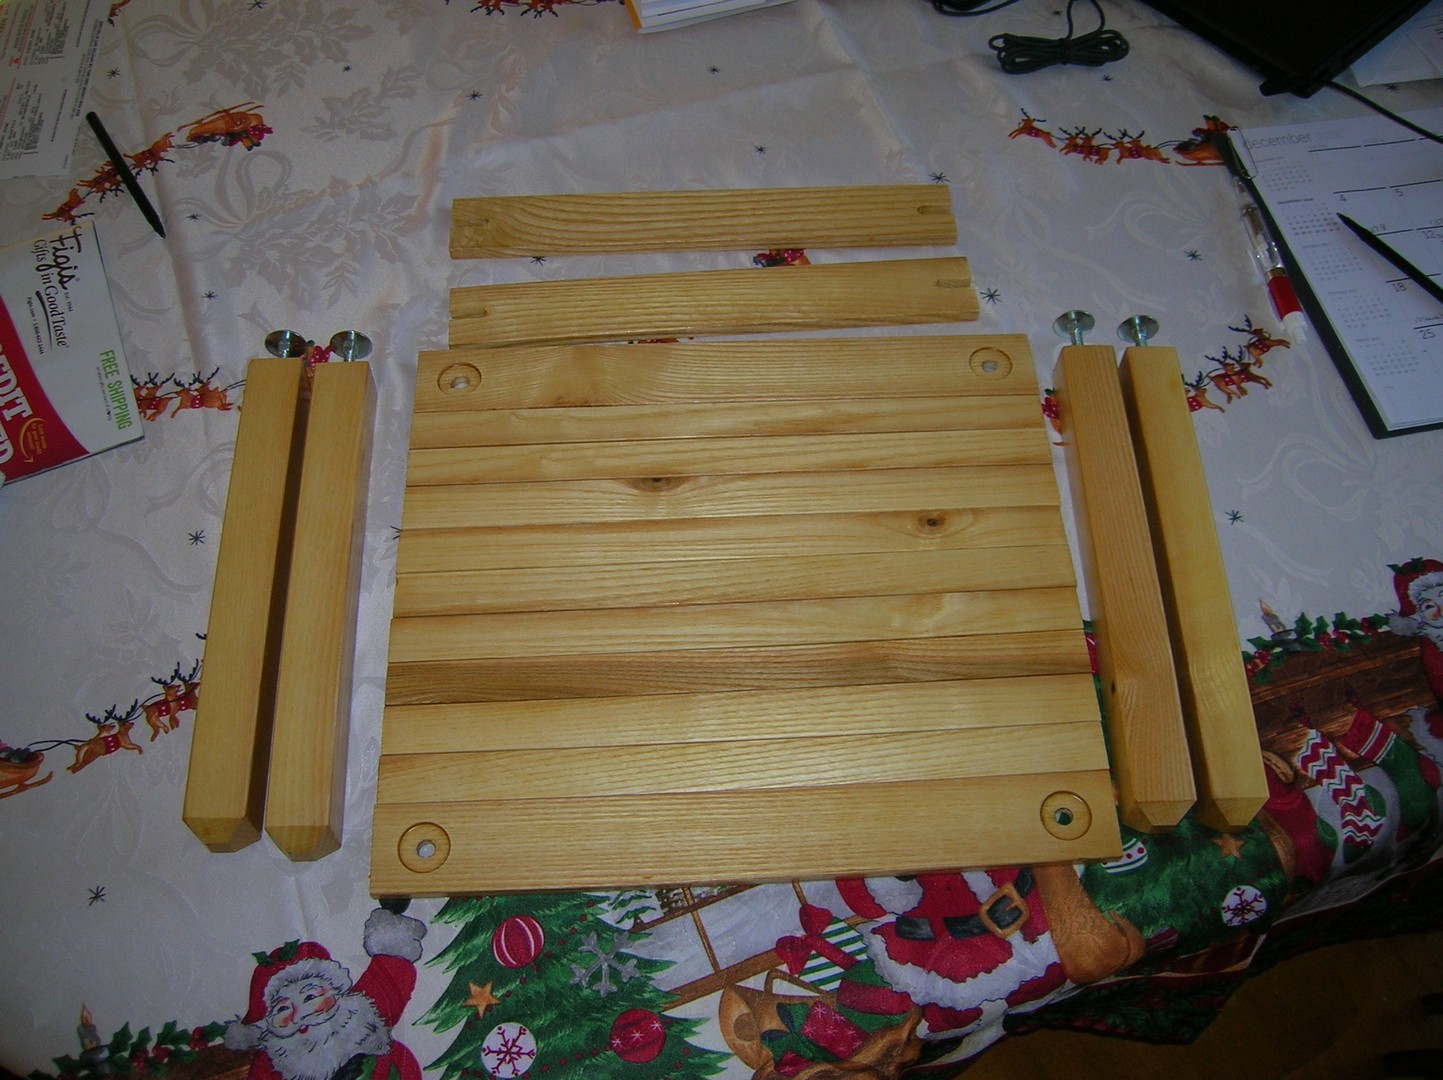
I do a considerable amount of motorcycle camping and have need of a small table to use inside the tent when its raining or just to have something to set drinks and the like on beside my folding chair. Several folks make a small roll up table, but being the frugal type, I decided to put the Shopsmith to work and make one.
Started with some 8/8 rough saw ash left over from my canoe build several years ago. I rough cut the stock to length and 4 squared things, then cut out the legs, slats, and reinforcing pieces. Using the sanding disk I got all the legs to the exact size square, then length, then sanded the bevel to the ends. I setup the drum sander horizontally and sanded all the slats to equal thickness and removed saw marks. I tried several times to put threaded inserts into the end-grain of the ash legs but the inserts would plug up with wood and not thread in, so I got some coupling nuts, drilled over sized holes and epoxy'd them in place, never again will I mess with those inserts in end grain. Forstner bit made the recess for the elevator bolts. Couple coats of urethane varnish and good to go. As you can see the slats make up a tambour panel. I used a harbor freight staple gun, but even with the pneumatic stapler, the ash was so tough some of the staples flattened out. It's holding fine for now time will tell. She's heavy, sturdy and stable, thanks to the sanding disk. Now all I need is a velcro strap to wrap it all up, and a waterproof bag, all available on ebay for less than 5 bucks. These things retail for upwards of $80.00. Ill be styling around the campfire with a place for my drink.
Re: Camping Table
Posted: Sat Dec 10, 2016 3:02 pm
by algale
Looking good!
Re: Camping Table
Posted: Sat Dec 10, 2016 3:28 pm
by reible
I like it!
Are we talking like 20" x 20" x 20" or so?
Ed
Re: Camping Table
Posted: Sat Dec 10, 2016 4:49 pm
by newportcycle
14" x 14" x 12" high, putting legs inside the top and it will rollup to about 6 1/2" diameter.
Re: Camping Table
Posted: Sat Dec 10, 2016 4:51 pm
by algale
Check your PMs, Newport!
Re: Camping Table
Posted: Sat Dec 10, 2016 4:58 pm
by rjent
That is pretty slick. Nice design! How are you strapping the "top" together with?
Re: Camping Table
Posted: Sat Dec 10, 2016 5:37 pm
by jsburger
I really like it. It would be great when we go to the Utah Symphony outdoor in the grass concerts at Deer Valley. Where did you get the nice "bolts" for the legs? I am going to make one.
Re: Camping Table
Posted: Sat Dec 10, 2016 5:42 pm
by newportcycle
Algale,
I cannot figure out how to post a reply with that PM system. Yes I've had my canoe in the water for couple years, been a great fishing boat, light weight, shallow draft, bass hate it. I haven't been here on the forum for some time, but just looked up your posts on your boat build, very nice, looks great. The paddles are fun to build, I've built 4 so far, two given as gifts, 2 being used with the boat. I'm thinking now about building a sailboat, I've gotten plans of two different sail boats, reading a book on lap strake plywood boat building so maybe that or maybe a runabout, who knows. Trying to decide which to boat to build is three quarters of the fun.
Rjent,
I used 1" wide nylon webbing stapled to the slats. The bolts are just simple 1/4" x 1 1/2" elevator bolts, I got them at the local hardware store. Slats are 3/8" x 1", the end slats are 1 1/2" wide, the reinforcing pieces below are 2" wide.
Re: Camping Table
Posted: Sat Dec 10, 2016 6:04 pm
by algale
newportcycle wrote:Algale,
I cannot figure out how to post a reply with that PM system. Yes I've had my canoe in the water for couple years, been a great fishing boat, light weight, shallow draft, bass hate it. I haven't been here on the forum for some time, but just looked up your posts on your boat build, very nice, looks great. The paddles are fun to build, I've built 4 so far, two given as gifts, 2 being used with the boat. I'm thinking now about building a sailboat, I've gotten plans of two different sail boats, reading a book on lap strake plywood boat building so maybe that or maybe a runabout, who knows. Trying to decide which to boat to build is three quarters of the fun.
Glad you are enjoying it! I've got at least one more boat in me. Maybe more in retirement.