Page 2 of 4
Re: New to me Mark V
Posted: Wed Oct 13, 2021 4:56 pm
by HopefulSSer
ScotSunnergren wrote: ↑Wed Oct 13, 2021 4:34 pm
Yeah... I was surprised that it is not a grounded plug. So that is original. I will see what I can do when I open it up. Are there instructions on where to attach the ground wire inside the headstock if I go get a cord?
Mine is (now) attached to one of the through-bolts that hold the motor together. That's where I found the last little bit of the ground wire from the prior cord that had been cut off. But I discovered that they are through-bolts the hard way. I started unscrewing one and heard a nut on the far end plink down into the motor. That necessitated removing the coil spring from the motor shaft and sliding the inner half of the sheave outward enough to retrieve and reattach the nut. You don't want to do that!

I'm not an electrician but I would expect that directly connected to the motor is best, but anywhere on the case would be fine as well since the motor is electrically connected to the case via the mounting screws.
Re: New to me Mark V
Posted: Wed Oct 13, 2021 5:29 pm
by HopefulSSer
Maybe think about changing the belts while you're in there. I just drillpress-ified mine for the first time and a sharp 1/2" forstner bit into a soft pine 2x4 was enough to kill the gilmer belt.
Re: New to me Mark V
Posted: Wed Oct 13, 2021 5:39 pm
by ScotSunnergren
Does anyone know where I can get the install instructions for this...?

- 500_clear_sawguard_upgrade2_l.jpg (41.97 KiB) Viewed 1329 times
Re: New to me Mark V
Posted: Wed Oct 13, 2021 6:32 pm
by DLB
ScotSunnergren wrote: ↑Wed Oct 13, 2021 4:34 pm
Yeah... I was surprised that it is not a grounded plug. So that is original. I will see what I can do when I open it up. Are there instructions on where to attach the ground wire inside the headstock if I go get a cord?
There are no specific instructions that I've ever seen. All of the newer ones connect it directly to the motor chassis, where there is a grounding terminal and screw for that specific purpose. But these won't be on yours if the motor is original. If I were doing mine over I would probably drill and tap for a grounding screw on the motor mounts. (Because if you ever replace the motor this is the vicinity the new ground terminal will be in.) When I did mine I added a screw under the speed control because I was using a generic power cord (aka cut off extension cord) and this was near the other connections.
- David
Re: New to me Mark V
Posted: Wed Oct 13, 2021 6:39 pm
by JPG
One caveat re the ground wire: It needs to be the longest wire so IF the strain relief fails and the cord is pulled, the ground wire is the LAST to separate from the appliance(SS).
Re: New to me Mark V
Posted: Wed Oct 13, 2021 9:48 pm
by DLB
JPG wrote: ↑Wed Oct 13, 2021 6:39 pm
One caveat re the ground wire: It needs to be the longest wire so IF the strain relief fails and the cord is pulled, the ground wire is the LAST to separate from the appliance(SS).
Interesting. I think on the current version the mothership provides the ground is the shortest wire. By quite a bit. They do use insulated terminals on the current carriers, if that is a factor.(?)
- David
Re: New to me Mark V
Posted: Wed Oct 13, 2021 9:59 pm
by JPG
Not everyone does the correct thing. Insulated terminals reduces the risk. but ungrounded is a significant risk.
In 1950's grounded tools were just appearing. Most existing homes did not then have grounded receptacles.
Truth be known, the best place to attach the ground wire is the chassis(headstock), then a jumper from the chassis to the motor.
If paranoid, a jumper from the switch(assuming a metal shaft mount) to the shaft to the chassis.
With these jumpers mounting hardware is not depended upon to provide grounding.
Re: New to me Mark V
Posted: Wed Oct 13, 2021 10:18 pm
by edma194
ScotSunnergren wrote: ↑Wed Oct 13, 2021 4:34 pm
And the previous owner had two different saw guards. One still had the wrapper around the upper blade guard so he never used that. One is an older cast metal version and the other, that I assume goes with the unwrapped upper guard is plastic with the springy bit to the left. But I am not sure if the lower right is missing. There is a piece but I am not sure how it would fit.
Looks like it is one of these...
That piece in the upper left of the picture attaches too the main table tie-bar. The holes to attach it may not be on your tie bar. You can see where it goes on the
exploded diagram for the the 500 main table. Notice the unavailable part number is simply 'Mounting Block'. I used to use the metal guards, it's somewhat annoying to set up but it works. Do you have a manual for that old style of machine? It would provide instructions for mounting the metal saw guards. There might be another guard system for the model 500s because
I've only seen that mounting block on one of them.
Re: New to me Mark V
Posted: Thu Oct 14, 2021 12:44 pm
by chapmanruss
ScotSunnergren,
First let me add my welcome to the Shopsmith Forum and add to what has already been posted. Your Mark 5 was made in August 1954 and has the "A" Headstock. You already know that the logo plate on the back has no access hole under it. That is true for the "A" Headstock and was changed on the "B" headstock. Some owners have purchased the "B" headstock access hole cover and made their own access hole. That is an option for you. The current "C" Headstock access hole cover is different from the "B" Headstock access hole cover.
Unless a previous owner has modified/upgraded you headstock it has a 3/4 HP motor and uses the Gilmer Drive. Yours should have the Clutched Gilmer Drive Sleeve but due to it's age may need a little work to have the clutch action working correctly. The clutch was one of the early changes made to help prevent the Gilmer Belt from breaking.
As has already been suggested opening up the Headstock would be a good idea. Not only will you be able to preform cleaning and the needed maintenance but also will allow you to better inspect the different parts that makeup the headstock.
Hopefully you have the Owner's Manual for your Mark 5 but if not there is a PDF version available through the link below. It is the first topic on this section of the Forum. On the "My Google Drive" link there, Everett Davis has made available documents he has restored and there you can find the second edition of the Mark 5 Manual. That would be the edition that came with your Mark 5 originally. You do have to use a Google account to sign on with to access the documents but there is a wealth of information to be found there and is worth accessing it.
viewtopic.php?f=10&t=16113
There have been three different Saw Blade Guards made for the Mark 5/V's. The first was an option available early on for the Greenie Mark 5 and can only use up to the 9" blades that were the size that came for use with the early Mark 5. I do not recommend using that version of the Saw Blade Guard plus it is harder to find. Below is a picture of that Saw Blade Guard set.
_

- 22 370.jpg (223.19 KiB) Viewed 1257 times
.
The second Saw Blade Guard is the one shown below.
_

- 505627 Upper and 505628 Lower Saw Blade Guards - shoe.jpg (129.35 KiB) Viewed 1257 times
.
It is Part Numbers 505627 and 505628 which is an easy to use and attach Saw Blade Guard Set for the Mark 5/V with no drilling or cutting needed. It is less popular because of the cast aluminum upper blade guard not allowing you to see the cut being made. If you do decide to go with this guard set do make sure it has the parts shown in the picture especially the part called the "shoe" which is the heavy wire loop shown circled in red in the picture above that lifts the upper guard up over the material being cut. Without it the upper guard is useless and this is the most common missing part I have seen on these for sale.
The Guard set in the picture in the previous post is the last Saw Blade Guard set that was made for the Mark V Model 500 with the two 2-1/2" dust collection ports upgrade. The has the clear plastic upper guard so you can see the cut being made. It is more work to put on and remove from the Mark 5/V. Installing it on your Mark 5 Greenie will take some drilling and cutting on the Table Tie Bar.
Remember we are always happy to help with any questions you may have.
Re: New to me Mark V
Posted: Fri Oct 15, 2021 12:17 pm
by ScotSunnergren
So... this is what I am dealing with electrically...
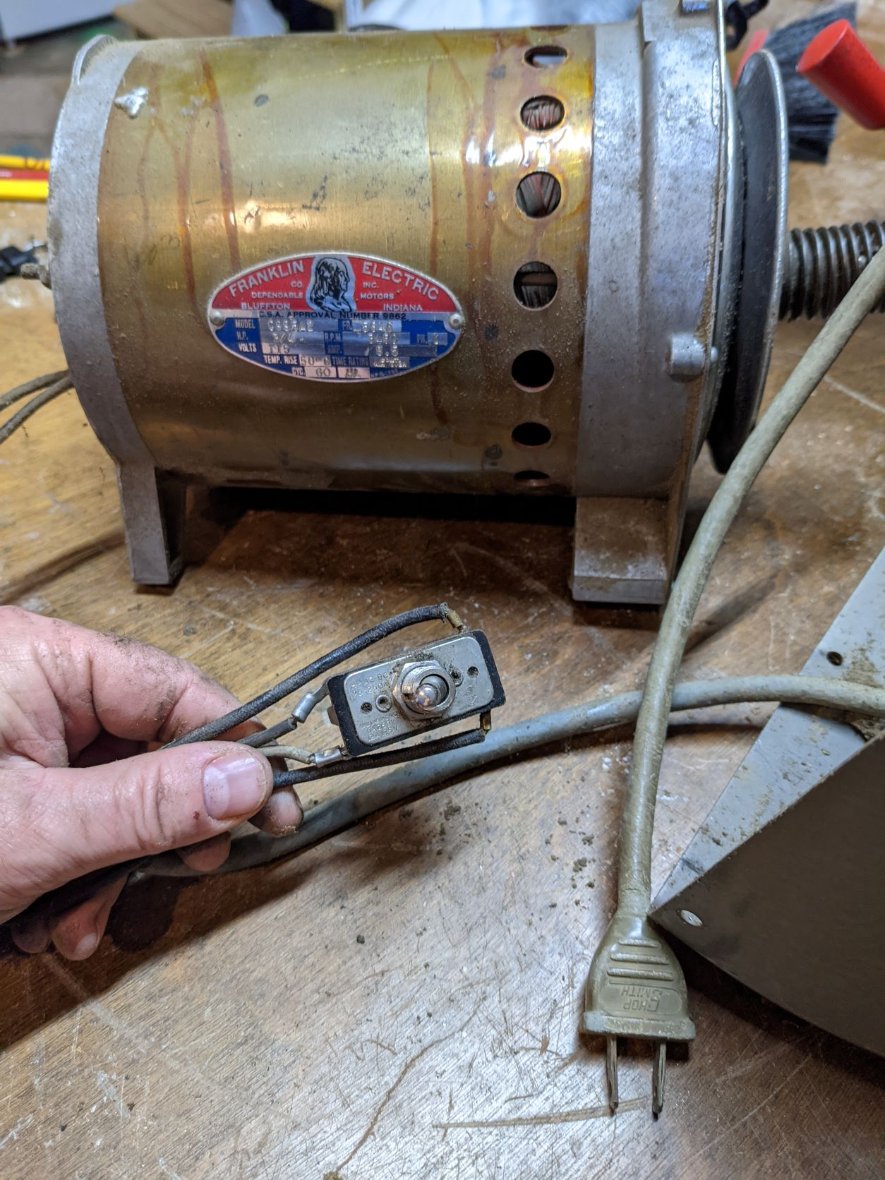
- PXL_20211015_160117085x.jpg (212.02 KiB) Viewed 1237 times