Page 1 of 2
510 Router Table Ideas
Posted: Mon Dec 29, 2008 6:39 pm
by jgrounds

Additional ideas in pictures at
http://www.firechat.com/RT.HTM. Please note the comments section at the end of this link will not work properly (Old html coding) If you have comments leave them here:) .
John
510 Router Table Ideas
Posted: Mon Dec 29, 2008 7:07 pm
by dusty
Excellent job, John.
I would be interested in seeing some detail about how you attached the rails to the table. It looks as though they are attached to an aluminum bar which is in turned lagged to the table.
I am curious about why you have the router setting at an angle.
Is the table made from MDF or is it phenolic?
Excellent Job!
Posted: Mon Dec 29, 2008 7:59 pm
by judaspre1982
======================
Posted: Tue Dec 30, 2008 8:55 am
by jgrounds
dusty wrote:Excellent job, John.
I would be interested in seeing some detail about how you attached the rails to the table. It looks as though they are attached to an aluminum bar which is in turned lagged to the table.
You are correct. The aluminumbar is attached by screws to the table.
I am curious about why you have the router setting at an angle.
and,
Judaspre1982
My guess is if the router mounting plate is set square to the table, the router handles on the router will hit thw way tubes.
That is the way it fit the best for me. The insert was pre drilled for my router and I tried to get the best fit for the router between the ways.
Is the table made from MDF or is it phenolic?
Got the table at Woodpeckers on clearance. It is 1 1/8 inch thick including the top and bottom surfaces. The mid section looks like a form of MDF.
John
510 Router Table Ideas
Posted: Tue Dec 30, 2008 9:36 am
by dusty
Thanks John for the feedback. Your table looks great and seems to have evolved out of a lot of thoughtful analysis of your needs.
I was interested in how you attached the rails to the MDF mostly because I have a small accumulation of 510 rail parts. I am looking for ways to utilize these. I posted an approach that sort of worked but yours seems much better.
Hopefully this will give someone an idea on how they might repurpose their harvested parts.
Access?
Posted: Tue Dec 30, 2008 10:40 am
by gilamonster
John - I'm looking at the pictures of your excellent router-table ShopSmith addition.
My question is: how easy/difficult is changing bits and height adjustment. Is there very much access room under there, with the waytubes, etc.?
(edited to correct my lack of reading comprehension <G>)
Posted: Tue Dec 30, 2008 12:02 pm
by Ed in Tampa
gilamonster wrote:John - I'm looking at the pictures of your excellent router-table ShopSmith addition.
My question is: how easy/difficult is changing bits and height adjustment. Is there very much access room under there, with the waytubes, etc.?
(edited to correct my lack of reading comprehension <G>)
I'm not John but let me make a suggestion. If you ever watch Router Workshop on PBS they merely lift the whole router/plate and make any adjustment.
I know people like the idea of doing under table adjustments but frankly I find being able to set the whole thing on edge and making the height adjust exactly where I want it is really beneficial. Since the plate stays attached it is easy to measure or use brass set blocks to get exactly what you want.
For changing bits again I don't do well hunched over trying to manever a couple of wrenches or push a spindle lock and using one wrench very well. I like having the whole thing at work level an as visible as possible.
With John's setup you can simply lift the router/plate up and set it on it's side on the router table and make any adjustment or bit change you want. Then just drop the router/plate back in place and your are ready to go.
Posted: Tue Dec 30, 2008 8:25 pm
by jgrounds
Ed in Tampa wrote:I'm not John but let me make a suggestion. If you ever watch Router Workshop on PBS they merely lift the whole router/plate and make any adjustment.
I know people like the idea of doing under table adjustments but frankly I find being able to set the whole thing on edge and making the height adjust exactly where I want it is really beneficial. Since the plate stays attached it is easy to measure or use brass set blocks to get exactly what you want.
For changing bits again I don't do well hunched over trying to manever a couple of wrenches or push a spindle lock and using one wrench very well. I like having the whole thing at work level an as visible as possible.
With John's setup you can simply lift the router/plate up and set it on it's side on the router table and make any adjustment or bit change you want. Then just drop the router/plate back in place and your are ready to go.
Great answere Ed!
John
Posted: Wed Dec 31, 2008 11:11 am
by gilamonster
Ed in Tampa wrote:With John's setup you can simply lift the router/plate up and set it on it's side on the router table and make any adjustment or bit change you want. Then just drop the router/plate back in place and you are ready to go.
good suggestion! I hadn't thought about the router/mounting plate being loose (as in 'unattached' or 'unfastened') in the table-top.
would have to be a pretty exact fit, though, to prevent movement in use...
Posted: Sun Jan 10, 2010 10:46 am
by bluekayak
Some great ideas in this thread. I've wanted a router table, but did not know where to start. I have a nice piece of leftover kitchen counter top (Formica) from my kitchen remodel, and this is what I am thinking of:
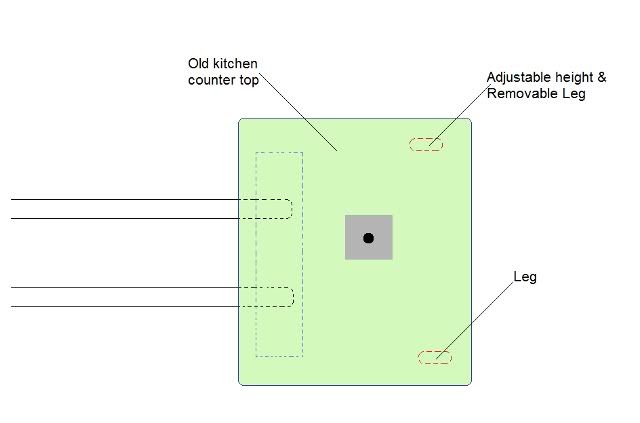
At first I just thought I would clamp the the counter to the Shopsmith table extension, but if it is fastened underneath, and there is a height adjustment for a pair of legs, it would also make a nice extension for the saw table.
I have a Shopsmith shaper fence, perhaps I can incorporate that in the router table.
If the legs can be removed, it would be easy to store, but more of a pain to set up. I'll have to see what is the best balance.
Jerry Floren
St. Peter, MN