Page 1 of 4
Repairing Quill Spring
Posted: Fri Feb 24, 2023 3:36 pm
by 510
I purchased a (1985) Mark V 510. The quill spring is not functioning. I am assuming it is broken. I live in Eagle WI. Is there a local person or local repair shop that could do this repair for me or even a local person who would work with me to do the repair? I appreciate any help on this.
Thank you,
Dale
Re: Repairing Quill Spring
Posted: Sat Feb 25, 2023 12:43 pm
by chapmanruss
I don't know if there is a repair person or a Forum member near you that could help you in person.
There are two likely reasons the Quill Return Spring is not working properly. The first is as you suggested, it is broken. The second could be the tension is not set properly. This is fairly easy to check. On the top of the Headstock above the Quill is a set screw which if it has never been removed is covered with putty. If the tension is the problem the putty has likely been removed previously. Remove the putty and then the set screw. Do not lose this set screw since it is not a common cup end set screw and harder to replace. This will allow the Quill to be removed from the Headstock. With the Quill out continue to turn the Quill Lever in the same direction to see if you get any tension. If so, that is the problem. Slowly release the tension to neutral. Since you have the Quill out it is a good time for maintenance. Clean the Quill sleeve and wax it per the maintenance suggestion in the Owner's Guide. When you are ready to put the Quill back into the Headstock turn the Quill Lever to get tension with 3 or 4 revolutions than insert the Quill and retract it. Put the set screw back in the top of the Headstock. The dog end of that set screw goes into the groove on the top of the Quill and keeps it from rotating and coming completely out of the Headstock. Do not completely lock down that set screw. Check the operation of the Quill extending and retracting.
If the Quill Return Spring is broken that is not a difficult fix either. It requires removing the Quill Feed Pinion Assembly. There is a set screw, again covered with putty if it has never been removed over the Spring Housing above the Quill Feed Pinion Assembly on the back side of the Headstock. If that set screw is loose it could be the cause of the lack of tension. Removing that set screw and the Quill Lock & washers from the front end of the Quill Feed Assembly will allow you to slide the Quill Feed Assembly out the back side of the Headstock. Removing the Feed Stop Lock, Depth Gauge and the Washers will allow you to remove the broken Spring in its housing. Keep all the Washers and other parts in order to reinstall them correctly during reassembly. The end of the spring hooks on a pin to the Quill Feed Pinion. With a replacement Spring and housing reverse the order to install it. Don't forget to re-tension the spring as previously described by removing the Quill.
Watch the My Growth Rings video Scott linked in his answer to your other post. He shows removing the Quill Feed Pinion Assembly and re-tensioning the spring.
A replacement can be purchased from Shopsmith and can be found here on the website under Products, Service, Service Parts, Mark 7/Mark V Models/ Newer Mark Models, Headstock. It is part number 521875 Quill Housing w/Spring and is $33.37 plus shipping. The spring is only sold with it already installed in the housing. A link to the service page for the conventional Headstock is below.
https://www.shopsmith.com/service/headstock/index.htm
Re: Repairing Quill Spring
Posted: Sat Feb 25, 2023 2:43 pm
by Matanuska
What Russ said - this should not be a difficult fix.
Re: Repairing Quill Spring
Posted: Sun Feb 26, 2023 9:41 am
by MichiganTom
I just two weeks ago completed a quill spring repair on my Mark VII, which has a identical quill assembly. I don't know yet how to copy links in here, but if you look down the subject list, look for "Mark VII repair questions"
The gents here have been very helpful getting through the unknowns. I'm new here.
Understand where and be aware of the location of the Cone Washer on the retractor shaft, be prepared to catch it when removing the shaft.
Re: Repairing Quill Spring
Posted: Sun Feb 26, 2023 1:18 pm
by john_001
MichiganTom wrote: Sun Feb 26, 2023 9:41 am
... Understand where and be aware of the location of the Cone Washer on the retractor shaft, be prepared to catch it when removing the shaft.
The quill feed has a number of washers on both ends that have to go back in the right order and sometimes even the right orientation, so keep careful track of everything as you disassemble.
Re: Repairing Quill Spring
Posted: Sun Feb 26, 2023 1:43 pm
by MichiganTom
john_001 wrote: Sun Feb 26, 2023 1:18 pm
MichiganTom wrote: Sun Feb 26, 2023 9:41 am
... Understand where and be aware of the location of the Cone Washer on the retractor shaft, be prepared to catch it when removing the shaft.
The quill feed has a number of washers on both ends that have to go back in the right order and sometimes even the right orientation, so keep careful track of everything as you disassemble.
Good point John,
Just making him aware of the cone washer (inside) falling into the headstock, it took me a while to find it and get it out. Best to refer to a print, some of the washers on mine were not oriented properly.
Re: Repairing Quill Spring
Posted: Sun Feb 26, 2023 2:25 pm
by SteveMaryland
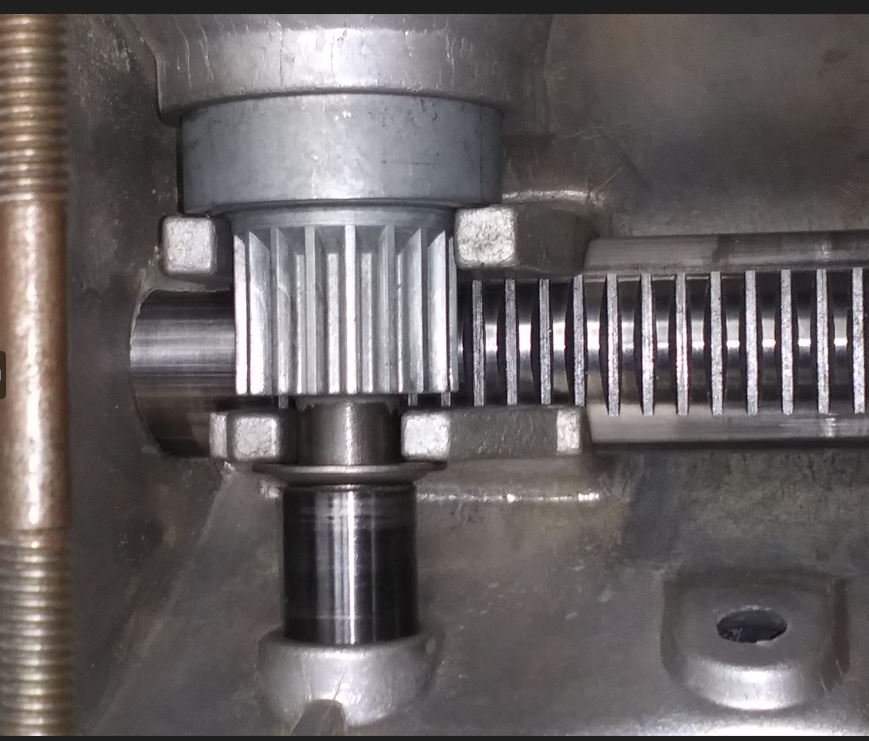
Item 53 is the spherical washer. I learned the hard way to stick my hand in underneath that washer when pulling out the quill pinion shaft.
The Shopsmith diagram is not clear as to 53 orientation. Attached is a photo. The convex side faces outboard, and the other side bears on the outboard surface of that cast housing boss.
I will bet that the improper installation of that 53 washer has been the source of many functional mysteries.
- ITEM 53 ORIENTATION.JPG (87.25 KiB) Viewed 8991 times
Re: Repairing Quill Spring
Posted: Sun Feb 26, 2023 2:45 pm
by edma194
As mentioned in another thread, tie a string around the quill advance shaft before pulling it out. The washers will stay on the string, in the right direction and order, and not fall into the headstock. Pull the string with the washers on it all the way out before you let go of the other end of the string.
Re: Repairing Quill Spring
Posted: Tue Feb 28, 2023 3:57 pm
by 510
Thank you all of you !!! I am new to the Shopsmith. I had watched some of Jacobs Repair shop video's but his were with the Headstock apart and/or with he whole assembly out. Again, I am new to all this and really appreciate the help. This is probably going to sound like a very stupid question. Where do you put your had IN to catch the washer? What do you take off the headstock to allow you to put your had in the right place to catch the washer. Pulling out the Quill would not allow hand access. Pulling off the ShopSmith name plate? This seems to be the right place but my hand does not fit in. I am also assuming the same access point would be used to slide the washer back on after the spring repair. That washer was / is my concern. Again, thank all for the help.
Re: Repairing Quill Spring
Posted: Tue Feb 28, 2023 5:04 pm
by chapmanruss
Unless the Headstock is all opened up "catching" that washer as it falls off the end of the shaft is not an option. When I say opened up, I mean the Belt Cover separated from the Headstock and the Motor Pan with the motor removed. That is not the option you probably want to use. Try either tying a string securely around the end of the Pinion Shaft to catch the washer or use a magnet as shown in Scott's video. Using one of those options the washer will come out with the Pinion Assembly. Just remember to tilt the end of the shaft coming out down as it comes out for the washer to clear the castings inside the Headstock around the Quill.